This post is part III of a series of posts on learning about dyeing katazome with indigo. It’s the last post for now, until I can dye with indigo again in the spring and summer.
It’s common with indigo katazome to brush soymilk on after laying down paste. This does two things: it strengthens the paste, sharpening the edges by forming a protective layer, and also, it acts as sort of binder for the dye due to its protein content. This is a double edged sword: you can dye a darker color in a shorter duration, but the soy protein sits more on the surface of the fabric. Even though fabrics it might uptake more indigo with soy applied, the dye is more vulnerable to abrasion.
Not all katzome dyers use soy; in fact, it doesn’t even appear in Takayuki’s new katazome book, which surprised me. I don’t use it all the time, but I was curious if it was a practical choice, especially for medieval dyers, who would have access to it and used it in other dye processes.
When I originally did the crab katabira, I didn’t have the weather to do the proper outdoor soy treatment in the full sun, because we had a cool and wet spring with constant rain. I performed a brief soy treatment for one of the trial swatches, which was a dip in 5% soymilk powder-made soymilk for only a few seconds, and then dried it in the sun before immediately dipping it.

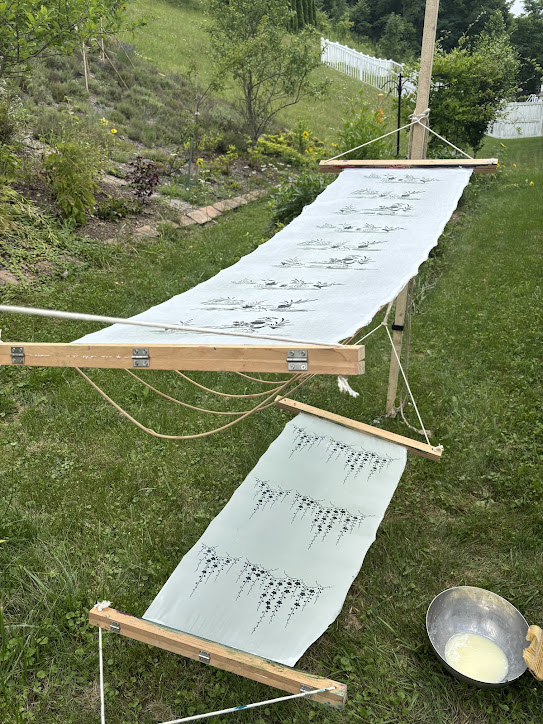
I can’t claim that I did the indigo dips with exactly the same duration, but below you can see two pieces of fabric that were both dipped in the same vat with the timing matching as best as I could. I did short dips of 30 seconds to a minute each, dipping and adjusting the color with more indigo as I evaluated each pass. It’s over four dips, and might be five, but it’s not anything like the twelve I sometimes hear about for darker colors. I based my timing off the descriptions in the book I mentioned previously about Shimizu Kotaro.
This is thiox reduced synthetic indigo, Jacquard brand, in a deliberately dilute vat. The fabric was sized with funori before pasting.

I was intrigued by this result, and I also wanted to see how long I could dip in the indigo vat before the paste broke up. With no soy, in my experience, with my paste recipe, it really does get tired after a minute or so, and it’s better to pull it out sooner or risk it dissolving.
However, Takayuki’s Katazome book says to dip the fabric for four minutes, and it does seem like that is the dip duration in some youtube videos of other indigo katazome dyers, as well. What surprises me is that Takayuki doesn’t treat with soy at all. He does use a fermentation vat, and he does use a different paste formula (1:1 mochi to nuka instead of 4:6). Perhaps these two factors are enough to make it possible to dip for a long time.
I decided to try another round of tests, with the soy application. following the traditional instructions that are in this book that details the process of Shimizu Kotaro. As a note, Mr. Shimizu is using synthetic indigo, probably for cost reasons; katazome dyers in Japan have to sell their work and make a living, and they don’t enjoy the wide consumer base they did 200 years ago and face stiff competition from commercial screenprinters who use modern industrial dyes.
To make the soy sizing, you make regular soymilk, and then dilute it three to four times; then add a bit of lime. The lime is used to preserve the soymilk, but it seems some secondary effects as well, as the book mentions that the amount of lime you add depends on the size of the pattern, but does not elaborate beyond that.
The book explains the recipe as follows (this is a simple machine translation that I verified with my less than stellar japanese, please email me if you find an error):
機械で挽き終わった大豆汁を、約3倍から4倍の水で割ります。10反の布に使用する大豆が約1升(1.8ℓ)、それを3升から4升の水でのばすわけです。のばした大豆汁の中へ石灰を入れます。この石灰の量は約 1反につき小さじで一杯位ですが、糊づけされた模様、大柄、小柄によって違ってきます。ただ夏場(6月~8月)では、石灰を余分に入れます。
The soybean juice that has been ground by machine is mixed with about 3 to 4 times the amount of water. About 1 sho (1.8 liters) of soybeans is used for 10 bolts of cloth, and this is diluted with 3 to 4 sho of water. Lime is added to the diluted soybean juice. The amount of lime is about one teaspoon per bolt, but it varies depending on the pattern that is starched, whether it is large or small. However, extra lime is added in the summer (June to August).
In simple terms, if you’re dyeing a kimono bolt, you want 1.8 liters of water, .45 liters of soybeans (I’m not sure if this is soaked or dry, but I think soaked/ground), and then 1 teaspoon of lime. I decided to use pure soymilk powder for this trial, because I really don’t like making soy milk from dry beans. I wore myself out on it making tofu every week during covid.
So my recipe looked like this: 235 ml of water, 21 grams of soy protein powder, 9 grams of lime. I used Now Foods Soy Milk Powder, which is discontinued, but there are other options.
This books also mentions that you can wait up to seven days to dye soymilk treated fabric.
豆汁引きが終わった時点で、すぐにでも染色工程に入ることもできますが、普通は天日で干し上がった後、反物をたたんで一週間位積んでおきます。これを「豆汁をさらす」と呼びます。豆汁が型置糊の周囲をしめて、染液に漬けた時防染の役目をしますし、白地についた豆汁は定着剤の役割を果たします。一週間さらされた反物は、染めに入る前に、布の片方の耳にそって伸子をかけます。
Once the soybean juice application is complete, the fabric can be immediately put into the dyeing process, but it is usually dried in the sun, then folded and stacked for about a week. This is called “exposing the soybean juice.” The soybean juice seals the edges of the stencil paste, acting as a dye-resistant barrier when the fabric is immersed in the dye solution, while the soybean juice on the white fabric acts as a fixative. Before dyeing, the fabric that has been exposed for a week is placed under a tensioner along one edge of the fabric.
Because I wanted to follow the instructions as well as I could, I waited seven days as prescribed. The other pleasant effect of the soymilk that that the fabric was very stiff, and stayed stiff as I lowered it in the vat, which meant it was less likely for folds to touch and transfer or disturb paste.
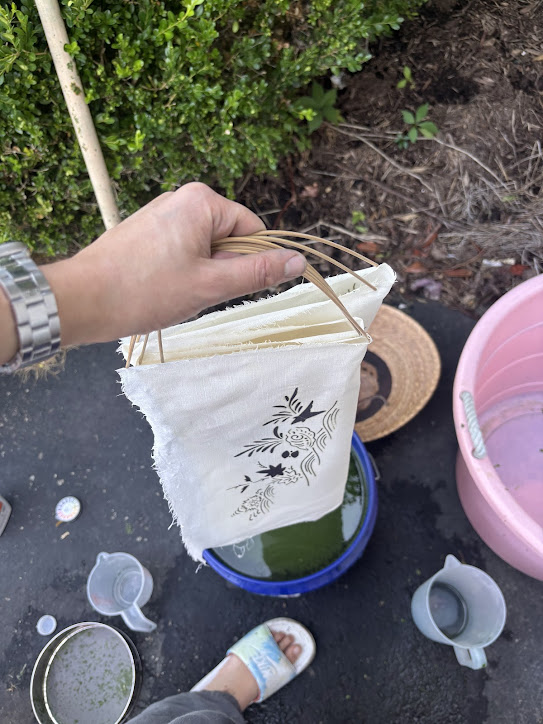
I was able to apply the soy with a brush that I bought from aikuma specifically for the purpose, on shinshi, in the full summer sun, the proper way.

I was very hopeful that the soy treatment would also allow me to use a smaller vat, like we see in traditional dyeing, and just move the fabric back and forth between my hands, like the gentleman is doing in this video:
This would allow me to use a smaller vat because I wouldn’t need to use my long pole that arranges the shinshi and fabric in a serpentine formation, keeping all the folds from touching. I also think it’s historical, based on the depictions of the size of the indigo vats seen in the kita-in screen.

The serpentine bar requires a longer, rectangular vat, and the vats depicted in the kita-in screen are circular and smaller.

Overall, this did work; I was able put the in the vat and it didn’t mind if the folds touched. The fabric was also much stiffer from the soy lime treatment, which made it go into the vat straighter. The paste even lasted through a four minute dip in a fresh indigo vat, although this did eat away at the soy lime treatment, so it was a little tired when I put it through another four minute dip in a regular indigo vat. However, it held up to the time, so this is a way to get very long dips in more alkaline synthetic vats or warmer fructose vats.

However, I was disappointed in the effect the soy had on the texture of the dyed fabric and overall crispness of the pattern. It has halo effect and a weathered texture. I gently handwashed these pieces, and they look like I beat them up in a commercial washing machine on a high setting repeatedly.

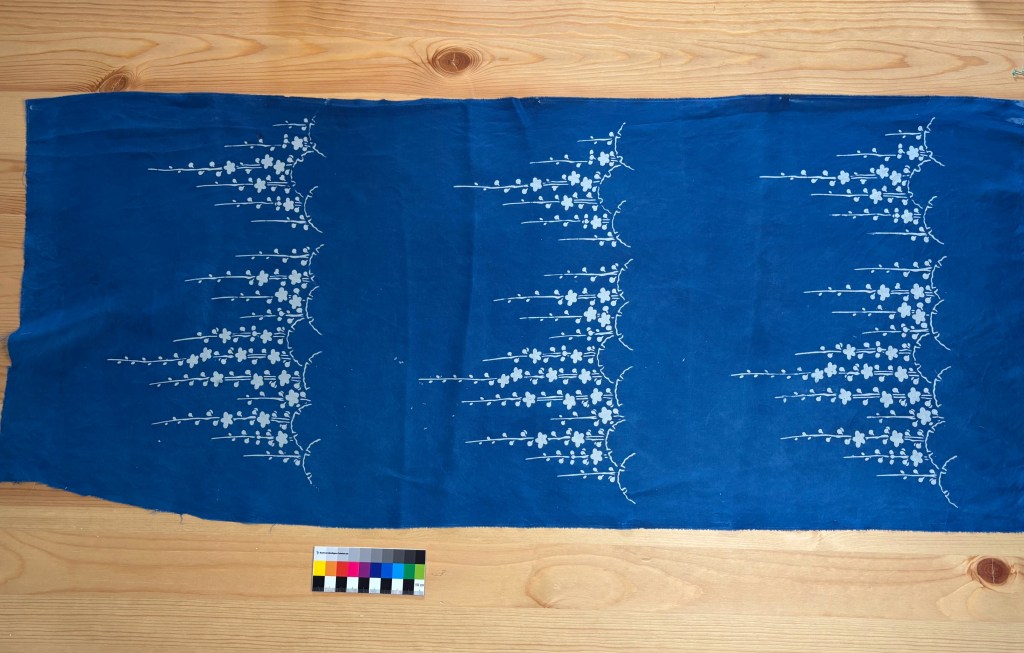
Some indigo I dyed earlier, with no soy or sizing, has a much more even coat of color, excepting where the fabric folded. Fabric folding can be solved by arranging the fabric on shinshi in a serpentine formation, I just didn’t know that at the time I dyed this tapestry.

You can compare the difference side by side


In conclusion, I think that the funori sizing at the beginning of the process is important (it’s actually far too difficult to do double sided paste without it), but I’m not convinced the soy lime treatment is essential or even beneficial for all types of vats and patterns. It does allow for dips in a much more confined vat, but I’ve read sawdust can also be used for this purpose, and I want to try that as well. The fabric is definitely more susceptible to abrasion and has a more textured effect. If I do soy again, I doubt I’ll let it cure for the full 7 days, as the short duration curing seems to produce a better result for me right now. I also want to try with fresh soymilk; I think that might make a small difference in some of the speckling, but I worked very hard to make sure everything was dissolved, so I’m not certain it’s really a problem.
In the future, I want to do the following experiments to give better recommendations:
– Make the soy sizing from dry beans instead of soy powder
– Use a better brush to apply the soy. I used this brush, but I think the right brush was this brush. I have bought it after saving up. I also want to practice my application technique.
– Try different curing times, dip times, and different types of vats.
– Try using sawdust instead of soy.
– Experiment with re-dipping soy or applying pigment on soy that has already cured to see if this “reactivates” the soy and allows you to dye it even if it has fully cured.
Chemically, there’s a lot going on behind the scenes as well that I haven’t talked about or explored. Why soymilk behaves different from funori, why it doesn’t hold up to abrasive washing, and what is happening when you allow it to age. These are things I hope to understand better in the future and explain in another post, but for now the observational science is what I have.
It’s cold here now, so I won’t do much indigo work until the spring, but expect some updates as soon as it warms up.
Do you use soy for your indigo katazome? Do you like the results you get? Let me know in the comments!