Recreating a Momoyama Era Pattern
Introduction
Japanese stencil dye technology was perfected at the end of the Muromachi period(1336-1537). It is remarkably similar to the process used by contemporary dye houses in Japan, allowing for some modern conveniences and proprieties. The goal of this project was to copy a Momoyama era(1573–1615) stencil textile using the same techniques in period, in preparation for the construction of an extant garment. Adjustments were made for cost, ergonomics, environmental impact, and a touch of modern aesthetics.
The extant piece is a katabira (unlined summer robe) owned by Tokugawa Ieyasu, the first shogun of the Tokugawa dynasty. It is dated to the Momoyama period. It is made of hemp, and dyed with stencil resist and indigo. The Tokugawa Art Museum recently did their own reconstruction of this garment, and they attempted to recreate the original color of this garment as well, which was a darker blue.

The Tokugawa Art Museum
Google Arts and Culture
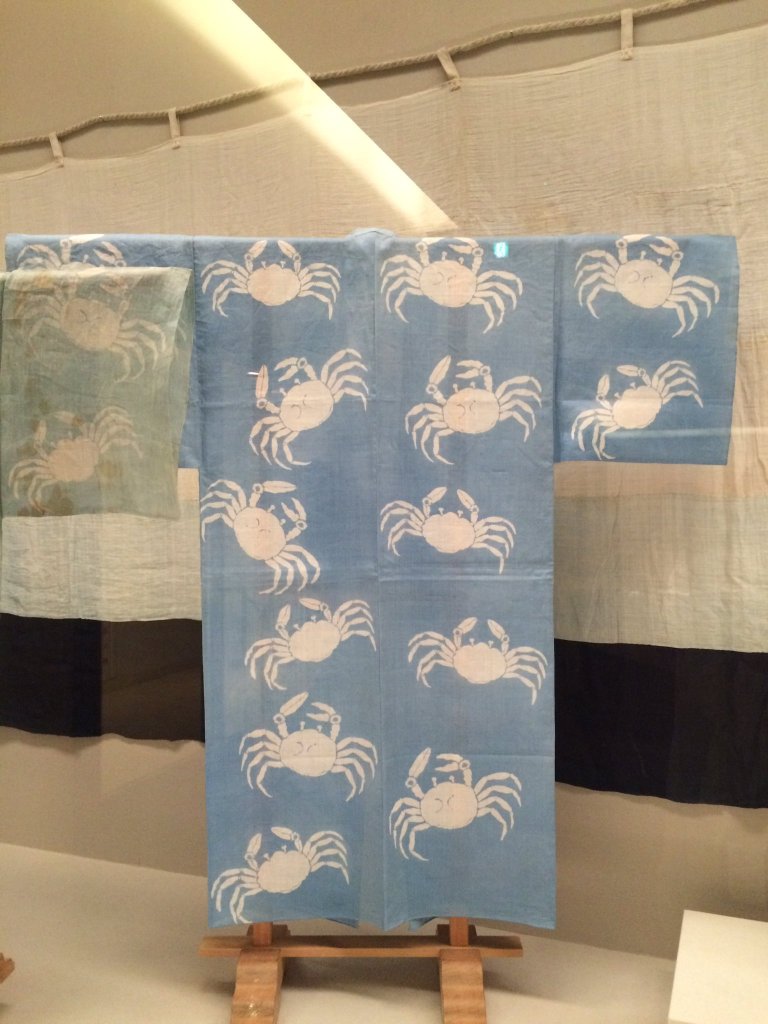
Tokugawa Art Museum
Methodology
Japanese stencil dyeing, more properly called “katazome”, is a many step process, about eight to ten steps from designing the stencil to the final drying process. In the table below, each step is listed, with the in period techniques contrasted with the adapted techniques used. I changed some things to make the process accessible to me. Many of the modern changes I have made (like cutting with a die cutter machine) are in practice in the modern dye houses of Kyoto and are well accepted by Japanese artisans practicing the traditional craft.

Kano Yoshinobu
No medieval (or modern) Japanese artisan house would write down their recipes and processes; doing so would only invite the theft of trade secrets. The small amount of documentation that does exist comes from a medieval painting of stencil dyers, [職人尽絵屏風], and the extant stencil dyed garments themselves. Since paste and resist and sizing are designed to wash out, it’s difficult to determine the recipes used from extants. As a substitute, I have used the recipes and techniques used by modern Japanese dyers carrying on traditional methods. These techniques have been handed down for generations through oral traditions and training. Where I was unable to find the exact medieval formula, I have marked a “(?)” next to the item or ingredient.
I preserved authentic methods and equipment as much as possible. I hand drew and designed each stencil based on the original garment. I handmade the resist paste, down to making and mashing the steamed bran donuts in a huge ceramic Japanese mortar and pestle. I ordered and mastered the dye brushes and fabric suspension system from a dye house in Kyoto. I even purchased and cautiously cut the persimmon tannin paper, though I ended up with a more economical substitute.
| Medieval Technique | Technique Used | Reason for Technique Used | |
| Prepare Bolt | purchase hemp tanmono (bolt) from weaver directly | cotton sheeting, ripped into bolt, scoured with synthaprol and ironed | Cotton is much cheaper for experiments, and the behavior of the resist depends on the weave and weight of the fabric, so I matched my “final goal” hemp with cotton sheeting. The dye will shift hue slightly, so a test swatch on hemp can be done later. |
| Design Stencil | sumi and rice paper brush drawing | mylar stencil cut with Cricut machine after digital tracing of hand drawing | Less messy, more control, ergonomics, easy to do in small time periods |
| Stencil Making | smoked persimmon paper hand cut with a knife, human hair or silk mesh, urushii | komon nuka, mochiko, calx and salt recipe, suribachi | Ergonomics, fidelity, easy to make and resize multiple stencils. Persimmon paper was tested but there was no significant difference for this type of design other than 10x the cost. An aluminum mesh frame was attempted to substitute for the silk mesh, but discarded |
| Paste Making | rice paste resist (?) Suribachi | glued wood board, Yamato nori paste | Dye houses jealously guard their paste formulas; no medieval recipe was accessible, so I used a published one modified after buying some ready made paste from a kyoto dye house for reference. |
| Pasteboard Preparation | wood board + rice glue (?) | wood spatulas | Difficult to find wood boards 16” wide, so a glued board was used. Yamato nori is only tapioca starch and water, so it’s very similar to the original. |
| Paste Laying | bamboo spatula | wood spatulas | Comfort and ergonomics, availability of large bamboo planks |
| Sizing | soybean milk (?) hair brush (deer?) shinshi (bamboo stretchers) harite (wood clamps) | sodium alginate sheep hair brush shinshi harite | Soybean milk can ruin the process of the dye I chose to use; sodium alginate (seaweed extract) and water is the preferred substitute. Sheep Hair brush chosen for cost |
| Dye | indigo or pigment hair brush(deer?) shinshi, harite | Procion MX deer hair brush shinshi harite | I’m more familiar with procion dyes, and do not have an indigo vat large enough. Isolating test variables meant using a dye that would be consistent batch to batch that I could already work well with. Plant pigment dyes other than indigo would be dyed with a brush, whereas indigo would use a likely use a vat. |
| Washing | nearby river | garden hose, tubs, soft dish brush | Whole bolts used to just be put into the river and the current would gently wash away the paste. Obviously not good for the environment. |
Process Photos




Results
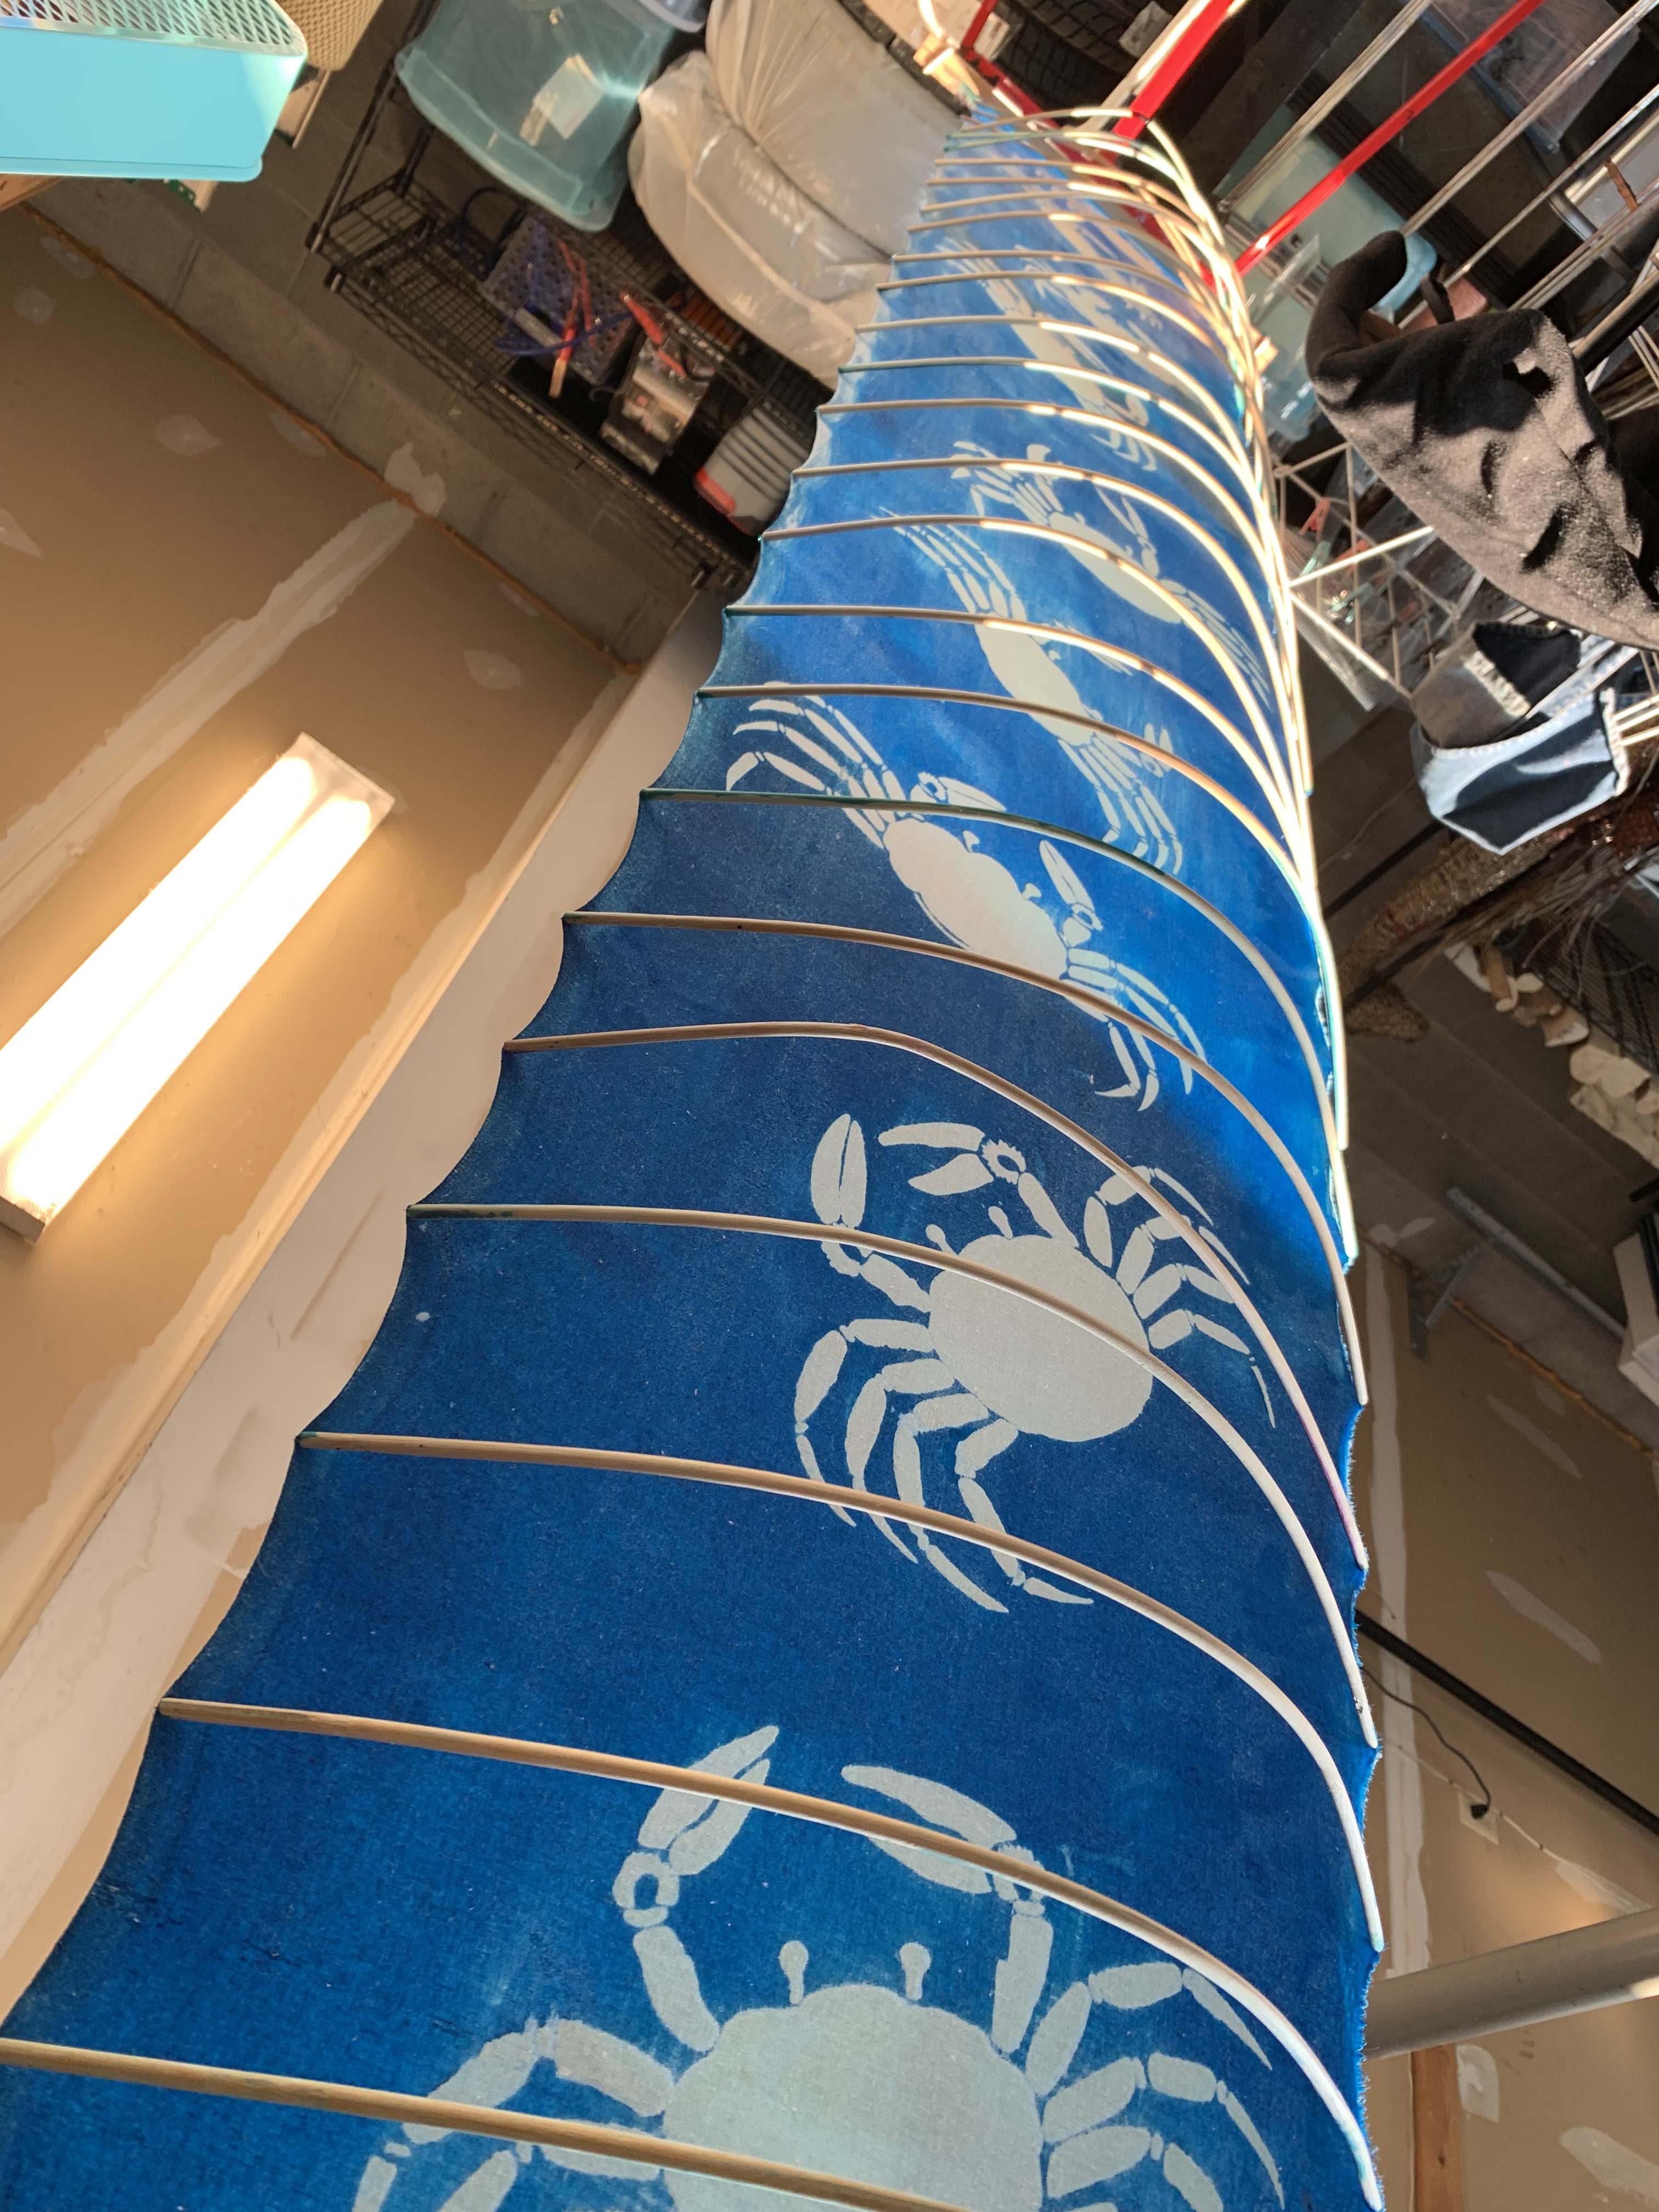
Overall, the resist paste worked as expected on the first crab bolt. Some crabs came out perfectly, whereas others did not. Additionally, the background color seemed very vibrant and even. I have some refinements to my technique to make because of errors in my process. Without a teacher, most of these errors can only be discovered organically. So I tried again with a second bolt, and fewer errors occurred. I plan to iterate this process until I cannot find any more improvements to make.
The biggest aesthetic issue with the bolt is that some lines on the crabs appear smudged or not clearly defined. This happened for three reasons. Firstly, overapplication of dye, or failure to keep the dye brush dry enough while still applying dye, is the most common reason for this failure. Procion MX dyes are notorious for causing bleed in katazome, so I have to be extra vigilant. If the brush is too dry, however, the dye will streak and the color will be uneven.
Secondly, underapplication of paste – if the paste is not mixed well or not applied thickly enough, then the dye will seep through. If the paste is too thick, it will crack, so I can’t just spatula paste on to solve the issue. This is mostly an experience issue, and I get a little better sense of how “thick” to mix the paste each time, and also by watching youtube videos of other dyers. Thirdly, if the stencil is disturbed while the paste is being applied, then it will smudge. One of the crabs has a ghosted outline because its stencil fell on it. For a small portion of the first bolt, I experimented with using an aluminum mesh frame on top of the stencil to help distribute the paste evenly. The mylar stuck to the aluminum frame when I went to lift it up and crashed onto its crab, smearing it. Normally, a silk mesh would be bonded to the persimmon stencil with urushii (lacquer), but urushii is highly toxic, and the appropriate substitute, cashew lacquer, is $60/oz in the US. I stopped using the frame for the rest of the bolt, and cleaned up the stencil as best I could with a small brush.
The other aesthetic issue with the bolt is oddities in the coloration where the pasteboard adhesive rice paste stuck to the bolt. To remedy this, I let the next set of pasteboards dry fully before adhering the bolt for pastelaying, rewetting with a spray bottle to activate the glue “just enough”.
Some dye remained on the shinshi after my first dye run, and it snuck onto the selvedge of the next bolt. I later learned that shinshi must be soaked for three hours after dyeing to avoid this. Some dye houses put vinyl screw caps on their shinshi as well.
I also had some dye creep back into the resist paste on the second bolt because my bowl had some leftover dye in it that I missed (bowl and dye were both blue). I have made separate bowls for paste and dye going forward, but there are some speckled crabs as a result.
Streaks on the main color background color itself are from uneven dissolution of the dye or the soda ash, which I plan to remedy by using hotter water to dissolve the dye before mixing it in to the carrier water.
By the third bolt, I mostly had the process down – a dye mix with more sodium alginate really helped, there was almost no bleed through, and I had enough finesse to not drop stencils or smudge them. I sometimes saw a “halo effect” around a few of the crabs, which I did not see on the earlier stencils. It smoothed out with more applications of dye, but was still present after cleaning off the paste. I assume, since it was not where I saw any paste, that it is either from slightly dirty stencils, or from some sort of spreading interaction between the sizing and the rice paste. My suspicion is slightly dirty stencils, and I will clean them better next time. As a side note, this problem would be almost unheard of with kakishibu paper katazome stencils, because they are soaked overnight before use. It’s almost impossible for them to be dirty.
I have come to dislike the mylar after three uses, mostly because my cats like to eat all the little pieces of plastic that are cut out from them, and I can never seem to find them all. But also because I do adore the sustainability of the original process – it’s all natural materials, front to end, and the paper is remarkably durable. It also has the cedar and incense aroma of what I imagine a forest in heaven to be.

Further Experiments
With the successful conclusion of the test bolts, I am pleasantly surprised with the result. I am going to sew them up into a katabira before proceeding with one final design. I will probably dye a bokashi style with procion dye, not indigo. This is partially because I don’t have a vat large enough to dip a full bolt in, and partially because chemical dyes are a bit tougher than indigo, and I am rough on my clothes. This batch’s color was clearly not a simulation of indigo; I chose it simply because I liked it and had some extra.
I am in the process of learning to adhere mesh to persimmon paper stencils with ordinary black house paint and polyurethane. This will allow the construction of more intricate and detailed stencils with isolated sections.

I am also learning to paint gradients and selective color with smaller brushes. This will be facilitated with the mesh stencils discussed above, as the type of stencils with selective small bits of color tend to need mesh to support them. Finally, I am refining the paste recipe and learning to apply dye more delicately. The addition of a better flour sifter and a power mixer will greatly aid this process. Initially, I found the paste very hard to work and painful for my hands to apply. I originally thought this was just a hand strength recovery issue, but I discovered after watching youtube videos from other bingata houses that 1) they send out a young man with a power drill to mix the paste in buckets and 2) their paste is much thinner than mine. To remedy this for further batches, I plan to thin down the paste more, and heat it up, with the addition of hot water.
References
Although not a book, Yuta, from Japanese dye store Aikuma Dye works, was invaluable to my process. She answered every question I had patiently, and sometimes would walk over to the master kimono dyer and ask him for me. She also praised all my work, even my first, very unevenly dyed crab, and helped me troubleshoot issues.
I watched dozens of videos from different dye houses in Japan, and have listed a selection of the most helpful below.
Videos
1. CHINEN BINGATA. “【Bingata Vlog】紅型の型置き、日々の仕事。【沖縄】One Day to Do Kataoki. My Day Job.” Www.youtube.com, http://www.youtube.com/watch?v=rpXD56Fy8eY. Accessed 14 Sept. 2023.
2. —. “地染めをずっと撮ってみたら【Dye the Background】.” Www.youtube.com, 2021, www.youtube.com/watch?v=FDdS-600wQ4. Accessed 14 Sept. 2023.
3. Kuriyama Bingata. “糊練り [作業風景] 和染紅型 栗山工房 *007 #Shorts.” Www.youtube.com, www.youtube.com/shorts/XsZawiOXZWY. Accessed 14 Sept. 2023.
4. 栗山工房 型染チャンネル. “栗山工房 型染チャンネル [麻帯の糊置き 猫に金魚編]#007.” Www.youtube.com, www.youtube.com/watch?v=ztGJbM6hL2g. Accessed 14 Sept. 2023.
5. —. “栗山工房 型染チャンネル 帯の彩色[スイトピー編].” Www.youtube.com, www.youtube.com/watch?v=PkE4R5toKiI. Accessed 14 Sept. 2023.
Publications
I used the following books and articles for inspiration and reference.
1. Mizukami, Kayoko. 喜多院所蔵 職人尽絵屏風 「型置師」 に描かれた 染物・型付技法に関する一考察.
2. Nakano, Eiko, and Barbara B Stephan. Japanese Stencil Dyeing. Weatherhill, Incorporated, 1982.
3. 金子賢治. 型染・小紋・中型. 1994.
Primary Sources
1. “Bath Robe (Yukata).” Google Arts & Culture, artsandculture.google.com/asset/bath-robe-yukata/8QG-Upsnye_SZg. Accessed 14 Sept. 2023.
2. Kano, Yoshinobu. 職人尽絵屏風「型置師」, Momoyama to Early Edo Period
Appendix
Resist Paste Recipe
Makes 2.5 cups of Resist Paste
Adapted from Japanese Stencil Dyeing by Eishia Nakano
120 grams (1 cup) Mochiko / Glutinous Rice Flour
150 grams (1.5 cups) Komon Nuka / Defatted Rice Bran – do not substitute
120-175 ml (.5-.75 cups) Water
40 grams (2 tbsp) Salt dissolved in 80 ml (.33 cups) Hot Water
20+ grams (2+tbsps) Calcium Hydroxide, also called Pickling Lime, dissolved in 120 ml (.5 cup) Hot Water
1. Sift the komon nuka. Modern mochiko typically does not need sifting.
2. Mix the komon nuka and mochiko well in a large bowl
3. Add water a little at a time, kneading.
4. Shape dough into doughnuts
5. Wrap the doughnuts in a damp kitchen towel (preferable white or unbleached) and steam 50-60 minutes.
6. White they are hot, pound doughnuts into a paste. This is traditionally done with a large suribachi, but you can also use a bread mixer. Do not use a cake mixer, the dough is too tough for the motor.
7. Add hot water and salt solution.
8. Beat well, and slowly if you are using the electric mixer. Five minutes at a minimum.
9. Add only enough of the top water of the calcium hydroxide solution to turn the paste a glossy mustard yellow.
After this, you can either let the paste cool a bit and use it immediately, or store the mixture in a mason jar with a bit of water on top in the fridge. You will need to re-warm the mixture from the fridge. I find that this recipe makes a very thick paste, and I am able to dilute it with hot water considerably, but the amount of water needed varies based on the age of the paste and the temperature of the room. It is hard to describe exactly what the texture of resist paste should be; I recommend watching some of the above linked videos. In general, it should spread smoothly and easily, but not be runny.
It is also worth noting that the dye paste I purchased from Aikuma did not use calx, it was a clearer color. This made the paste hard to see. Some professional dye shops seem to add a fugitive blue dye to their paste (probably aobana or a synthetic version of it); this makes the paste very easy to see.
Sizing Formula
10 grams of High Viscosity Sodium Alginate
1 liter of Water
Add the alginate a little bit at a time. Mix thoroughly with a whisk, and allow to rest for a few hours so the alginate will dissolve fully.
Dye Formula
Chemical Water
Can be stored in the refrigerator
13 grams of High Viscosity Sodium Alginate
100 grams of Urea
1 liter of Hot Water
Dissolve the urea in the hot water. Add the alginate a little bit at a time. Mix thoroughly with a whisk, and allow to rest for a few hours so the alginate will dissolve fully.
Dye Solution
10 grams Soda Ash
Dye to taste – 1-6% OWG.
1 cup of Chemical Water
1. Dissolve soda ash in as little hot water as possible
2. Dissolve dye in as little hot water as possible; strain through a fine mesh
3. Mix thoroughly, ensuring everything has fully dissolved and there are no speckles of concentrated dye.