In December of 2025 I acquiring 6 packets of Japanese madder seedlings. This was done with the help of a friend living in Japan, and the seeds were imported legally through the USDA inspection process. The box arrived smashed, and open, but luckily the seeds hadn’t fallen out.
As a note, you must use Japan Post to ship seeds. DHL, Fedex, and UPS will not do it. With the current restrictions on the package shipments from Japan Post to the US, they have to be marked as a gift, so it is something only a friend can do. I paid my friend to buy the seeds for me, and she mailed them to the USDA who then forwarded them to me after inspection via the small lots of seeds program. It was a lot of paperwork and careful packaging on her part, so I am extremely grateful.
I purchased the seeds from two different vendors to get a good genetic variety. I wanted to buy from the Nihon Akane project but they weren’t ready when my friend had time. As a note, if you follow this process, please don’t be a seed hog and buy all the seeds. You really don’t need more than a few packets, and the germination rate is MUCH higher than listed if you follow some basic procedures.
Japanese madder (Nihon Akane) is one of many subspecies of the rubia family, and it’s native to Japan. It produces unique and different colors from the other types of Rubia. I’ll save the details on this for another post, but it’s sufficient to say that it has a different variety of dye compounds in different concentrations from the European and Indian madder most dyers are familiar with.
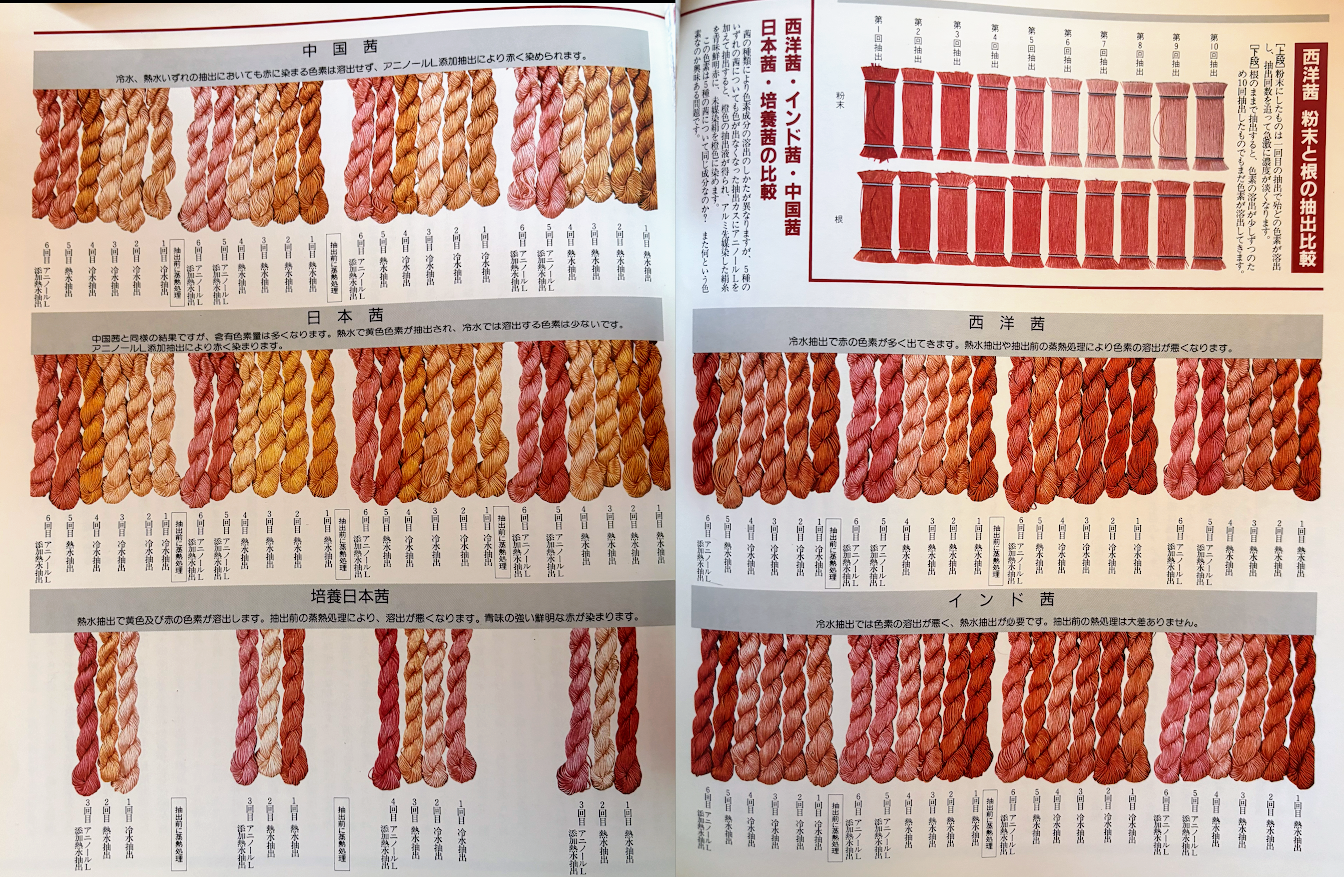
Senshoku Alpha Edition 95 – comparison of different Shades of different types of madder using novel extraction methods.
In ancient and medieval China, and Japan, red from madder specifically held an important symbolism as one of the five elements (Earth, Air, Fire, Water, Metal). Red from madder was the fullness of life, fire, also associated with the south, and the season and summer. It was a powerful color, used at burial sites to cover graves to protect the passage of life and death even before the elemental theories emerged.
But not just any red would do! It was specifically the red from madder, not safflower or suoh, that counted as the pure, elemental red. And it was specifically Nihon Akane (Rubia Akane), that would make that color in Heian Japan. Rubia Cordifolia would be imported much later, in the Muromachi period, and Rubia Tinctoria didn’t arrive until the Momoyama period.
So, therefore, if you want the original Japanese red, for the element of fire, then you have to dye with Rubia Akane to see it. This is a very different red than the primary red we are accustomed to seeing in I Ching and Taoism illustrations -more close to cinnabar, which was the accepted mineral pigment for fire. I hope, in a few years, I can share my own photos of this red with you.
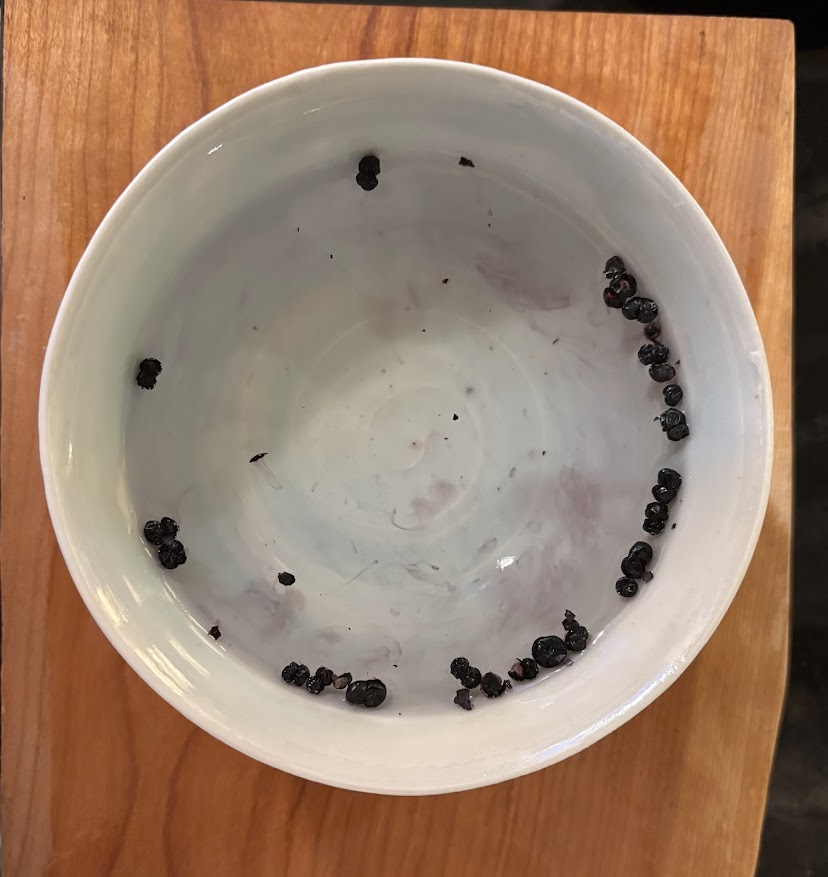
To start, I put the seedlings in a bowl of water (I made this one myself!) and let them soak for a day or two.
I then put them in my fridge, which actually accidentally froze them for a little bit as they fell to the back, so I started a new batch and put everything in the vegetable drawer
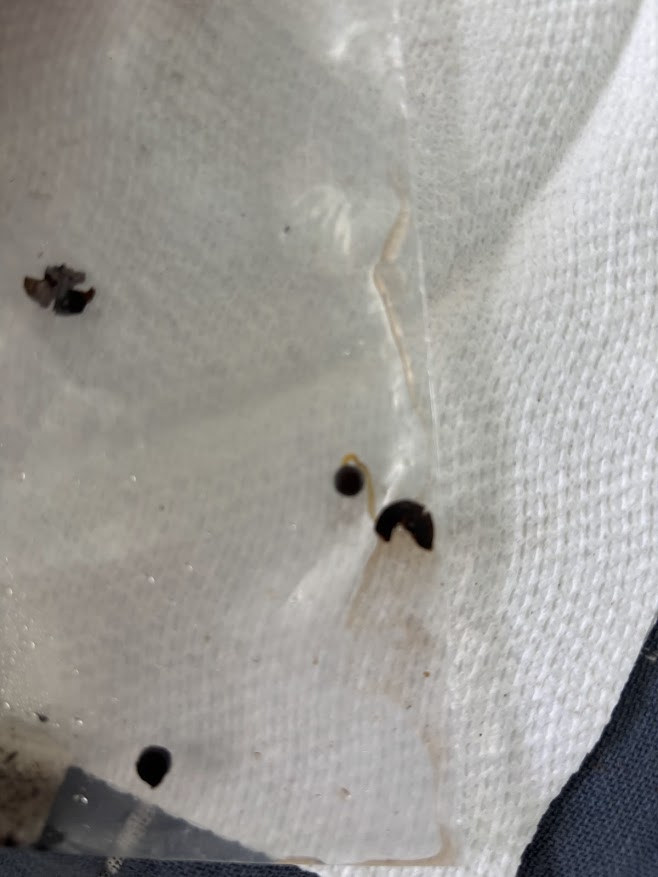
After a long while, two weeks, I planted some of them and then left the rest in the fridge for another two weeks, at which point some of them begin to sprout, so I took them out.
I planted them in Black & Gold Organic Seedling Mix, and put them under my Root Farm lights. I don’t think you need to use these specific brands, I’m just giving them informationally. They hung out in my pottery studio, which is usually around 60-65 degrees and a bit dry in the winter, so they needed frequent watering. I tried to water the bottom of the tray.
In the end it didn’t seem to make a big difference how long the seedlings were in the fridge, just that I was patient with keeping them wet. After about two to three weeks of minimal progress I begin to despair of the whole process, and then they sprouted.
I kept them warm and well watered, and then they started to sprout more and more. I think my germination rate was well above 60%, certainly not the 20% I see frequently quoted online. I had many many more than I thought I would.
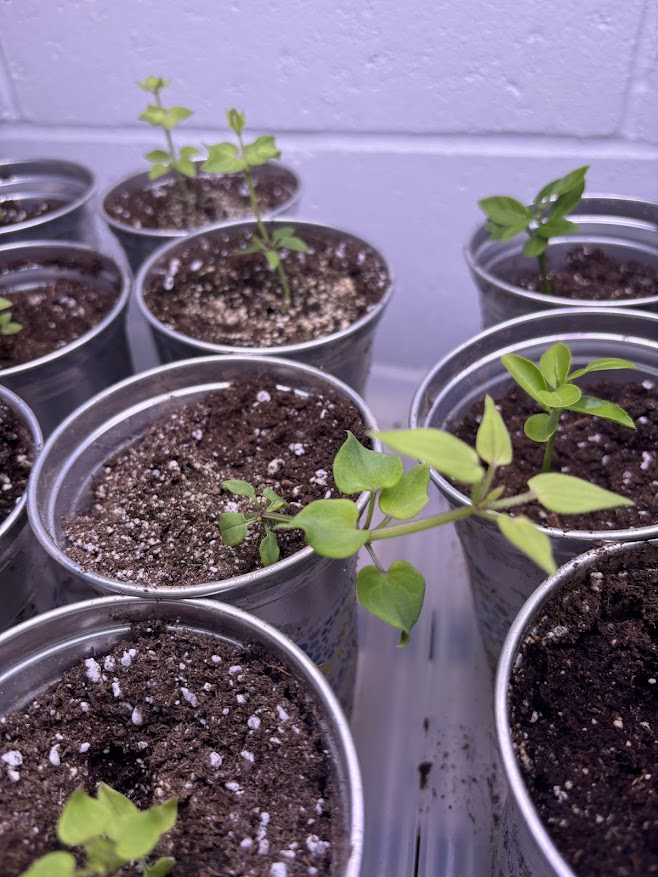
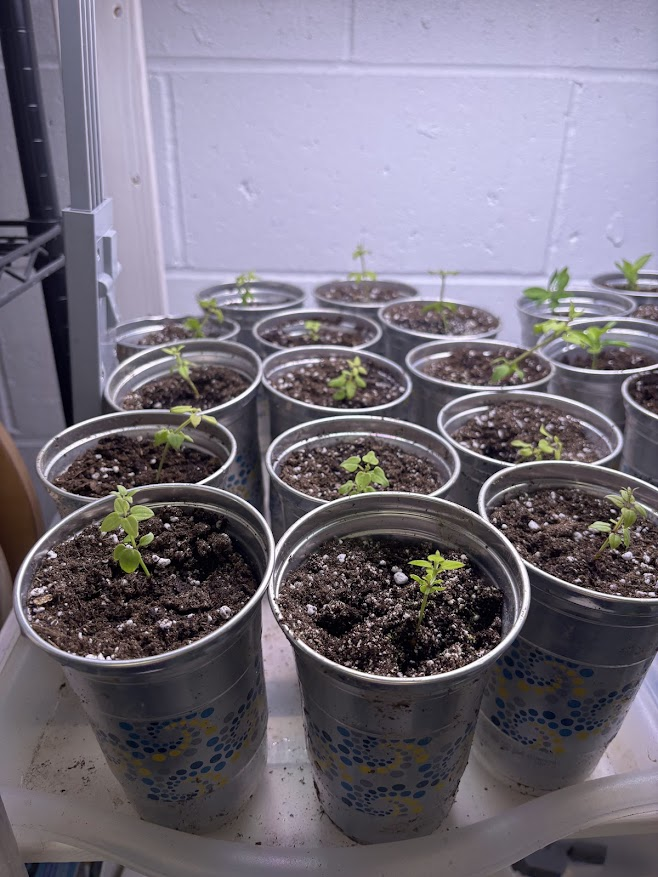
When they started crowding and getting a little big for their pots, I moved them into some aluminum cups. I had drilled holes in the bottom of the cups for drainage. I put them back under the light and raised its height so they could get nice and big for spring.
So they’re currently this size, and I’m wondering where in the garden I’m going to have room for them. I need to head out with a pickaxe and some compost and till some soil, so that by planting season in May I have a good spot for every one of them.
It will take 2-5 years for these plants to produce quality dye, so it’s definitely a long term project. I would like to find a way to give and sell these seeds to others. More updates on that later, when I have enough to share.
This article is written as a guide for people making medieval Japanese garments, such as costumes or for historical displays. While the list of textiles isn’t exhaustive, it should serve as a decent starting point.
If you are just getting started sewing, I actually recommend working with fabric that is very affordable, in a plain white, that you can make mistakes with. Sew an underlayer or two. Get all your mistakes out on something cheap, and then invest in quality for the visible layers.
Despite preconceptions of twelve layer silk garments, Japanese people of the medieval era wore a wide variety of fabrics and fibers, and it is possible to find reasonably priced approximations of medieval fabrics, but first, we have to understand what was used.
Because of the length of the article, I have included a table of contents.
If you’re just in a hurry and don’t have time to read the whole article (which is really long enough to almost be a book), I have a few quick and easy recommendations based on what you’re making. These are just the most typical representations with the most reasonably priced options. If you want to understand why to buy these things or want more options, scroll down and read further. The headings are designed so that you can navigate to your chosen topic of interest and look further.
Disclaimer: I discuss this more in the bast fibers section, but linen was not available in period, just hemp and ramie. I added it because it’s more accessible and similar, but if you’re a purist, stick with hemp and ramie.
First Attempt Katabira
This should probably just be a simple white juban or solid color katabira.
Choose 3 to 5 oz linen, ramie, linen or hemp that is easy to sew and affordable. This means it is not super dancy or slippery, which actually tends to happen with the most expensive linen and hemp because of how finely spun it is. Try to pick something on the tougher side, because you will be ripping some seams as you learn, and this just tears the very fine bast fibers of veil linen or gauze.
If you are on a tight budget, cotton dobby in plain horizontal stripes is similar to one of a few cotton extants we have. For your skin layer, a simple cotton batiste or voile will not be seen by anyone except at the collar.
If you have sensitive skin and can’t stand textures, lyocell satin or twill is fine for middle to upper class personas, and is fairly easy to sew, especially compared to silk.
Underlayers go by many names, but I’m referring specifically to the first layer that touches the skin – asetori or 汗取り, and the first kosode that goes over top of it, which is modernly called a juban or hadagi. I have also seen hadakosode in some books.
This really depends on the time of year, but a lightweight hemp, linen or rayon in a washable fabric is going to serve you best for the skin layer. If you’re doing additional underlayers past that for upper class, you can branch out into silk.
16-8 momme silk habotai face, 14-8 silk habotai lining or fine 2-3 oz hemp, linen or ramie. For vegans who wish to wear imitation silk, lyocell satin in 1-3 oz weights, in lighter weights for both face and lining. Dye with simple shibori, surizome, or leave as a plain color. In period, getting vibrant colors other than deep blues on hemp was tough; bast fibers do not get the same bright colors as silks do from natural dyes. If you want to be accurate in your portrayal, consider toning down your color palette if you are wearing plant fibers (but not rayons and lyocells, which are pretending to be silk).
Same weight fibers as above, be sure your plant fibers are extremely finely spun and look very ironed and crisp. Patterns become more elaborate and gold leaf and hand painting are possibilities. Silk and rayon brocades and jacquards in appropriate patterns are also nice for outer layers.
2 to 3 oz hemp, linen or ramie; if wearing without an undergarment or in a cold climate, bump up to 4 to 5 oz for modesty and comfort. Yellows and lighter indigos seem to be typical colors. Dye complexity varies from solid to simple shibori to complex shibori and stencil dyeing for upper classes.
I have not yet found any extant weights of hakama. If you’re wearing them for martial arts with impact, you’ll want heavyweight hemp or cotton, probably in a twill weave to make the gaps smaller, with an appropriate lightweight 2-3 oz hemp, linen or cotton lining if desired. This is practical advice from a fellow martial artist, not aimed at perfect recreation.
For everyone else, most of the fabric weights above apply, but you can increase the weight of the fabric for better longevity and modesty if desired. For example, 5-7 oz hemp is a very nice weight for bottom layers in general. Brocade was extremely common for upper class hakama and matching top layers. Keep in mind textured fabrics without a lining may chafe your thighs, and raw silks and brocades with raised detail may pill quickly on the seat and in between the thighs. I recommend wearing a layer in between your hakama and your body if you have any concerns about comfort – bike shorts, shitabakama, leggings, or modern japanese hakama underwear, will all work.
When I talk about weight of the fabric, what I mean is the oz or gsm weight of the fabric, which is the measurement of how many grams or ounces the fabric weighs per square yard or meter. It’s important to understand that this is not really how fabrics were measured in period, but it is how fabrics are sold today.
I based my research on a series of weights of different surviving garments from the Muromachi and Momoyama Eras. Not many have weights available, but a few did, and I estimated their bolt size based on their dimensions and did basic arithmetic to arrive at their momme or gsm. The complete spreadsheet can be found here.
Unfortunately I do not have weights for earlier periods garments, so my advice is to use common sense and the data here to arrive at the right weight and textile for your era. The more layers you have, the thinner you need the silk to be. It’s not appropriate to make a juni-hitoe out of 30 momme dupioni silk for each layer, for example. Not only would the slubs be too informal, you would end up wearing so much silk you would get a neckache from the weight of it. This is how sumptuary laws are made – ladies passing out from too many layers of silk. Don’t be the inspiration for sumptuary laws.
Modern kimonos top out at about a kilo (2.2 lbs) of weight for the whole face bolt, and this is considered pretty heavy, and jubans at around half a kilo (1.1 lbs). Depending on how ripped you are, wearing any more than four or five pounds of fabric of silk draping from your shoulders might give you a head or neckache, so experiment with gradually making your garments heavier and adding layers if you want to go past that limit, or use support from belts and hakamas.
I also want to note that these are the weights of the linings and the face fabrics combined, with my best guess at the seam allowances. They’re approximate. To determine the weight of the fabric to order, you need to divide by two if you want the lining and the face to be equal weight. A 30 momme garment would be 15 momme face and 15 momme lining if you were self lining it. It will probably drape a little better at something like 16 momme face / 14 momme lining, or even an 18/12 or a 20/10 split.
This is complete conjecture, but if linings were reused face garments, I would expect them to be a probable face garment weight. An older kimono seamstress recalling garments from early in her work said that old kimono tended to have indistinguishable face and lining weights on the bolts, because silk was so precious. Of course she was talking about the Taisho era and not the Momoyama era, but it made me consider thinking about linings as redyed face fabric, or just reused face fabric.
Extant Kosode Weights
Garment
Weight (g)
Square Meters
Momme
伝上杉謙信所用小物 – 4
505
3.9
30
伝上杉謙信所用小物 – 5
545
3.9
32
伝上杉謙信所用小物 – 6
460
4.1
26
伝上杉謙信所用小物 – 7
535
4.1
30
伝上杉謙信所用小物 – 9
440
3.9
26
伝上杉謙信所用小物 – 10
300
3.8
18
Median
483
3.9
28
Extant Katabira Weights
Garment
Weight (g)
Square Meters
GSM
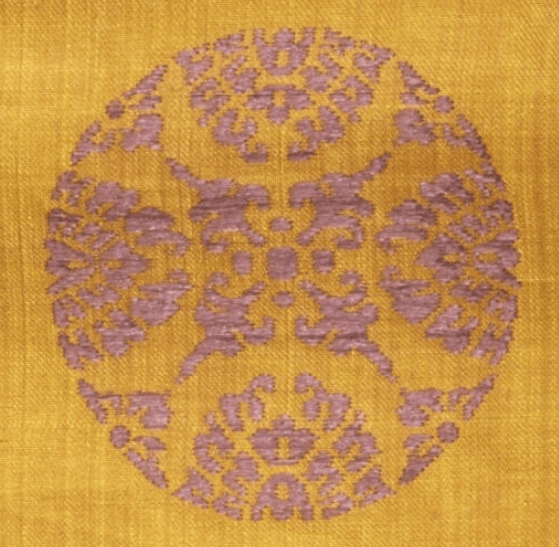
(1) 伝上杉森信所用黄地 小花模樣小紋桂子
400
3.7
108
(2)同 上浅葱椎子
367
3.9
87
(3)同 上同上
355
3.9
90
(4)同 上同 上 [編]
293
3.9
76
Median
361
3.9
89
Because these katabira were made of hemp, Grams Per Square Meter (gsm) is the appropriate weight measurement.
Extant Doubuku Weights
Garment
Weight (g)
Square Meters
Momme
浅葱饺竹雀紋繡襟摺箔描絵胴服
440
3.7
28
Unfortunately all the dobuku but one were padded, however, this one seems fairly representative.
Recommended Weights
From these tables, I can make the following recommendations for fabric weights of medieval garments:
Kosode & Dobuku
Silk: 8 to 18 momme face, 8 to 14 momme lining, not totaling above 32 momme when summed together Tencel, Rayon, Lyocell: 1.0 to 2.4 oz face, 1.0 to 1.4 oz lining, not totaling above 4.3 oz when summed together.
Katabira
Hemp, Ramie, Linen: 2.2 to 3.3 oz
Types of Fabric
In medieval period, the Japanese had domestic access to silk, ramie, hemp, and a variety of other bast fibers that are no longer produced from various domestic plants. They also produced a small amount of cotton, and imported it as well. The records we have for cotton show it being used as winter wear for military outfits. It may also have been used for aristocratic clothing, though this was atypical. Cotton was a textile with limited consumption by the upper samurai class.
In Okinawa, bashofu, made from banana leaves, was also available.
Finally, wool was imported in the late medieval era, often pre-dyed. There’s a stunning example of cochineal dyed wool being used for a doubuku. In particular, jinbaori and doubuku seem to use wool fabric. I haven’t seen any examples of wool kosode or hakama.
There are a lot of unique fabrics used for doubuku and jinbaori. If you have some strange fabric and you don’t know what to make with it, my recommendation is make a doubuku. Making your battle attire with exotic imported fabric was quite fashionable.
For simplicity’s sake, I’ll cover the most typical fibers – silk, ramie, and hemp, and I’ll touch briefly on cotton.
Silks
Silk was used by the “middle” and upper classes in Japan; it would have been unaffordable for low class laborers and peasants, excepting maybe a tsumuginoragi. Skilled tradespersons, refined craftspersons, merchants, samurais and courtiers all might wear silk.
Silk was worn year round, but light, gauze like silks were worn in the summer. The gauze like layers are very sheer, to the point of possibly being considered immodest in modern times.
If you are vegan, making clothing for active outdoor wear, want to save money, or hate handsewing, consider rayon. It was made to mimic silk, and it’s very easy to care for. It is wonderfully cool in summer, and it can be stuffed with cotton for warmth in the winter, mimicking silk stuffed kosode. Rayon’s original process is so polluting it can’t be manufactured in the US, but lyocell and tencel offer significant improvements with closed loop process that is far superior in environmental impact.
Of course polyester makes a fine silk imitation, but I can’t recommend using plastics, which are a non-degradable pollutant that contaminate the water they are washed in, especially for an optional hobby pursuit. They also do not breathe and feel like wearing a trash bag; they’re cold in winter and hot in summer, and tend to retain odors. Sometimes they’re the only option for specific patterns of imitation brocade, but I almost always choose to do without unless I’m making something that won’t be washed, like an obi.
Now, let’s talk about specific types of silk.
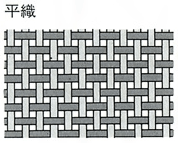
平絹 ・Hiraginu/Heikan
A plain woven silk fabric with warp and weft threads of the same thickness. It is woven without twisting, so it has a soft texture. There are many variations of this silk, with different names, to indicate whether it is woven with raw silk or refined silk on the warp, its thickness, etc.
A plain woven silk fabric that uses raw silk in the warp and silk thread with the sericin removed in the weft. It isn’t produced much anymore, but it was used in many kosode in the medieval era. This silk was often used for various types of pattern dyeing, such as tsujigahana, shibori, and surihaku. It is a subtype of hiraginu.
Silk Habotai: Probably not the best choice, but a heavier weight of it may work alright. Sandwashed might be too matte.
Silk Charmeuse: It can be too shiny and regular, but it’s often very affordable. If you want to mimic the shine of nerinuki, this is an option.
Silk Crepe Back Satin: One of the easiest silks to find, which is why I have included it. Crepe is very late period, but crepe back satin is a different animal entirely. The ‘crepe’ back is hardly crepe at all, and it has a manufacturing variance to the point where either side could pose as nerinuki to some extent, though I would be inclined to pick the satin side.
One of the biggest myths about Japanese medieval clothing is that they never used raw silk and didn’t tolerate any imperfections in the silk. The truth is quite the opposite. While this is true for formal garments, we have extant examples of a raw silk kosode owned by Kenshin, and records of pongee (a similar korean textile) being imported for winter military wear. Additionally, some records state that raw silk has been used for field and farm work clothes since ancient times.
Tsumugi is not a type of weave so much as type of fiber. It is often plain woven, but there are waffle, striped, and ikat tsumugis in production today. In the mediveal period, the one extant example we have is a horizontal striped kosode.
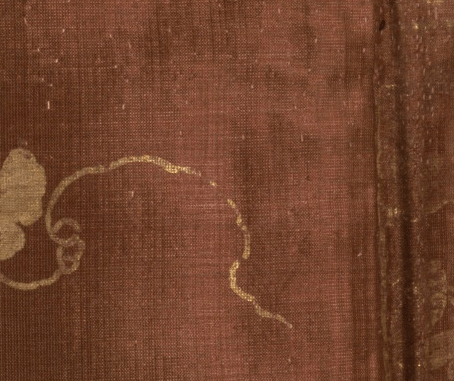
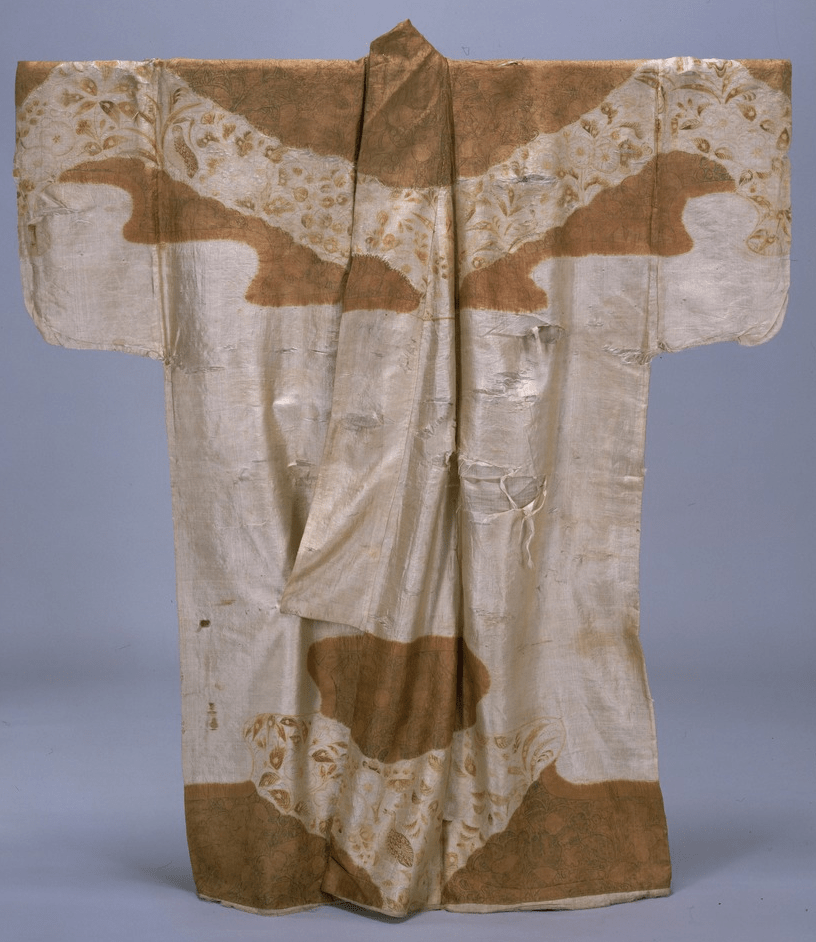
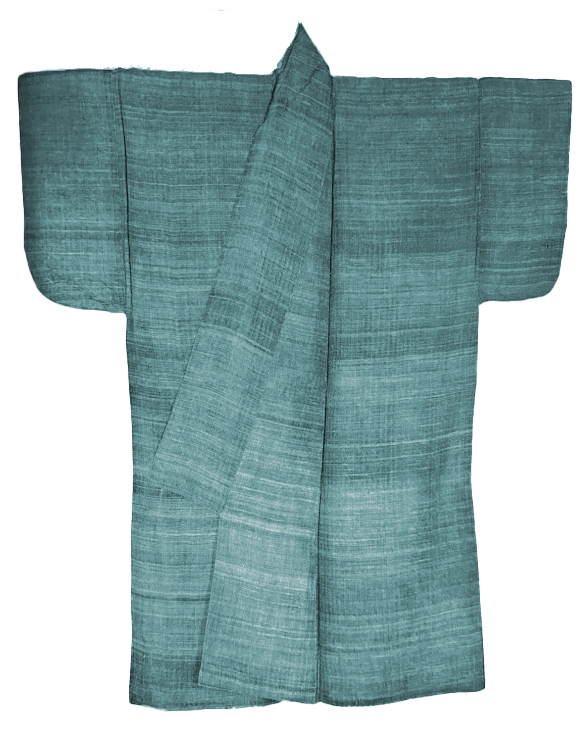
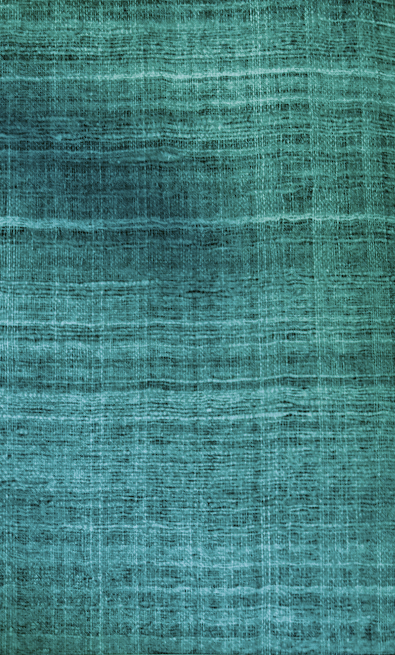
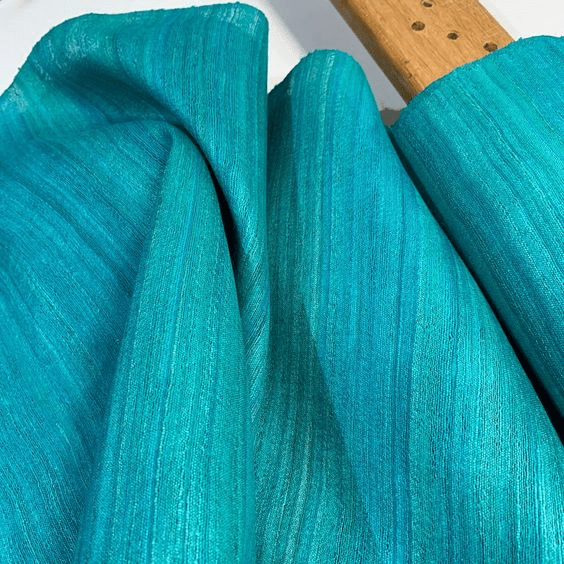
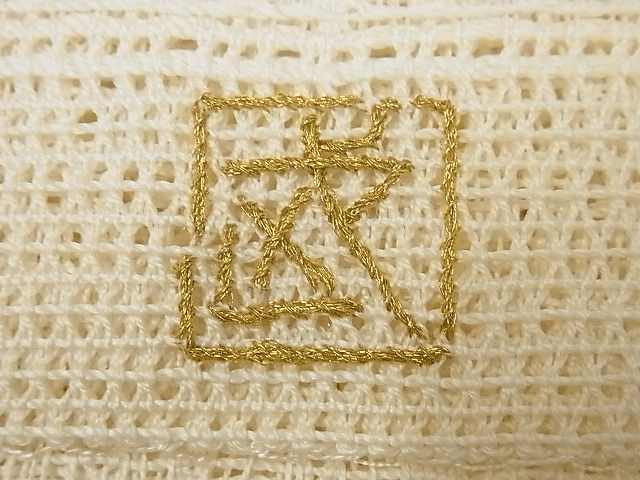
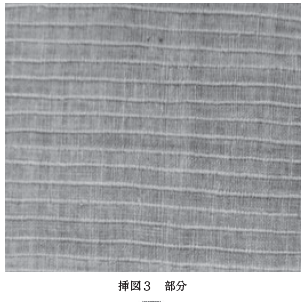
伝上杉謙信所用浅葱袖小袖(室町時代 上杉神社) Uesugi Kenshin’s Asagi (Blue-Green) Tsumugi Kosode Muromachi Period, Uesugi Shrine This tsumugi kosode had an uneven weft weave, making it coarse, and a red lining that peeked through the gaps of the face weave, making it very stylish. I have colorized it since only one gray photo is available in an old magazine.Closeup of the Asagi Kosode’s weave
If you have noil or dupioni, or shantung, which are probably the most common thrift store silk finds (they are popular curtain fabrics), tsumugi is the nearest neighbor fabric.
If you are portraying a lower class persona, then tsumugi is perfectly acceptable for your field clothes. If you are portraying an upper class persona, Tsumugi is a good choice for casual wear, but might be a little informal for court situations. Think sundress poplin vs evening gown or suit fabric.
Tsumugi Sources & Substitutes
Interestingly, there is a vegetarian source of raw silk where the silkworms are only semi-domesticated and allowed to fly free once they have broken their cocoons. This is called ahimsa tussah silk, and it is traditionally produced by tribal peoples in India. Note that ahimsa denotes the fact that the cocoons are broken, and tussah is the species of moth, so you need both, not just tussah, for the right match.
Of course, unscrupulous farmers can always smoke the moths out early and then they won’t be able to live a full life, but the proper process qualifies as vegetarian or vegan depending on your ideology. It also happens to have some perfect matches for our surviving extants, so this is my first recommendation.
In modern Japan, tsumugi bolts are often wider, so if your wrist to neck measurement allows you a bolt width of 16″, then you can purchase the real thing used. Try to look for plain colors or horizontal stripes. Some of the more elaborately patterned tsumugi is more difficult to document. These can be found on Rakuten, Mercari, and Yahoo Auctions.
If you’re looking for a plant fiber option, some linen and cotton chambrays, shots/slub/slabs will fit the bill, such as this one.
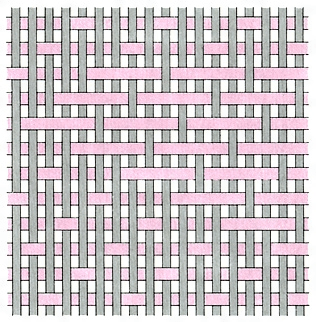
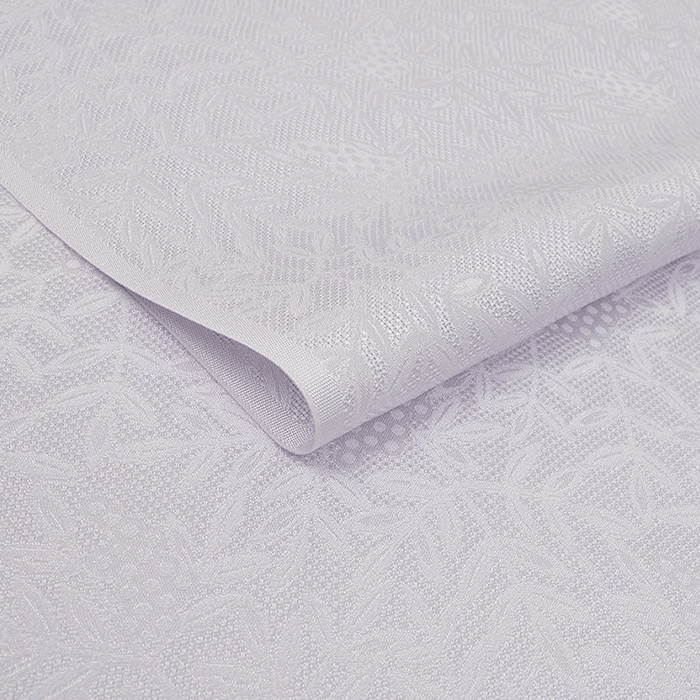
綸子・Rinzu
Rinzu is a single color pattern weave silk that is woven out of untwisted raw (unprocessed, sericin not removed) silk for both the warp and weft. Multiple strands of silk are used for both the warp and weft, though the number of strands varies.
Some earlier definitions of rinzu also include plain woven fabric, but it is not clear to me what particular part of the weaving process makes it rinzu if there is no pattern.
As you can see in the diagram, the pattern is simply made by skipping warp threads in the weft.
Rinzu was used plain colored, but also for pattern dyeing. It takes a lot of skill to stencil dye with textured weaves, because the unevenness of the weave affects the resist application, but it is still done. It is often seen with shibori and tsujigahana patterns.
Until the Momoyama period, rinzu was imported from China. Then, domestic production began in Nishijin.
Rinzu is such a specific silk that if you want to purchase it, you will probably need to buy from overseas directly, because the silk and rayon jacquards available in the US are mostly very western patterns or extremely marked up, like 10x. I have done my best to find affordable options, but they are mostly overseas, so that means that you will need to use a proxy service to purchase them, like Buyee for Japan or Parcelup/PandaBuy for China. Do not be intimidated; these services are designed to be easy for foreigners to use and the customer service is friendly.
Used rinzu bolts are also often available in used kimono markets, but they tend to be too narrow, especially because the plain ones are often for undergarments. It’s not enough material to make a kosode without piecework, but piecework is period.
Rinzu Sources & Substitutes
Direct Shipping To US
Poppy Lollipop – Mix of Silk and Synthetic Blends CNElement – Mix of Silk and Synthetic Blends Vietnamese Silks – Pure silk, but a lot of modern designs. The dragonflies and some of the geometrics are good.
Japan
Tokuan is the biggest manufacturer, unfortunately, most of it is polyester, but it does come in a wider width. It’s pretty expensive. Rakuten has other options. Check the size of the pattern before you order. Rinzu is a popular fabric for doll clothes, so many of the patterns have been scaled down from their medieval size.
China (Taobao)
These options will likely run out of stock eventually, just take them as examples if they are sold. out. The search term ‘silk jacquard’ (‘花真丝面料’ or ‘提花缎真丝’) will help you look for more.
Nishiki-ori is the general term for brocade in Japanese. It is so little used that if you search for it without specifying you are looking for the textile, you just get pictures of a famous tennis player. However, nishiki-ori refers to fabrics made with different color threads to create a raised pattern.
One of the things that is important to understand about Japanese textiles is that the Japanese don’t classify and sort textiles the way we do in English. It would be simplistic to say that nishiki-ori = brocade, and rinzu = damask, but there are all sorts of exceptions to this, like the fact that early rinzu could refer to plain weave.
A more common word for brocade is Nishijin-ori, which just means “weaving from Nishijin”. Nishijin is the current center of brocade production in Japan, where it was established after the end of the Ōnin War (1467–1477).
Currently, Tatsumura is the leading producer of Nishijin-ori. They actually made reproductions of Nara brocades as well as creative modern designs. To purchase textiles instead of ready made items, you will need to directly contact them. However, understand that they charge prices commiserate with their skill and effort as expert artists and weavers that routinely make textiles for museums and exhibitions. As an alternative, sometimes you can find used Tatsumura obi on Japanese secondhand markets like mercari and yahoo very reasonably. Searching for ‘西陣織’ will also give promising results.
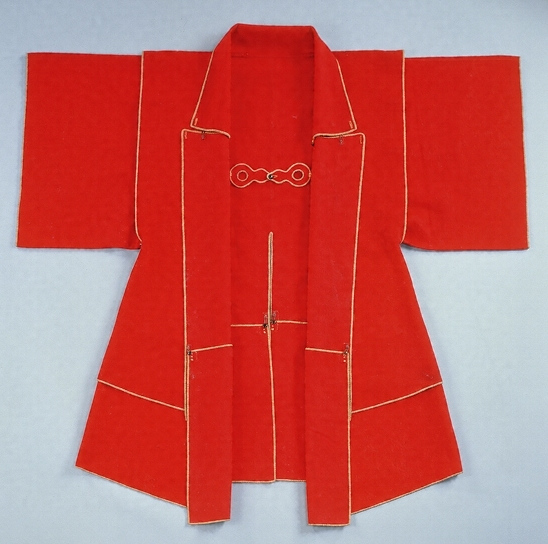
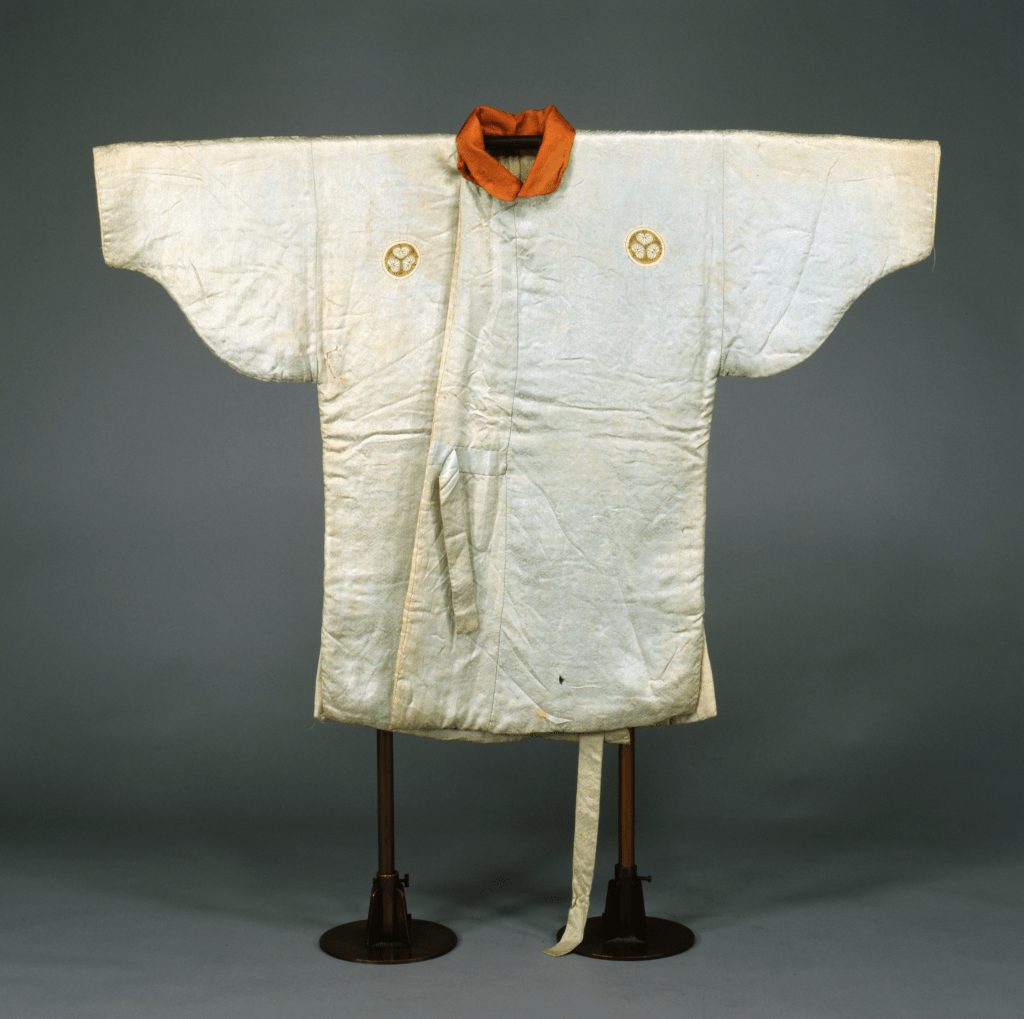
Jinbaori with Kinran Collar Momoyama Period Chido Museum
Kinran refers specifically to brocade patterns made with gold thread. It was brought over to Japan during the Song Dynasty by monks, and came to be used for items such as bags and scroll mountings. Records of production in Japan date back to 1567 domestically. Silk and cotton were both used, as well as a variety of weaving techniques, twill and plain.
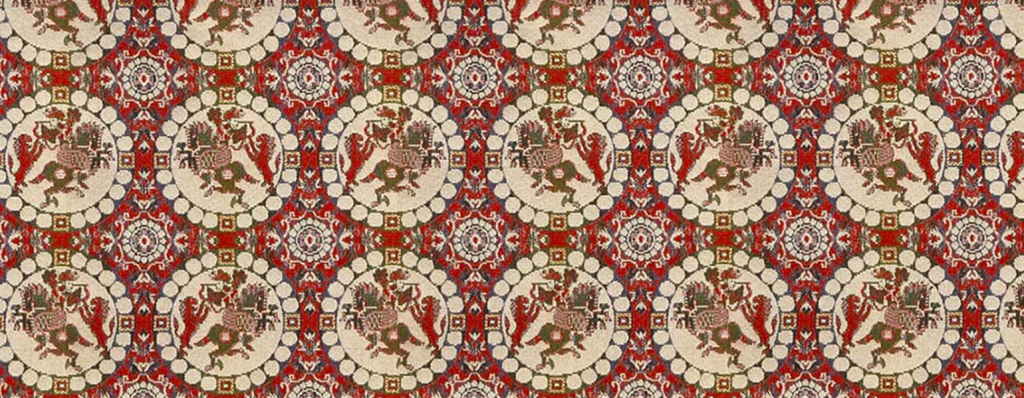
Karaori uses an old word for China to simply mean “Chinese weaving”. The same kanji is used to denote other things imported from China, such as karakusa – an arabesque pattern, which, ironically, came to Japan through China from Greece, and karabitsu -a type of footed chest. Karaori is sometimes also used to refer specifically to the sort of floating twill weave that is used in yusoku (有職) textiles, commonly seen in Heian courtwear.
This is a silk fabric that uses a 3×1 twill structure (triple weft threads) with raw silk in the warp for the base cloth. The decorative weft threads float between these threads to create patterns that are raised, giving them the appearance of embroidery. This sort of triple twill is also sometimes called fusen ryo (浮線), especially when it features a roundel pattern.
I am often asked where one can obtain Heian court textiles specifically for garments like juni-hitoe. The answer is, unfortunately, not simple. It is actually quite easy to obtain the fabric on a smaller scale for dolls, but there’s almost no large scale commercially available beyond what Tokuan offers in basic rinzu. It seems the costume shops that make Heian attire have private relationships with the weavers, and they are probably often choosing synthetics (because it is more practical for their needs). If you are willing to pay custom order prices, it’s probably worth contacting one of the following stores about your needs: Kyoto Shioya, Shouzukuten. You might also consider ordering custom digitally printed silk with the patterns. It will look close and be considerably more affordable.
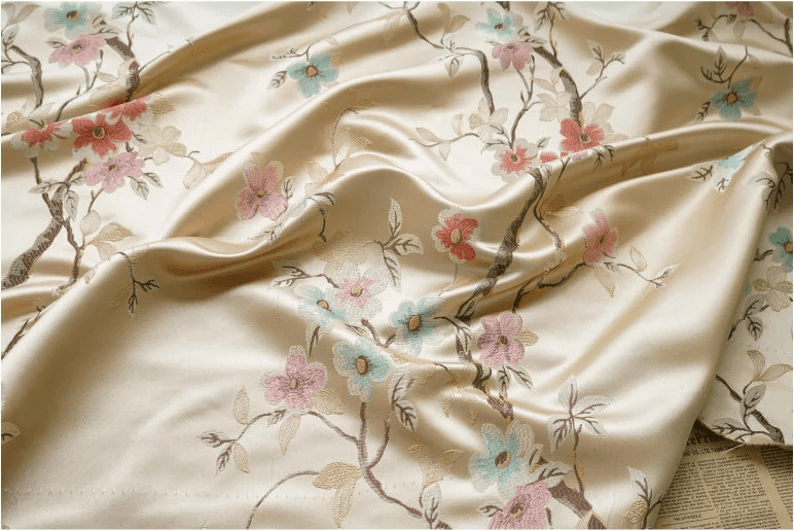
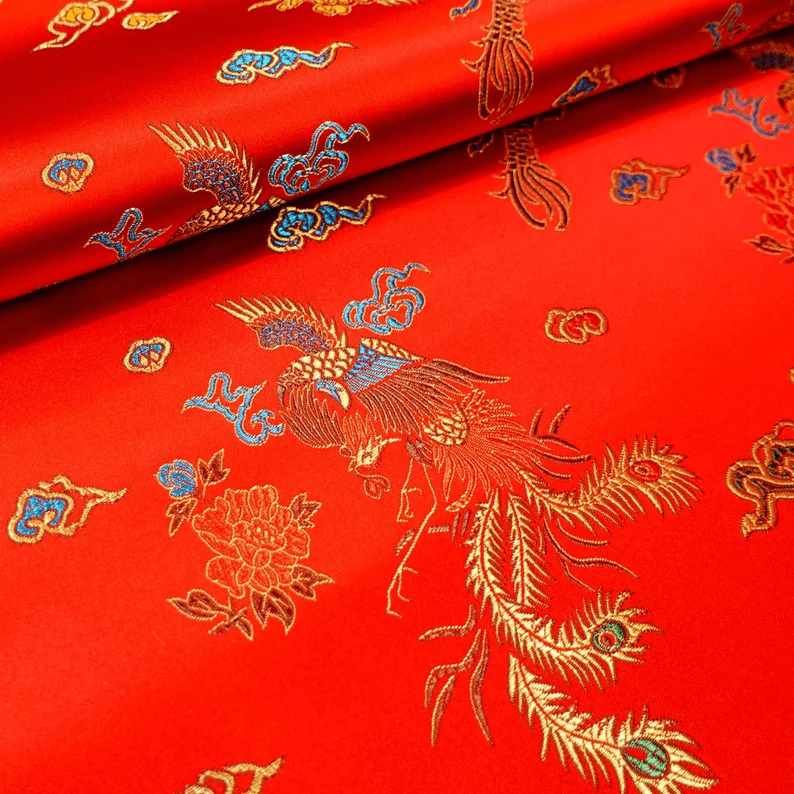
For later period personas or for people who don’t have several thousand to spend on fabric, there are a lot of nice silk brocades that fit the bill. One thing I want to caution is to stay away from modern cheongsam style brocades that look like they might be medieval Japanese style, but are very modern (and often Chinese). Here are some examples:
Try to spend some time looking at period brocades in museums and online before making an expensive purchase. There are quite a range of options, and it’s a period behavior to use Chinese patterns as well, just like with rinzu.
Brocade Shopping & Substitutes
It’s very difficult to find affordable pure silk brocade in period styles. It does exist, but most commercially available silks are rayon or polyester blends. Check fiber content diligently if you need pure silk, and don’t be fooled by terms like ‘art silk’.
Direct Shipping To US
Poppy Lollipop – Mix of Silk and Synthetic Blends Forest Fabrics – Mix of Silk and Synthetic Blends Indian Laces and Silks – Mostly Indian designs, but some of the geometrics are really good matches. Indian textiles were sometimes imported, but be judicious with your pattern choices.
Japan
Aside from Tatsumura, discussed above, Tokuan is the biggest manufacturer, unfortunately, most of it is polyester, but it does come in a wider width. I linked to the ‘festival cloth’ section, which will be scaled for costumes, but there is a seperate kinran section and a pure silk section – it’s pretty expensive. Rakuten has other options. Check the size of the pattern before you order. Brocade is a popular fabric for doll clothes, so many of the patterns have been scaled down from their medieval size.
China (TaoBaO)
China is a really excellent option because of how much pure silk is available at very reasonable prices in comparison to Japan and India. The patterns are also often historical matches or very close. This search should also help.
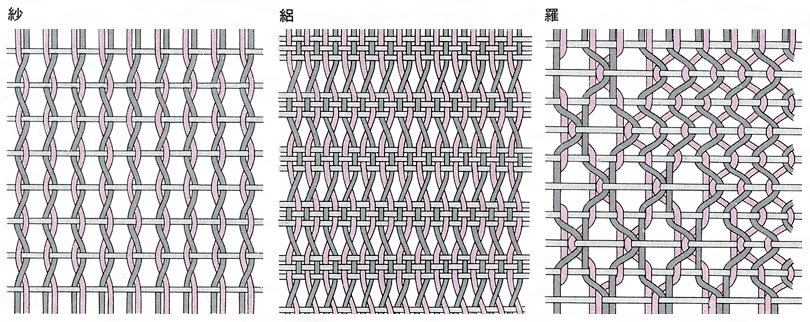
Sha is the simplest of the three light weaves. Its name literally translates to “gauze” It is a thin silk fabric that creates a gap by intertwining two adjacent warp threads with one weft thread, alternating the left and right threads. It’s important to note that sha can be patterned, but it’s patterned like a gauze, not like a net (that’s ra), and the distinction of striped sha is ro, discussed below. You can view closeups from Senshoku Bunka. It is very hard to find surviving sha extants, so please take a look at the modern examples.
I hesitate to recommend fabrics like organza and chiffon, because despite being thin, they have a very tight weave, and so I don’t believe they will really be as cooling in summer as true sha. However, they are a very affordable substitute, and widely available. Just be aware that it may not be as cooling as the real thing. Organza will be stiffer, and chiffon will be drapier. Choose the right fabric for the garment you are making. If you are wanting something vegan, try for a very low gsm bast fiber or cotton voile, or rayon organza or gauze.
Occasionally you will luck out and find a nice jacquard organza, but the prices are usually not affordable, to the point where ordering from Japan looks economical. There are some etsy sellers selling Chinese sha that have very period fabrics. These are often clones of taobao stores, so you’ll pay a premium for the convenience of etsy.
Japan
It’s actually not too hard to buy real sha overseas, it’s just not imported at all do to low demand. Once again, you will need to use a proxy service like Buyee for Japan or PandaBuy/Parcelup for China.
Again, Tokuan has a good selection of wider widths, but they’re mostly polyester unless you click in the ‘pure silk’ section, where there are a few. You can shop rakuten for bolts as well as yahoo auctions and mercari for deals on used bolts. Please be mindful of bolt widths for your garb and select appropriately.
China (Taobao)
The real deals, however, are on taobao, and there are quite a lot of them. Below are some stores that have good stock with period patterns, and then also this search and this search are helpful for finding more.
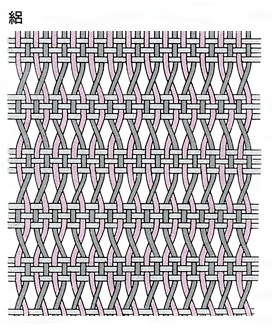
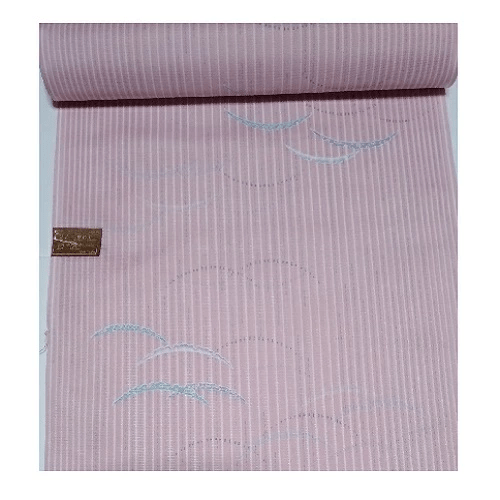
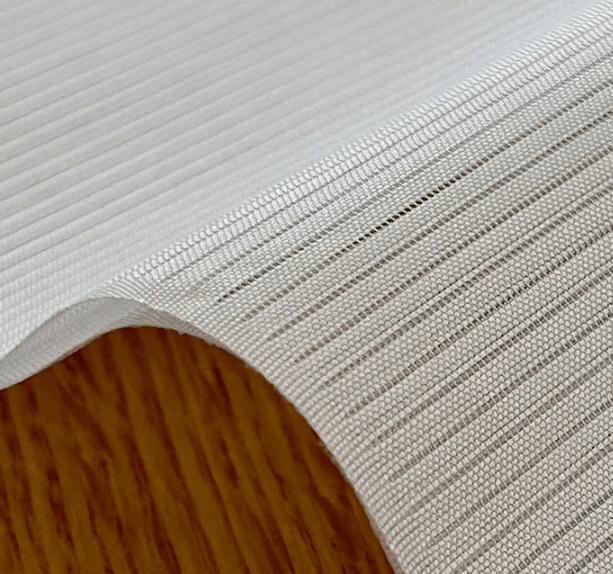
Ro uses a weaving technique similar to sha, only it leaves gaps inbetween multiple threads to create a striped effect. Ro can be a horizontal or vertical pattern. Horizontal patterns were very popular in the Muromachi era, but ironically, the only surviving ro garment I can find uses a vertical pattern!
Both vertical and horizontal ro are available today commercially in japan for summer kimono. It’s quite popular.
vertical modern ro RakutenHorizontal Modern Synthetic ro Rakuten
Ro Shopping & Substitutes
Direct US Shipping Options
Ro is such a specific weave that it’s very hard to find in the west. I once found clearance designer shirt fabric at FabricMart that happened to be ro, but that’s not a reliable occurrence. Searching for ‘striped silk organza’ will get you things that look like ro, but they won’t have the same gauzy characteristics as ro, so you probably still overheat in them if you wear them in high summer.
If you are looking for vegan options, try searching for ‘striped linen gauze’ or ‘striped cotton voile’ will yield some results, as well ‘striped cotton dobby’.
Japan
The shopping situation for ro is a little bit more difficult than sha, because it’s only really sold as kimono bolts in Japan. Tokuan doesn’t carry anything. So, again, you can shop rakuten for bolts as well as yahoo auctions and mercari for deals on used and new bolts. Please be mindful of bolt widths for your costume and select appropriately.
China
China has a similar fabric to ro, which is actually what looks like a ra that is striped. I’ve found it for sale both on taobao and aliexpress from the same vendor. The nice thing about it is that it appears to have airgaps, which will make it cooling, and that it comes in 70 cm widths, which means it can be used for most people’s yuki without piecing. You can use the leftover edge for your okumi and collar :).
Ra is an open weave textile with a net-like appearance. It is woven using raw silk or half-raw silk, which is silk with about half its sericin removed. Each warp thread is intertwined with its adjacent warp threads, creating a net-like appearance. It originated in China and was introduced to Japan around the first half of the 4th century. Production began in Japan during the Asuka period. Its production began to decline during the Kamakura period, and stopped during the Muromachi period. Sha and ro, introduced from the Ming Dynasty, replaced it.
Ra is a very labor intensive fiber to produce, though it seems there must be some modern innovation because there is a Chinese weaver making it at industrial scale.
There are a few people in Japan who keep alive the tradition of ra weaving. Takeshi Kitamura revived the practice, and has passed it down to others. You can read about their stories here and here. Here is a video of ra being woven on a modern loom.
Ra Shopping
There isn’t really a substitute for ra, and it’s almost nonexistent in the modern west. So, there are two options for purchase: buy a kimono bolt for thousands of dollars from one of the surviving Japanese weavers, or buy from a chinese supplier where it is about $50/meter.
The Japanese weavers are weaving at standard kimono bolt widths, so please keep that in mind. Even used, the bolts might be very expensive.
Japan
With all of these stores, please check the textile. Sometime sha or ro is listed as ra incorrectly. Look at the product photo carefully.
The one chinese supplier I could find is here. In mainland chinese, ra is written with the simplied character ‘罗’ (luó). Look for fabrics with the character 罗.
麻・Asa ・Bast Fibers
Ramie and hemp were staple fabrics in medieval Japan; it is posited that ramie was more common than hemp, but it doesn’t seem to be a settled debate. Both fibers were used by both upper and lower classes during the summer, and by the lower classes through all seasons. Because hemp is not very warm, hemp kosode worn through the winter were stuffed with silk if it was available, to add insulation.
Hemp was also beloved by the samurai class for under armor, bathing and activewear, and was frequently stencil dyed in later periods with crests or small patterns.
There are a number of other bast fibers lost to time, made from more esoteric plants such as wisteria fiber. However, linen was not available in this period for Japan. It is a very similar fiber to hemp in both feeling and texture, so if you don’t have any hemp or ramie available, linen is an okay substitute. It is a little less durable and it wears little differently, with minor texture differences. I personally find high quality hemp feels crisper and wears a bit softer than high quality linen, probably due to the fact that hemp can have a much longer staple length. Here is an article explaining their differences.
Bast Fiber Shopping
My page on fabric shopping covers this topic exhaustively, so I’m just going to link my top favorites. I’m a dyer so I buy white fabric, but many of these stores stock nice colors as well, just click around for those options.
Sartor often has a fine selection of ramie fabrics, as does Aliexpress.
綿・Men・Cotton
One of the great frustrations of historical costuming is that the most abundant natural fiber available to most of us – cotton – was not a typical fiber of the period for most garments. However, that is not to say that it was not ever used in period, or that you should not use it.
We began to see surviving cotton garments fairly late in period; later 1500s and Momoyama Era, to be specific. Most of what survives is being used for military applications – jinbaori, haori, dobuku, and then one cotton katabira, which is here.
Motoyoshi Masuda’s Cotton Katabira Momoyama to Early Edo Period Private CollectionCloseup of Cotton Katabira
Interesting thing to note about this katabira: it is sewn selvage to selvage and the cotton is narrow, and so the sleeve ratio is closer to hemp katabira of the time rather than silk kosode. This means, for me, if I chose to make a cotton robe (which I did do!), I would probably choose to sew it based on the katabira layout rather than the kosode layout, unless I was using cotton to mimic silk. For details on this garment, there is a whole paper with its cutting layout.
Cotton usage in Japan was not widespread until the Edo Period. Cultivation began in the 16th century, and large quantities of seeds were brought over in the 1590s. Production began to accelarate, and in the early Edo period sumptuary laws were passed limiting peasants to cotton, bast fibers, and pongee for their clothing. The cotton cloth that survives from before the Edo period was imported from India, Korea, and China in addition to the limited domestic production. There exist records of requests for cotton cloth and pongee from Japan to Korea to for winter military clothing.
Additionally, China produces a silk-cotton blend cloth called oudon (黄緞). This cloth uses silk for the warp and cotton for the weft. It was imported and used for theatre costumes. It was treated the same way as gold and silver brocades, which speaks to its rarity.
So, what garments can you make out of cotton? If you want to be faithful to the fiber usage of the time, use them for jackets, vests and fighting gear. Cotton dobby is the closest match to the striped fabric of the surviving kosode, but you may have to turn the fabric sideways to get it horizontal. Most of the dobby produced now is vertical. However, given that ro comes in vertical and horizontal stripes in period, vertical may have been produced as well; there simply aren’t enough examples to say.
Cotton chintzes from India were also imported, although they would have been a costly treasure. Ensure you’re purchasing historical Indian designs – scattered paisley is a modern pattern, for example.
Finally, silk cotton is a really wonderful textile. Although it was very rare in period, it drapes extraordinarily well, and it’s fantastic for people with skin sensitivity or just summer wear in general. It’s still produced in China, and it’s very easy to find on etsy, aliexpress and taobao, as well as American stores like Mood. Sometimes it is textured and looks like hemp, but even the smooth variety I recommend for linings and underlayers, as well as a general purpose affordable substitute for some of the plain weave silks.
綾織り・Aya・Twill
Twill isn’t a type of fiber so much as a type of weave, so I’m only adding this in here to say, if you did find twill fabric, then yes, that technology existed in period and was used. It’s hard to beat twill for durability and for combat garments because of its toughness and resistant to puncture. If you’re looking for a blessing from someone on making your fencing hakama out of hemp twill, it’s right here.
The most important thing in textile selection, more than historical accuracy, is firstly, your comfort, and secondly, your budget. Never buy a fabric you find uncomfortable, and never buy a fabric you can’t afford, no matter how beautiful it is. Remember: the best clothes feel like wearing nothing but a pleasant sensation.
For your first few pieces, select affordable fabrics you don’t mind making mistakes on, are easy to sew, and not a big deal if you ruin. Once you have learned how to make the garments, then I advise saving up for quality fabrics that last. This does not mean spending a lot of money, but it does mean waiting patiently for the right fabric to come along, or saving money so that you can spend a little bit more if you need something before a special occasion.
Many costumers end up with boxes and boxes of fabric that they will never get around to sewing, and that is perfectly fine. It provides a stash that friends and last minute events can draw from. However, it is much more efficient to simply save the money and buy what you need, when you need it. Do not feel pressured into a purchase you do not need, and do not feel pressured into a purchase you cannot afford because “it’s on sale” or “it’s one of a kind”. If it’s not an enthusiastic yes!, it’s a no.
Bibliography
Almost all of my resources are linked inline, but I used the resources at kotobank and senshoku bunka extensively.
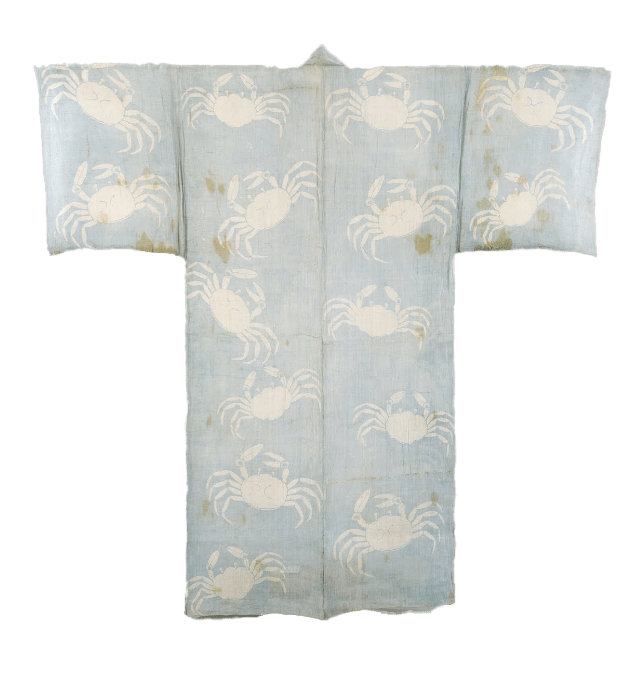
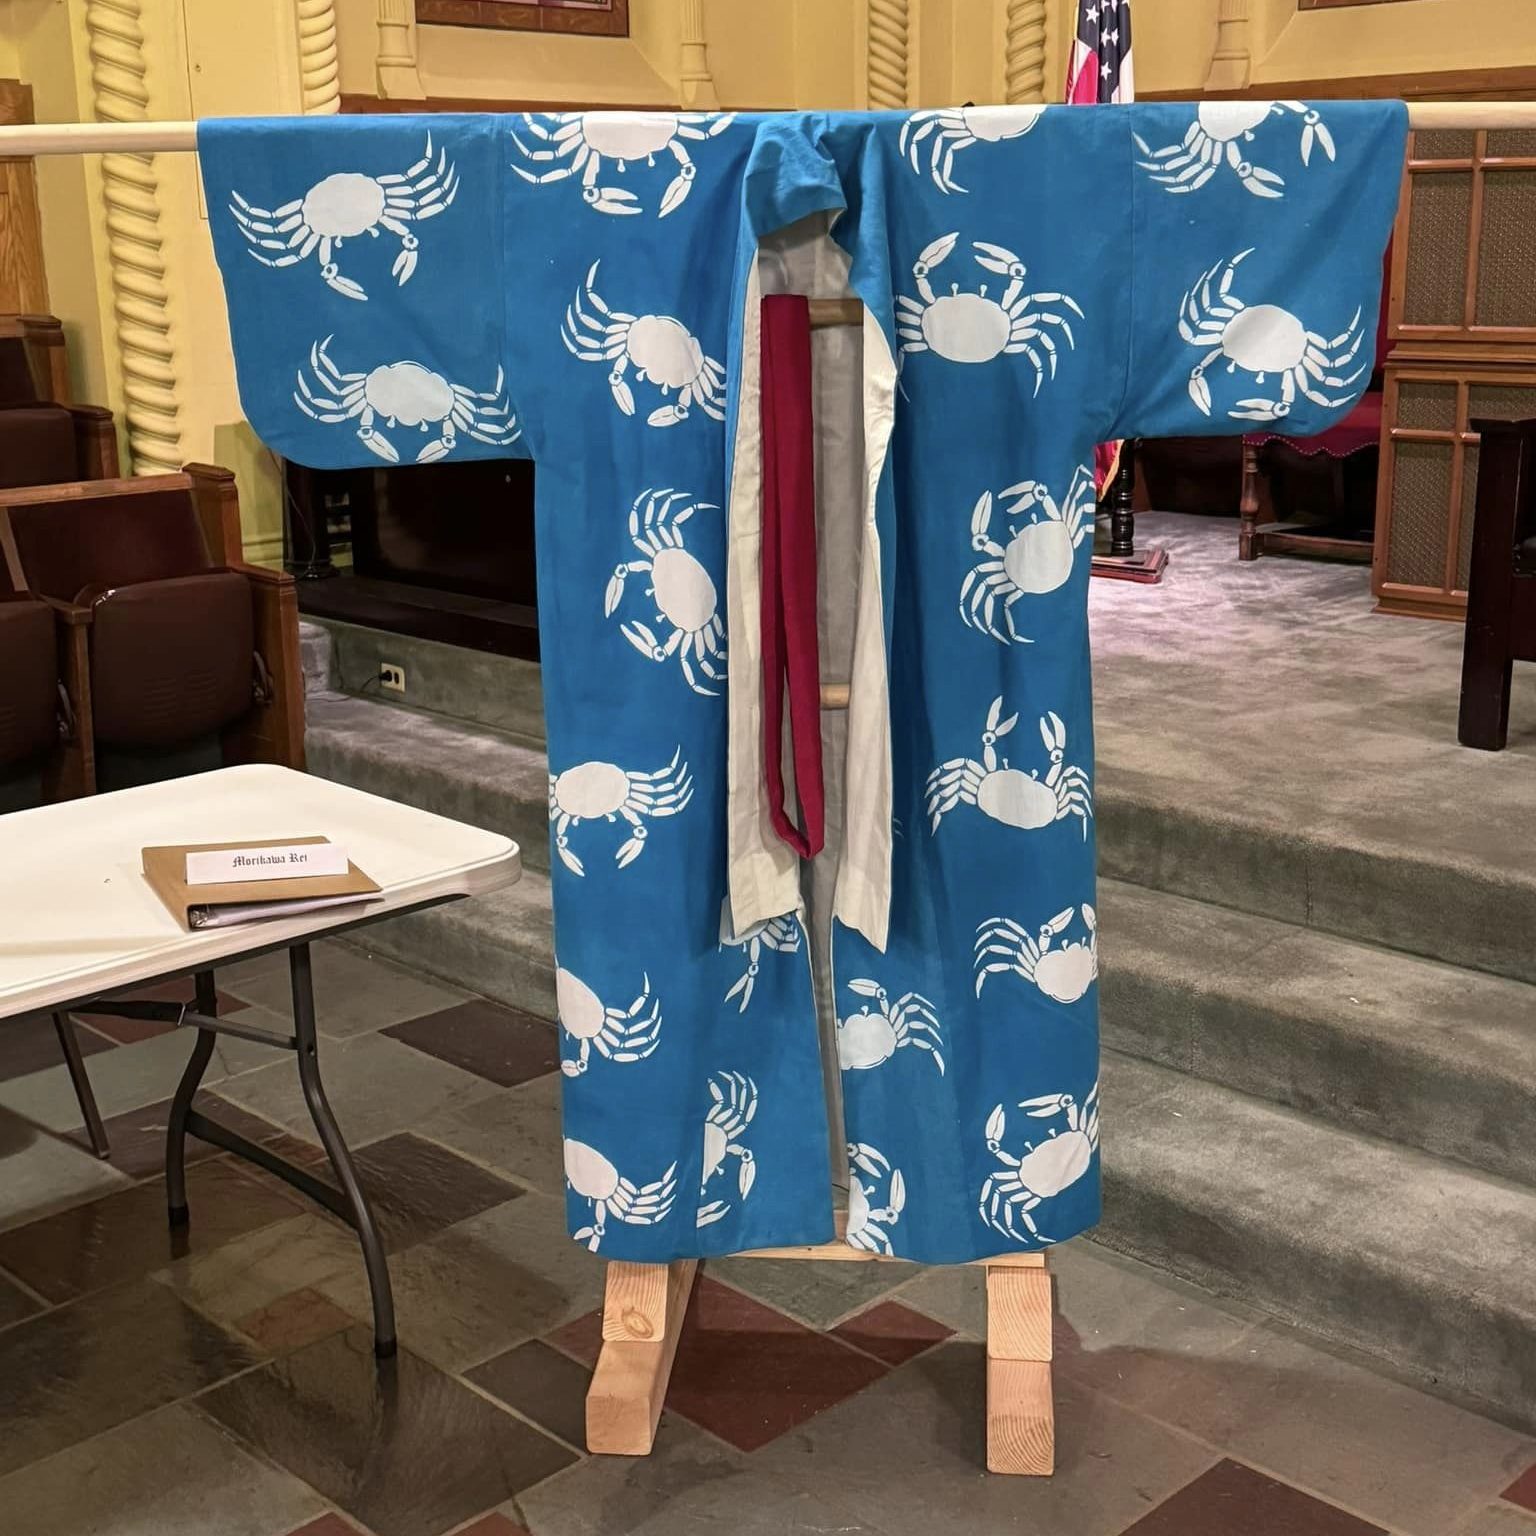
Previously I dyed a bolt of fabric to make a crab kosode, and I detailed my journey in this post: Katazome Stencil Dyeing.
Originally, I had intended for the test fabric for the crab kosode to be curtains. I had purchased cheap $4/yd sheet cotton from Dharma, and I had used a bright turquoise blue that was unusual if not out of period to dye it, because it matched the room. However, when I completed dyeing, the fabric looked better than expected, and my husband pointed all the claw holes from our cat in the current curtains. I had spent a month dyeing this fabric, so maybe letting it get destroyed wasn’t the best option. I opted to make a prototype kosode with it, in preparation for making a hemp katabira with the same pattern.
A kosode is a garment that was a staple of Japanese clothing from the Kamakura period to through to the Edo period. Initially, it was a garment of the common people , but as the warrior class rose to power, the kosode gained favor among them as a simpler garment for attire, and it was elevated with fabrics more suitable to the upper and middle classes.
Commoner Woman in a Kosode with Apron Recreation of Kamakura Era Garb Taken from 写真でみる日本の女性風俗史 : 京都染織まつり記念図録 (1)
Interestingly, because this kosode is intended for a working woman, it has detached sleeves and a narrower profile. It looks more modern than the Muromachi era kosode from a later period intended for a noblewoman. It may have been modified from a kimono for budgetary reasons. The Kyoto costume museum also does this.
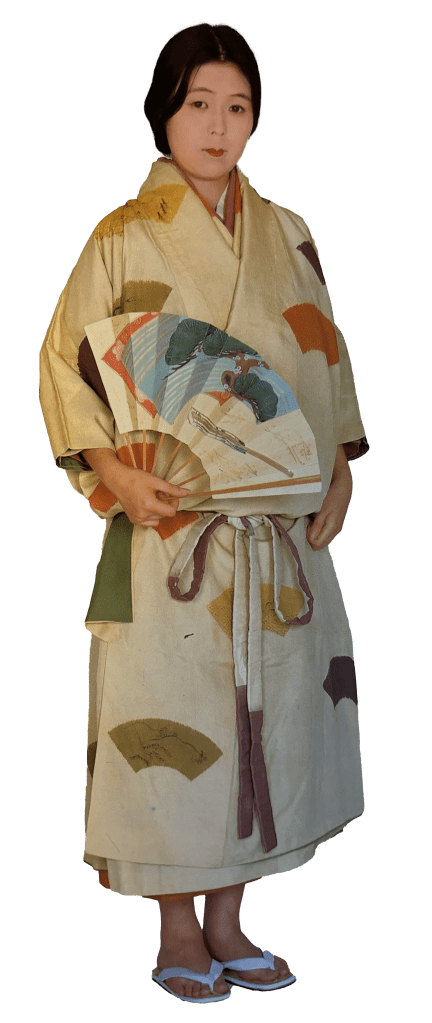
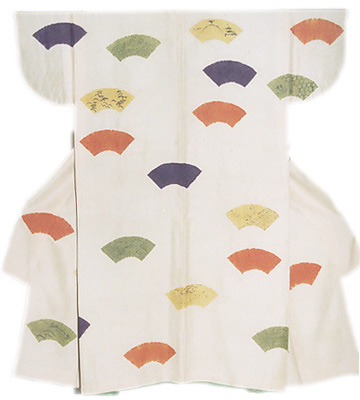
Kamakura Kosode Reconstruction Kyoto Senshoku Bunka Kyokai (2)Muromachi Era Fanmaker’s Kosode Reconstruction Taken from 写真でみる日本の女性風俗史 : 京都染織まつり記念図録 (1)Muromachi Era Kosode Reconstruction Kyoto Senshoku Bunka Kyokai (2)
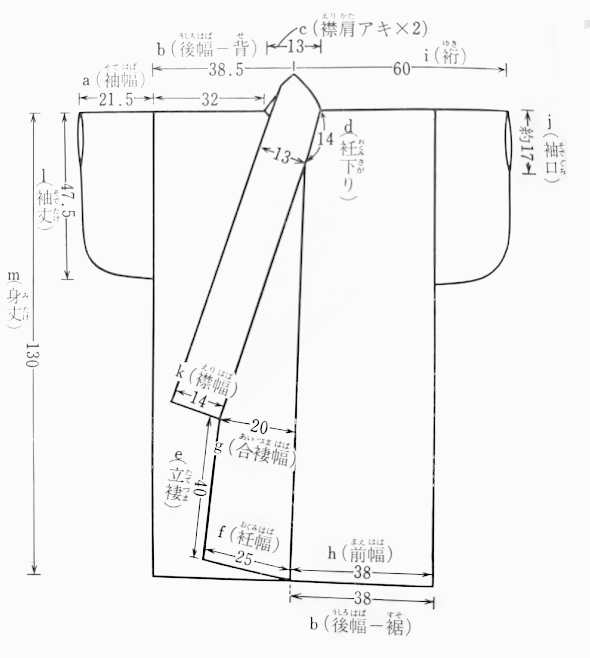
Its sister garment was the katabira, which is a lightweight, and casual garment that has no ornamentation that prevents it from being washed. Katabira are cut differently on the bolt than kosode. Importantly, the sleeves are not cut alongside the collar, but alongside the okumi (small front panels). This makes the sleeves wider, and allows for the use of a narrower bolt in general, but it also necessitates a longer bolt. Here are a representative stencil dyed katabira’s cutting layout and dimensions.
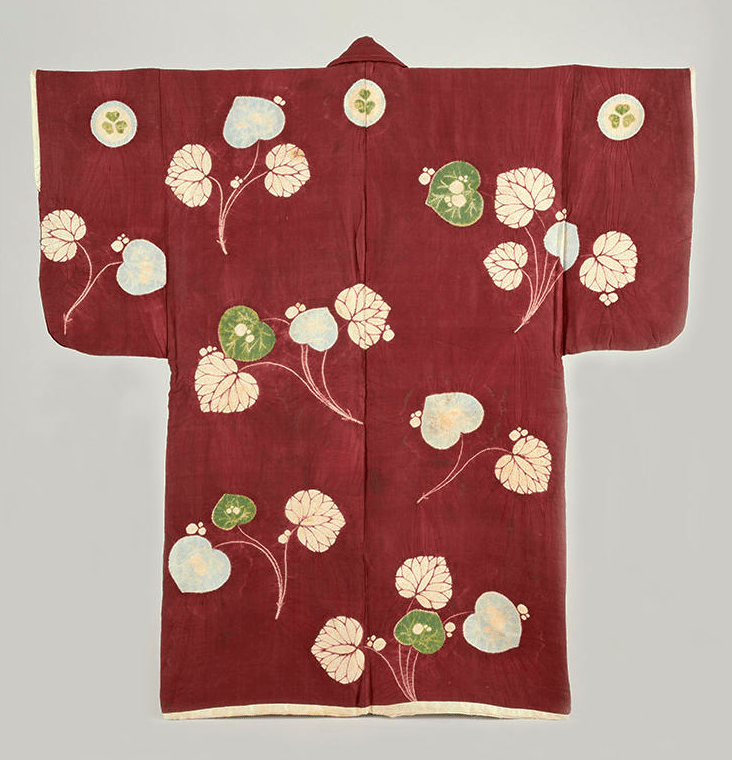
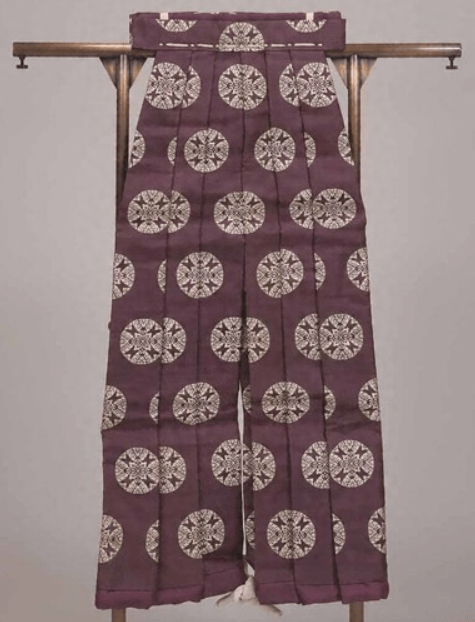
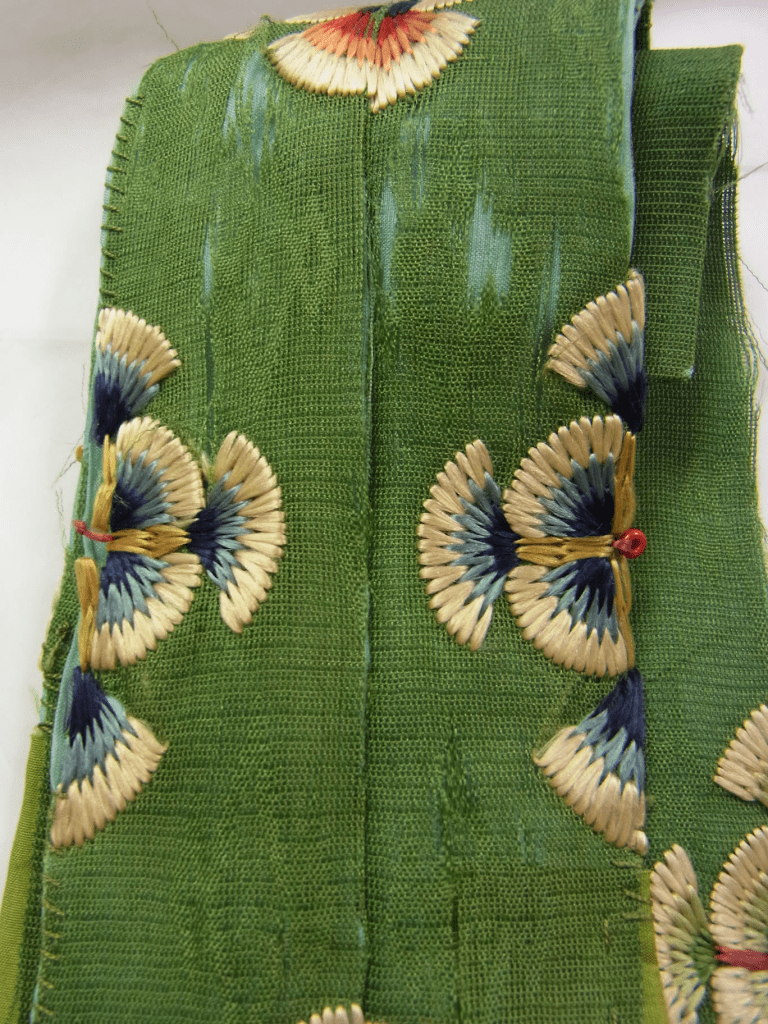
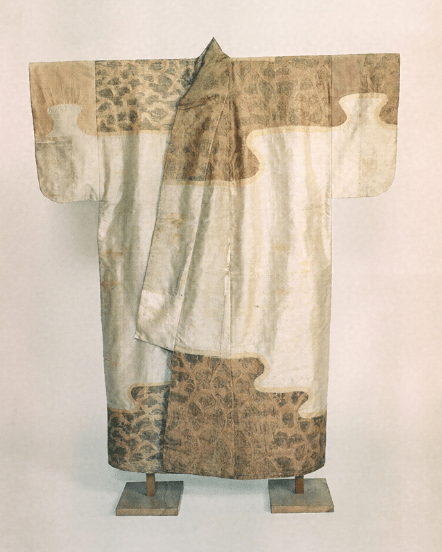
Kenshin’s Yellow Flower Katabira Muromachi – Momoyama Period From Komon, Katazome, Chuugata (Citation 5)Garment Diagram – Kenshin’s Yellow Flower Katabira From 日本の美術 No 67 小袖 (4)Measurements – Kenshin’s Yellow Flower Katabira From 日本の美術 No 67 小袖 (4)Bolt Layout – Kenshin’s Yellow Flower Katabira From 日本の美術 No 67 小袖 (4)
To contrast, here is a representative kosode with its cutting layout and dimensions.
Tsujigahana Kosode 16th Century E国宝 (3)Tsujigahana Kosode 16th Century E国宝 (3)Tsujigahana Kosode Diagram From 日本の美術 No 67 小袖(4)Tsujigahana Kosode Bolt Cutting Layout From 日本の美術 No 67 小袖(4)
When cutting the bolt, two dimensions need to be considered – firstly, that the bolt is sufficient width for the wearer, and that it can be cut accommodate a sufficient length. Upper class kosode and uchikake can be cut where the “shoulder” or torso panel reaches to the elbow. However, lower class and casual kosode very. Katabira dimensions can be a narrower torso with longer sleeves because of their changed cutting method. It’s important to understand that these measurements are not meant to be copied directly, but need to be checked against the wearer’s dimensions and altered as needed. The cut body panel length needs to accommodate the wearer’s height, and the bolt must be of sufficient width to accommodate the torso and length of the arm. It is desirable for the wearer to be able to sit cross legged the traditional way while still being modest, and also for the sleeves to reach the wrist if the garment is upper class and formal.
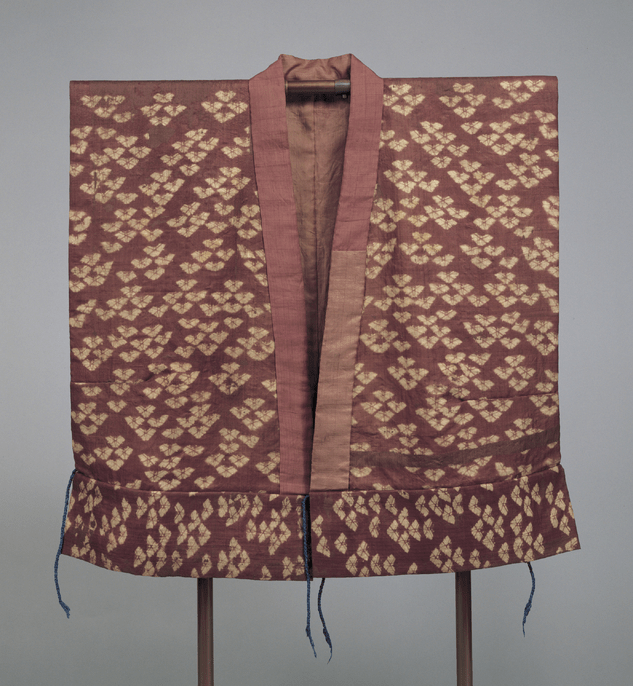
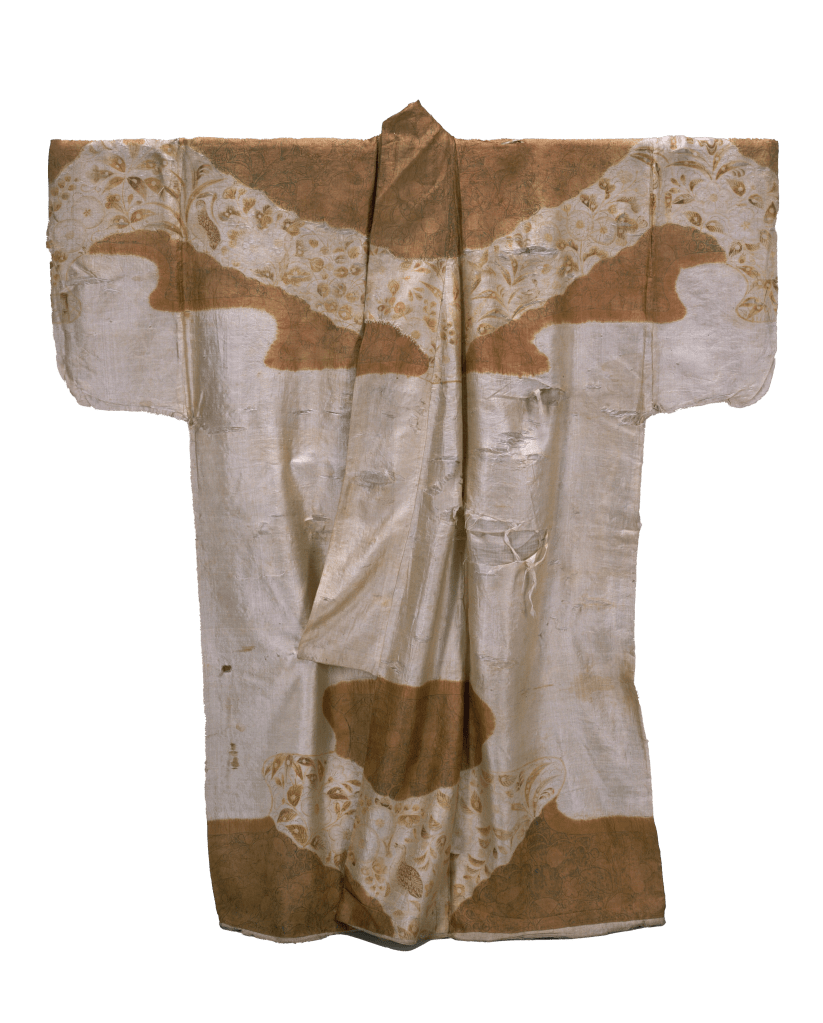
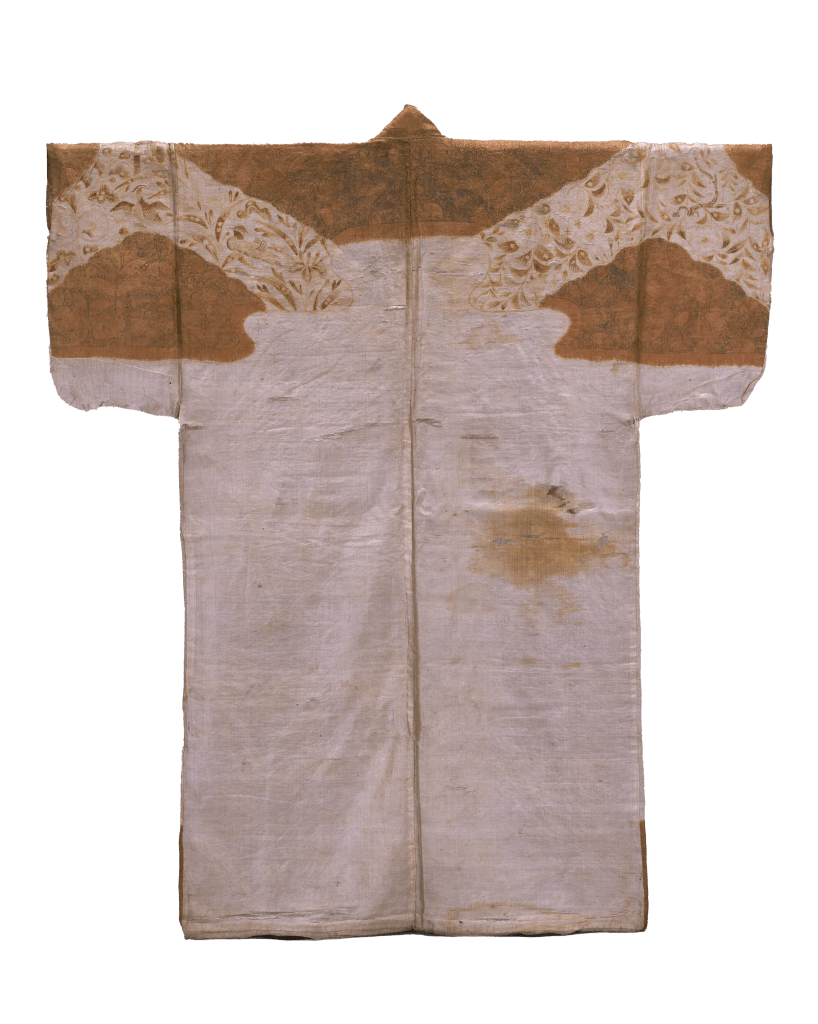
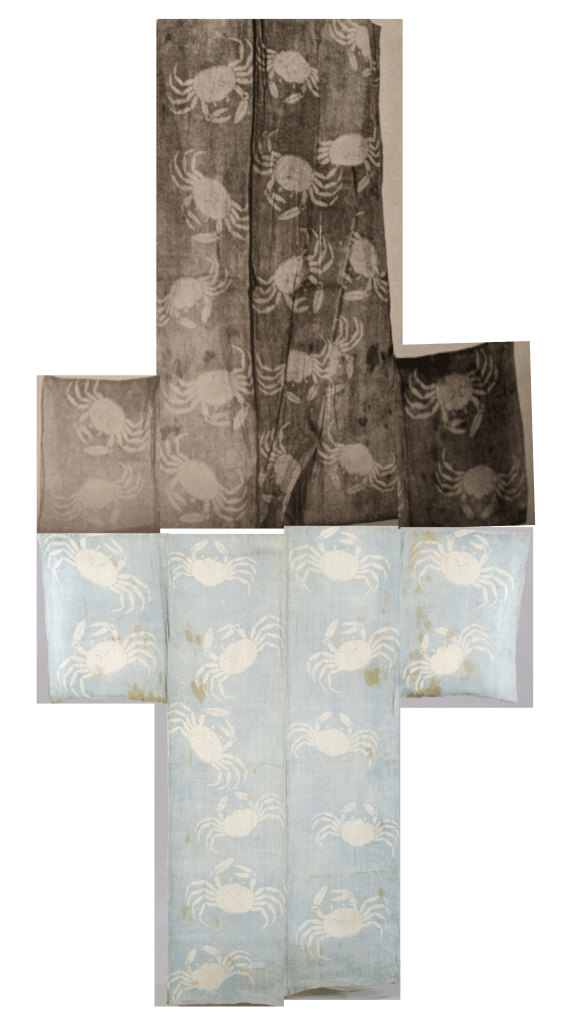
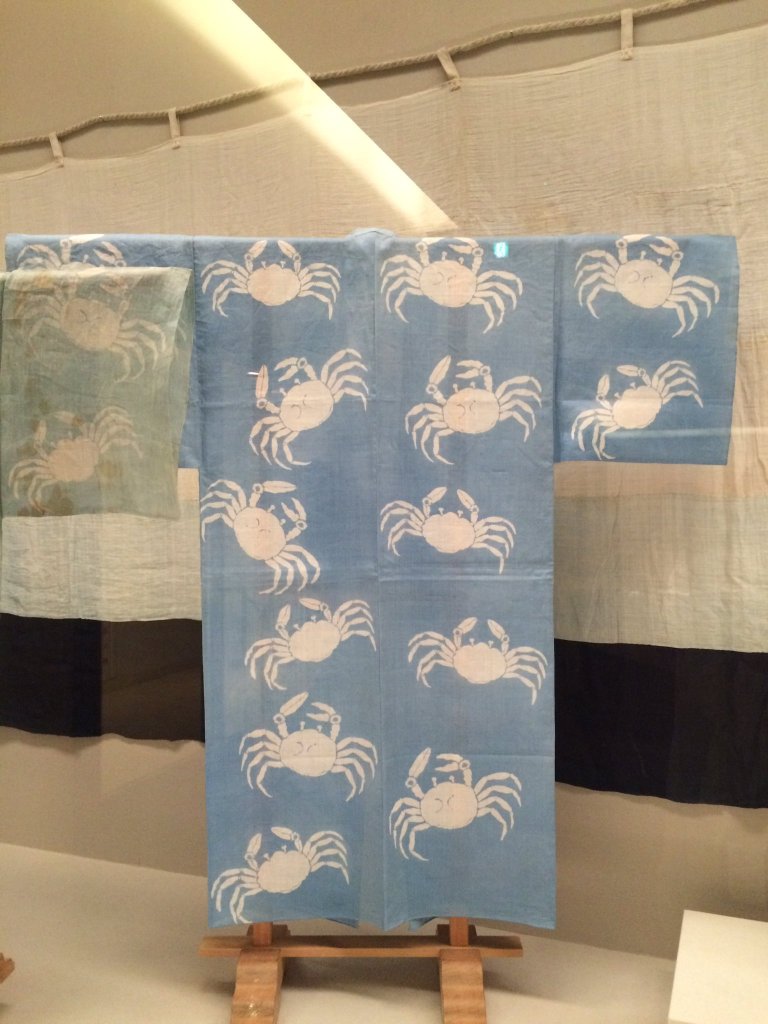
Tokugawa Ieyasu’s Crab Yukata/Katabira Momoyama-Edo period, 17th c Tokugawa Art Museum Accessed at Google Arts And Culture (Citation 11)
The crab patterned robe that I had based my dye pattern on is a katabira, though interestingly many of the books that reference it call it a ‘yukata’. A yukata is an Edo period robe that was used as a bathrobe. Because this crab patterned robe is the earliest example of chuugata (literally, ‘mid size pattern’), the type of stencil dyeing that was used predominantly for yukata, it may be called yukata by a museum even though the people in period would likely have referred to it as a katabira.
It would have been nice to make an unlined katabira, because that is typical for the era. However, the cheap cotton from Dharma was quite scratchy and thick when I was done dyeing it, and it didn’t really seem like something I wanted on me, even with an undergarment. Additionally, the fabric was fairly heavy for a summer weight garment, so it seemed to be calling for a lining. I decided to make a ‘lined katabira’ – that is, a lined garment with a katabira’s cutting pattern. Firstly, I chose to do this to more closely mimic the extant’s external appearance. Secondly, because I really do prefer the dimensions of the katabira’s longer sleeves and slightly narrower body for my own comfort and mobility. And thirdly, because I wanted big sleeves to show off more cute crabs. I imagine this garment with its playful deep ocean motif would look very cool for a summer festival at night, where it gets chilly and it’s nice to have a lining.
Materials
Cotton was in production in Japan in the 1600s, although its usage was more limited than the widespread adoption for everyday garments in the later Edo Period. In the 1500s, it had spread beyond the aristocracy and into military use, particularly for winter garments. Cotton would have been an unusual choice for a casual summer robe – hemp or ramie would have been more typical. However, I test on what is cheap and somewhat close to my goal, and in this case, a loose weave cotton fit the bill, because I was interested primarily in how the dye resist would behave on a similarly woven hemp.
Because cotton was used for the face, the simplest way to proceed for the best result was to choose a cotton lining or cotton thread, so that the drapes and shrinkages would match. I chose a satin batiste cotton from Switzerland for my lining, very modern manufacture, but it feels quite similar in drape, weight, and sheen to silk habotai, and it drapes very well. It also is comfortable on my sensitive skin. As a side note, the batiste cost more than the silk I typically import from China, so I did not actually save any money and will be using nicer fabrics for my test bolts in the future :).
A final note about the dye colors and methods: they are not fully medieval. In fact, I didn’t understand some of the differences until I translated a historical chapter from one of the many stencil dyeing books I had purchased, and was sewing up the garment. In this book, it is mentioned that the crabs are resisted on both sides. That means someone flipped the dried resisted fabric over before it was dyed, and perfectly lined up the crab stencils on the opposite side, and then reapplied the paste. Why was this done?
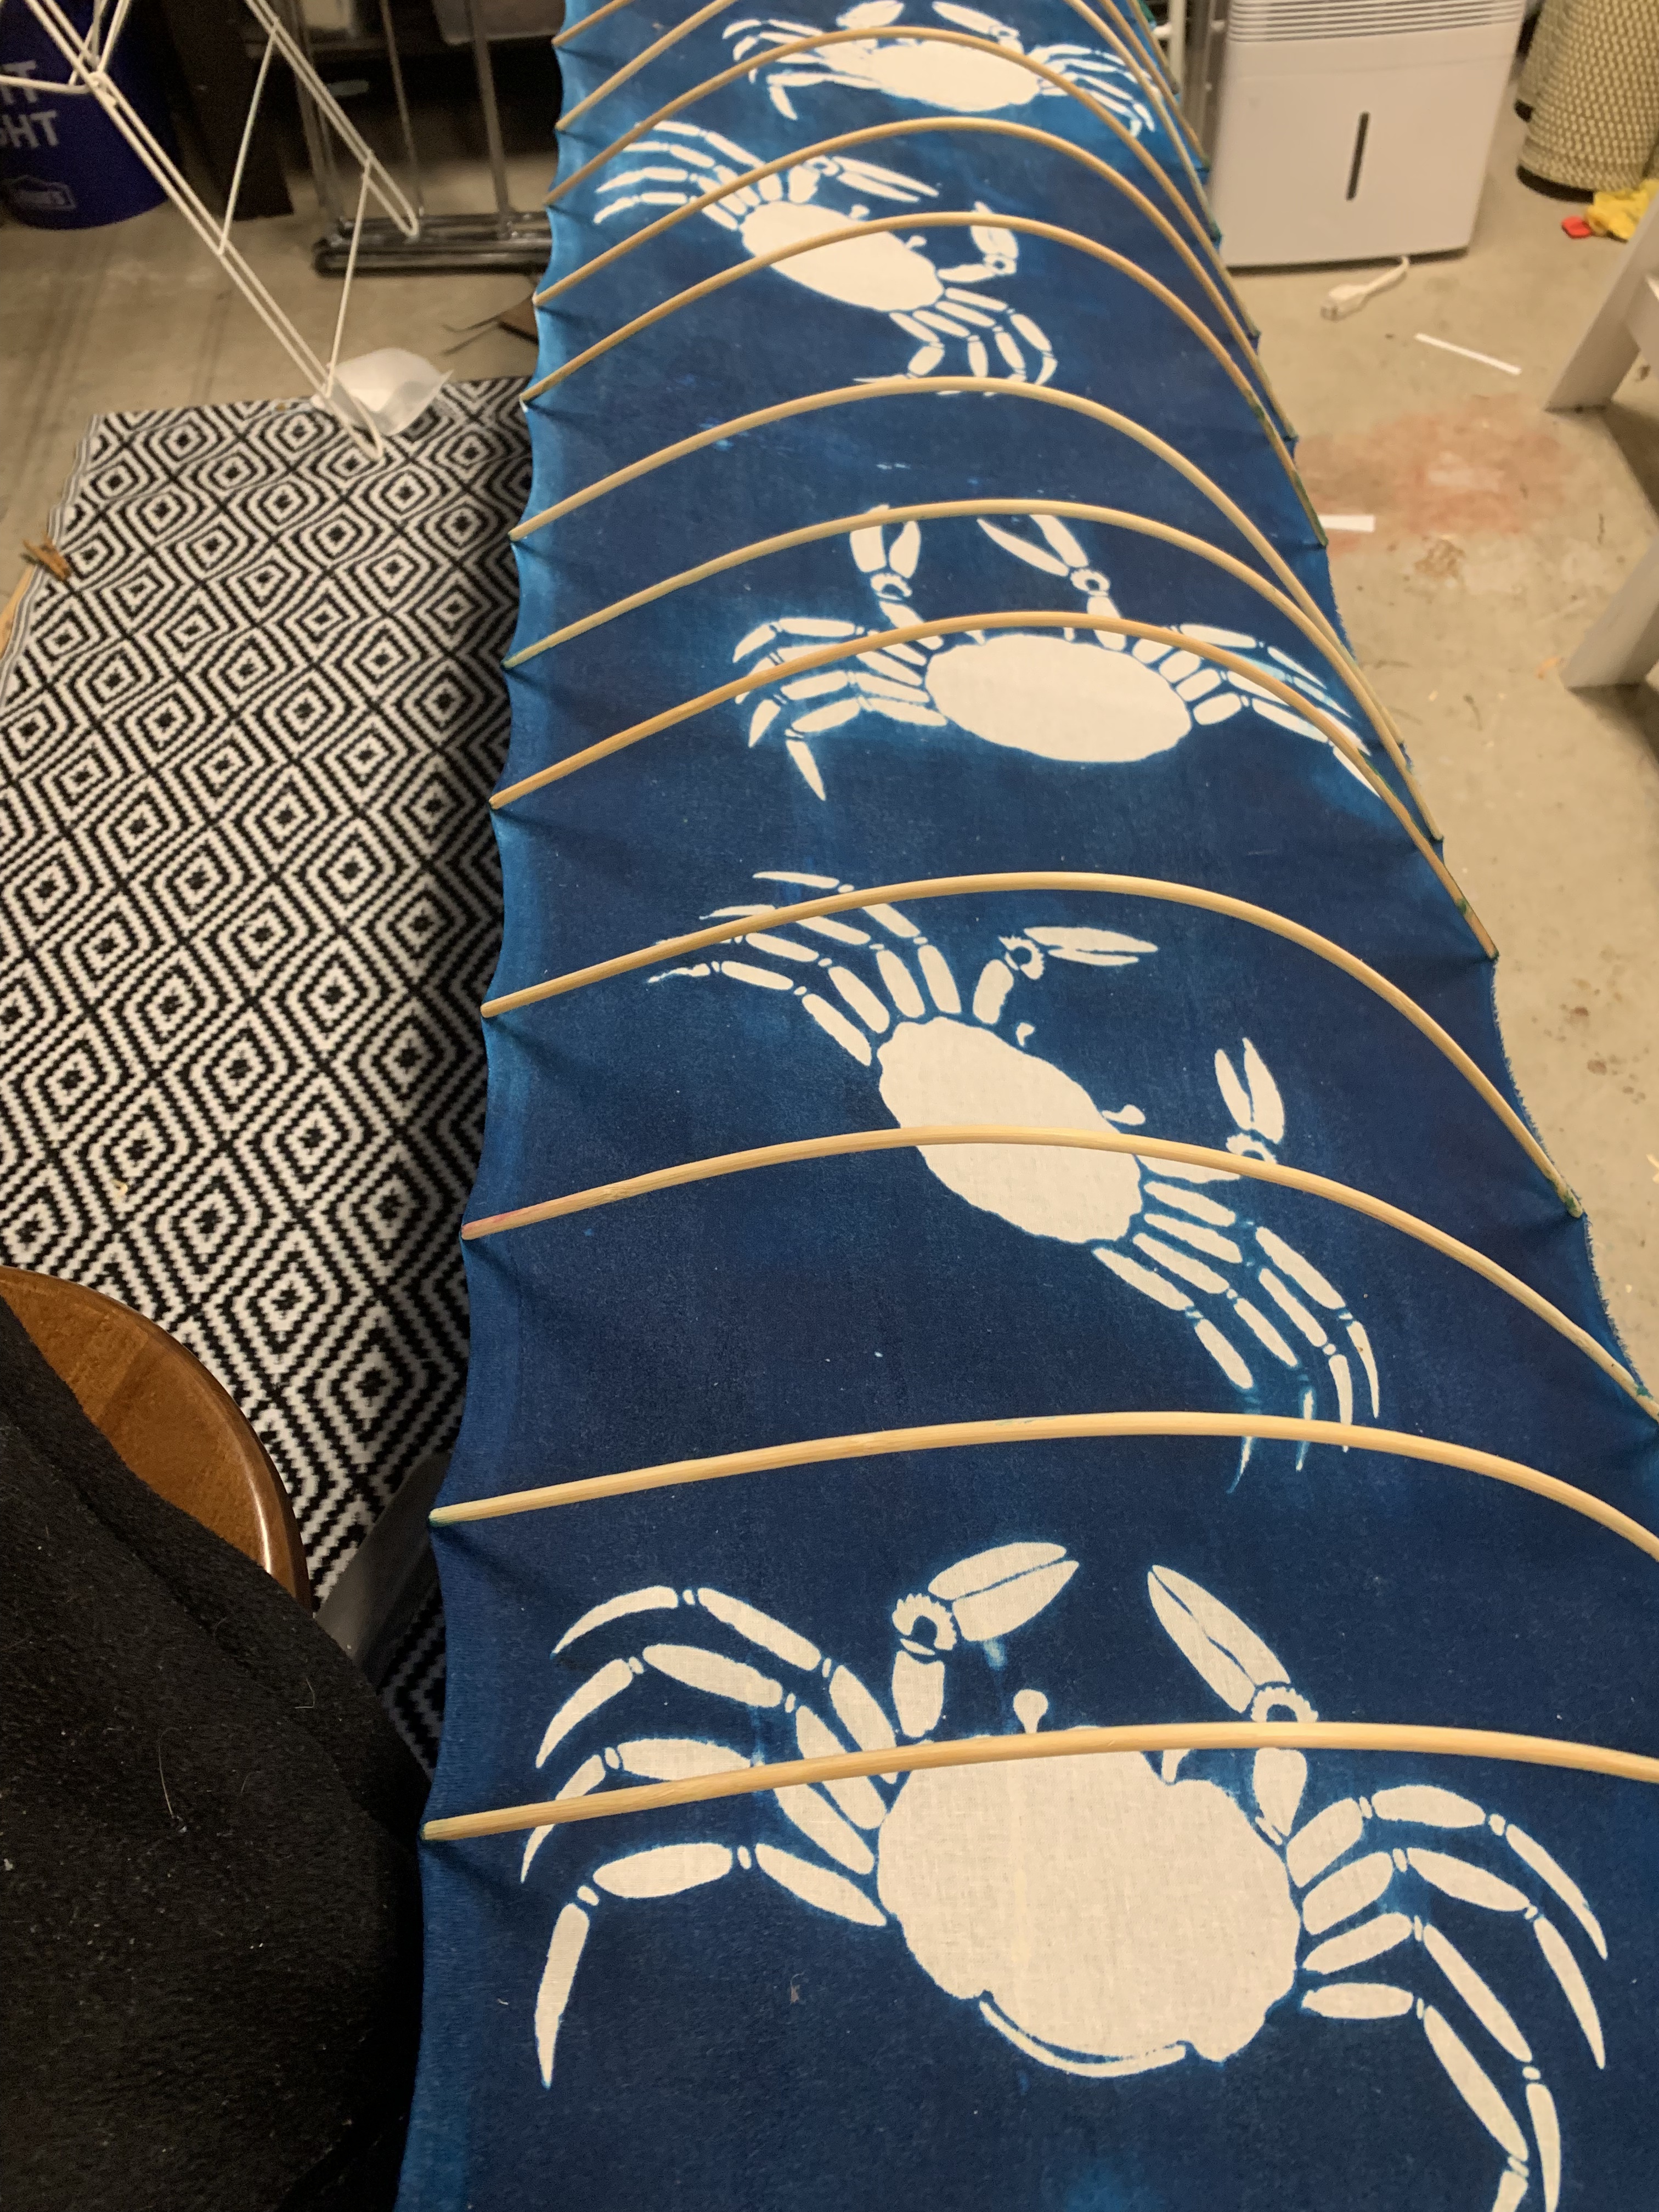
For the original robe, the crabs would have been paste resisted and dipped in indigo. There were only three ways to get blue pigment at this time: dip fiber in indigo, apply indigo with a soymilk binder with a brush, or use a crushed mineral pigment. It is fairly easy to tell from appearance alone that Tokugawa’s garment was dipped in indigo, but luckily the Tokugawa Museum and other historical authors confirm that dipping was the method, so we can be certain. Now, dipping in indigo with the stencil resisted on both sides means the resisted area will get a bright, perfect crisp white outline. If you only dip on one side, you might get some blue in areas of imperfect resist on the opposite, non resisted side. Both options were done in period – one and double sided. But the double sides are particularly luxurious, and fit for a shogun.
Restoration of the Tokugawa’s Crab Katabira Done by the Tokugawa Art Museum Posted on Tokugawa Art Museum Twitter
I, however, used Procion MX dyes. I did this for several reasons, firstly because I had done a lot of synthetic indigo submersion dyeing this summer and I was a little weary of it and the sulphur fumes, but also because I wanted a bright turquoise color for curtains, which is easily and economically achievable with chemical dyes. The second reason I used Procion mx dyes is I feel moderately better about the overall health and environmental impact of the Procion dyes compared to their natural counterparts (natural indigo excepted, although its vat maintenance is its own issue). I’m still learning and researching about this topic, while trying to do the best I can.
Turquoise Colors Achievable with Fresh Natural Indigo on Silk (I dyed this with indigo I grew myself)
The difference between indigo and Procion (and every other natural dye excepting woad and tyrian purple) is the non-vat dyes can be applied with the fabric mounted on the shinshi, and then brushed on. Because the dye can be applied only on one side instead of being dipped, the bright white can be preserved without having to apply the resist on both sides. Now, applying the resist and dye on both sides will make for an especially vivid, and beautiful garment, especially if unlined. However, I chose to line the garment and use a bright chemical dye, so I don’t believe a substantial difference would have been visible.
In the future, I hope to try the double sided technique, but it appears it is something even the master dyers present very proudly, and I understand it is considered extremely difficult even for professionals. It may be a little while. For the next garment, I did a test crab towel of different chemical dyes similar to indigo, to give myself options in addition to natural dye.
Color Test Tenugui
Methods
I used to handsew with great enthusiasm, but I have had 5 nerve surgeries on my hands in the past 18 months, so I now spend my handsewing time very wisely. Rather than feel discouraged by this, I decided to use this project as an opportunity to see how much of the kosode construction could be done well on the machine, so that others with accessibility issues or time constraints could easily sew kosode as authentically as possible.
Layout and Cutting
Japanese kosode and kimono are cut and sewn from a single bolt, also called a tanmono, or 反物. Ideally, the whole bolt is used and no fabric is wasted, just folded into the seams. The width of medieval tanmono is a subject of popular discussion in the SCA Japanese community, with the common assertion that bolts measured up to 45-50cm wide. However, katabira are a little different. Uesugi Kenshin’s katabira, which belonged to a man of considerable means, only measures 35.5 cm wide, and it is not the only one with that width in the collection. What this means to me is that while upper classes often favored styles where the body panel draped to their elbow, that was not the only option, particularly for casual robes. Accordingly, I sized my panels to be a little bit narrower than the average (around 44 cm), because I like to move easily and prefer a slimmer silhouette, and also because it fit the length of my arm.I thought this probably was a reasonable scaling of what a casual kosode would be for a likely smaller medieval Japanese man.
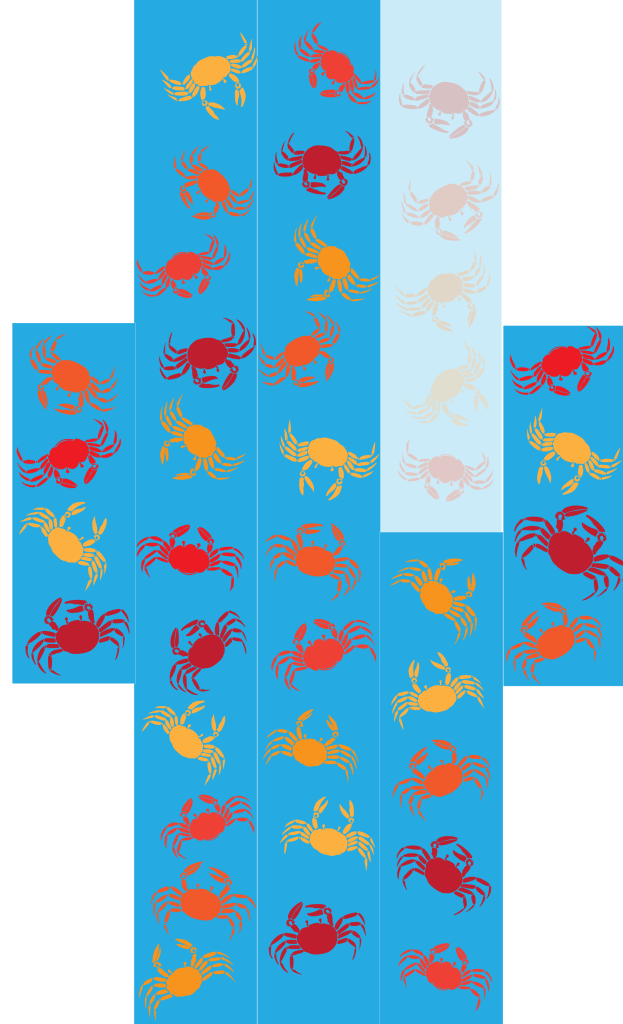
The original extant has a very special layout where the crabs were dyed walking up and down the garment. Because I was making curtains, I did not dye the crabs this way, and so I had to cut and piece my kosode to make an appealing arrangement. The way I arranged the crabs is slightly more modern; it comes from my kimono tailoring book. The crabs crawl up on one side and down on the other. I have prepared the proper dyeing layout for the final robe.
Original Layout of Crab StencilsPlanned Layout of New Crab Stencils for final robeCrab Bolt Cutting Layout
I laid out the fabric on the floor, pulled threads, and then ripped the fabric. I couldn’t find any good documentation of how garments were cut in period. I watched how the professional kimono tailors perform the task with videos, They either rip or pull out a thread and cut as appropriate to the material. I used ergonomic scissors in place of traditional cutting tools like a knife where the fabric didn’t want to rip well. Because I only cut in a straight line, there would be very little difference in the result.
I used the cutting layout for the katabira in Figure 5 to pattern my pieces. One variation is that I actually dyed the collar separately. I did this because I was short on fabric, and I needed to cut the okumi panels side by side instead of next to the collar. As a result, I have a plain collar instead of a collar with matching crabs.
I modified the layout and dimensions for my body size to determine the minimum amount of fabric needed. Because I had ripped the bolt myself, I had the minimum seam allowance (1 cm) to conserve fabric, whereas in period the seam allowances could be larger to tailor the kimono to the wearer without cutting the fabric, simple taking in the excess. However, with vertical integration of bolt production and construction, I could be efficient. I made a mistake and cut the sleeves a little too narrow (there was a lot of dyeing error and I was eager to be rid of it, in period the error would have been folded in the seam and still saved). However, shorter sleeves are still perfectly accurate in period, just not for upper class. I will not trim the sleeve by 5 cm, and my kosode should fit perfectly. It turns out the period practice was the right way, so I will not stray in the future!
Sewing
Research & Background
I referred to several respected books for the sewing of my kosode: 時代衣裳の縫い方 (Jidai Isshou no Nuikata / How to Sew Period Costumes), 資料日本衣服裁縫史 (Shiryō Nihon Ifuku Saihō-Shi / Materials History of Japanese Clothing Sewing). Both of these books present museum extants and then instructions for sewing them. It seems that the authors had unparalleled access to the pieces and were able to take detailed measurements and notes on the construction. Short of being allowed into some of the shrines for private viewing (very hard to do), this is the best one can do.
The books are intended for kimono tailor with professional certifications. It is important to understand that many details of the construction are omitted, because it is assumed that the reader will simply apply standard kimono construction techniques. Therefore, I also used 図説きものの仕立方 ( Zusetsu kimono no shitate hō / Illustrated Kimono Sewing Manual) and 和裁の基本 (Wasai no Kihon/Basics of Japanese Sewing), standard kimono construction books, along with some youtube videos, listed in the citations and appendix, to understand the construction.
I used standard Japanese tools during sewing, including a hera (a small spatula for folding fabric and making creases), a small iron just for pressing seams, a leather ring thimble and accompanying needles from a Japanese needle maker who sells handmade needles. I used the needles intended for use with cotton – they are a slightly different diameter than the silk ones, but otherwise the same.
The basic sequence for hand sewing a lined Japanese kimono is over a dozen steps, and takes a professional about 8 to 9 hours without stops. This is a simplified overview, it takes about 20 pages of detail in a textbook, with special folds and stitches for each step, along with millimeter widths for stitches. The textbooks are actually pretty confusing, with lots of black and white small pictures and a lot of advanced kanji. I spent a long time watching a professional seamstress go through sewing an entire lined kimono as exam practice on youtube. Here is another series of helpful videos that specifically show the sleeves.
(Notice I said kimono, and not kosode, because this is expected knowledge for the kosode instructions, which are mostly just dimensions and finishing details)
Kimono Sewing Steps
Measure and cut. There is a clever folding sequence using the length of the body and the bolt where you simply make cuts at certain stacked foldlines.
Measure and fold all of your important seam locations with the hera, small iron or tacking. Do this for the lining as well.
Sew the sleeves, independent of the torso, tacking down the curve and folding or basting wrist opening.
Join the back seam of the main body panels.
Sew the sides of the main body panels together, leaving a gap for the sleeves (which, since you have already sewed, are easy to measure and make.)
Sew the okumi (diagonal panels) onto the main body.
Sew the collar pieces to torso fabric.
Repeat steps 2-7 in the lining fabric
Join the hems, at the sides and bottom.
綴じ/Toji/ Binding – This is a basting step where the seams are basted together on the seam allowances the make the garment drape more gracefully. DO NOT BASTE THE COLLAR SEAMS TOGETHER HERE, you will not be able to attach the sleeves.
Attach the sleeves. The face is joined together, and then the inner lining is joined along that seam with another seam.
Sew the collar seam allowances together, then the collar sides where it meets the body. Then flip the collar over and finish the collar with a special invisible stitch.
Add traditional white tacking, for presentation, if desired.
Fold and press as needed. Done!
As for an extant kosode, there is an excellent translation of a representative kosode pattern in 時代衣裳の縫い方 by Tsukime Oribe (Citation 7). The only difficulty is that it is for a padded kosode, not one that is simply lined. This means that the internal toji/binding and finishing of seams may be slightly different from how a simple lined kosode would be constructed, but luckily we have a modern guide on those sorts of seam finishes to fall back on. It would be wonderful if there was a plain, lined kosode entry in 時代衣裳の縫い方, but there isn’t except for an “under” kosode, and it essentially reads ‘do the same thing as the uchikake instructions, except the dimensions are different’. Checking the uchikake instructions, which deserve a full and thorough translation at some point in the future, they seem very similar to the padded kosode instructions, omitting the padding part.
The kosode pattern has the following major deviations from the modern kimono sewing sequence, aside from dimensions:
It does not sew the sleeve lining and the sleeve face together when the sleeves are attached to the shoulder, it sews face to face and lining to lining and leaves them separate. This is probably because of the batting, or just individual tailor preference. I own a modern haori that also did not join together the sleeve lining and sleeve face at the shoulder, so I do not take it to be a rule either way.
It has wide collar that is tacked down and folded for wearing – this is not always the case with modern kimono, but it is not the rule either. Hiro-eri kimono (literally ‘wide collar’) follow the same basic construction, but some kimono don’t. Most yukata have a tri-fold collar as well.
It makes no mention of toji/binding on the seam allowances. This may be because of the wadding, but I also saw no mention of it in the uchikake pattern from what I could read (I need to do a formal translation with a lot of time with a dictionary, though). For a regular kosode, it may simply be omitted along with other implied details.
One thing I cannot discuss in sufficient detail in this paper are the basic hand stitches used in kimono construction. The most important one is unshin, which is a running stitch. Unshin is sewn with two hands, the dominant hand holding the needle, while the left hand assists with folding the fabric over the needle. It is blazingly fast in the hands of a skilled seamstress, but it requires a hand posture that is challenging for most people. Even Nami, the professional seamstress I watch on youtube, warns to be careful with how much you do at first, because your hand muscles and tendons have to stretch out a bit to accommodate it.
There are also a variety of invisible stitches, like honguke (本ぐけ), used to bind the collar and finish seams. This site has a good overview, and I like this video for the stitch used to bind the collar. There’s another, harder one, ぬいぐけ, that goes faster that can be attempted as well for other applications.
Methods
After a lot of thinking, I decided I could do everything except the sleeve hem and the final collar finishing on the sewing machine. I wasn’t going to be able to directly mimic all the stitches; I would be forced to substitute machine stitching for Japanese running stitch (unshin). I would also need to omit the toji/binding of seam allowances because it would be topologically complex with a sewing machine. However, it was also omitted in the reference book, so I decided to pretend that meant it was okay, at least for this time.
I also did not press kise (a type of fold which hides the seams slightly) diligently on all the seams, which would be typical for this type of garment. This is because when I have pressed kise on machine washable clothing in the past and then washed it, they have not really stayed and re-pressing them is challenging. Most of my machine washable kimono and yukata from Japan are also missing kise except at the collar and a few other critical places. So I did not overpress my seams, but I didn’t try to have the typical 1-2mm kise everywhere either; I just took a relaxed approach so I didn’t waste effort, because I knew I would want to wash this kosode.
Kosode/Katabira Machine Sewing Method
STep one – Sleeves
Sew the sleeves and their linings with a straight stitch. Machine stitch the curve with a 5mm stitch stitch, pull taut. (I figured this out halfway through, half are handsewn). Press.
step two: TorsO panels
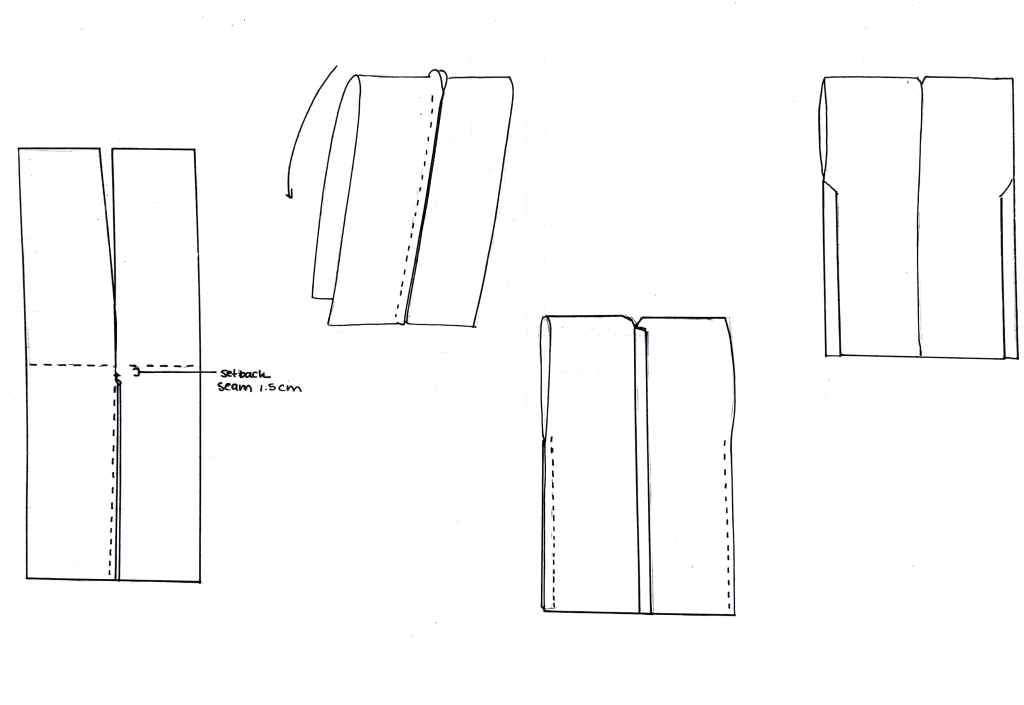
Sew the back seams, side seams, and the okumi together with a straight machine stitch. Be mindful to stop the back seam 1.5 before the center fold. Repeat on lining. Press.
Step Three: Cut Neck SLIt, attach sleeves and Okumi
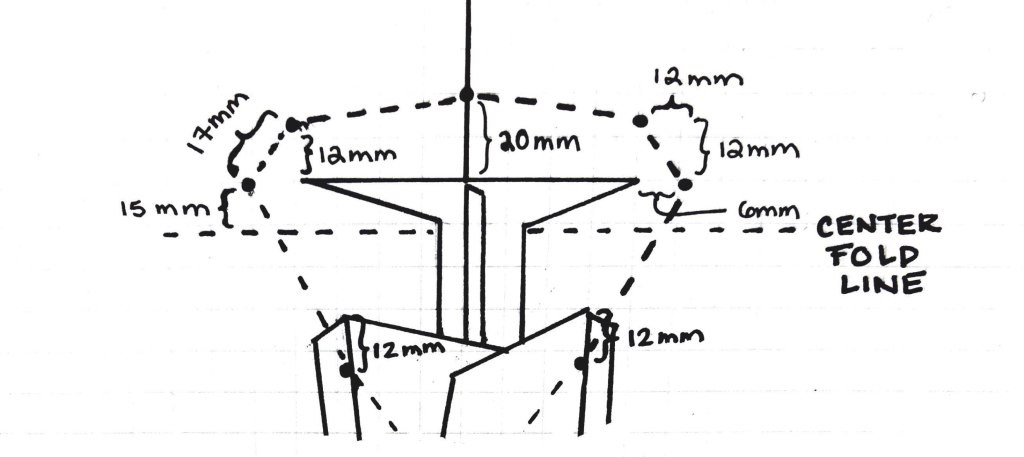
Cut the neck slit – it is on the center fold of the torso panel, and it is cut 8.7 cm deep on each side. You may need to adjust the depth if your neck is particularly thick.
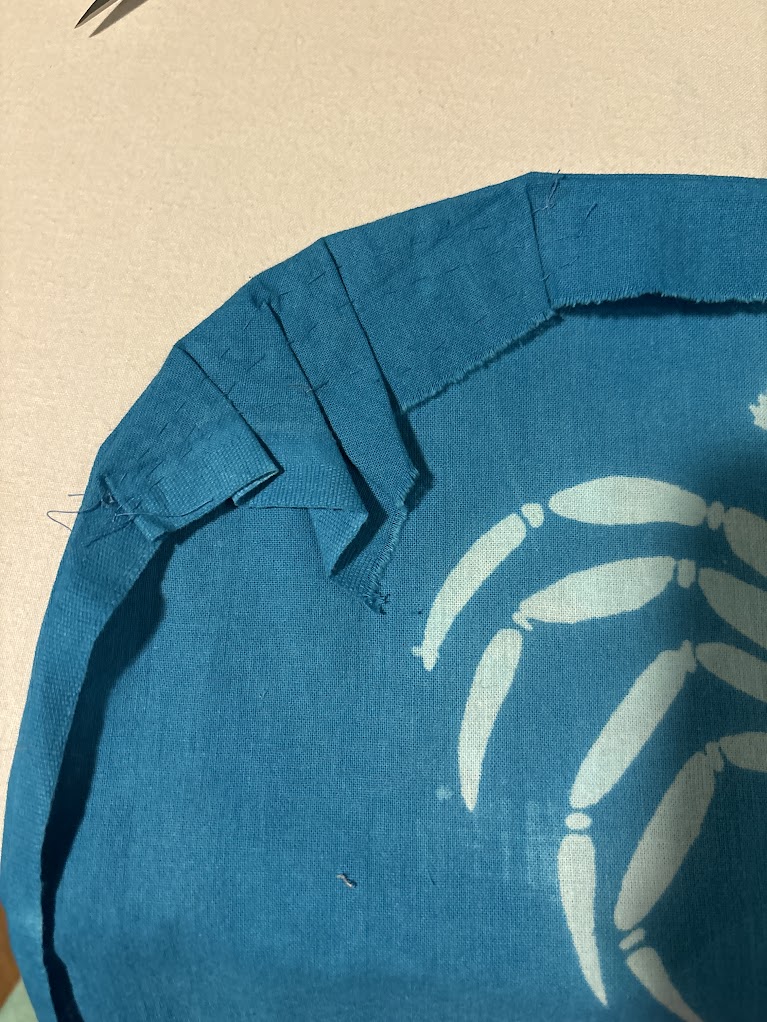
At this point, you can attach the okumi, the small diagonal front panel, which relies on the neck slit for its placement. When attaching the okumi, notice it has two sides – a straight side, and a diagonal side. The diagonal side is on the bias of the fabric and tends to stretch out, so it’s best to sew it to the body panels to stabilize it. It also makes sewing the collar easier if you have a straight woven edge to align the collar with.
However, if your fabric is only patterned on one side, it’s going to need one okumi panel to be attached on diagonal, and one attached on straight edge. Since the right side of the kosode is usually hidden and receives less wear, attach the right side on the straight edge if you have patterned fabric that is not reversible.
When attaching the okumi, it’s not going to match up with the top of the neck slit. Its top edge should be about 10 cm down from the top of the neck slit, and vertical attachment seam should start about 12 mm from the neck slit’s interior stop. This is pretty wierd in text, please look at the diagrams I have drawn because it’s much clearer.
When the okumi is done on both sides, attach the sleeves. Attach the face sleeves to the face shoulders, using the set-in sleeve technique, and then repeat with lining. Set in sleeves are a little tricky at first, but they’re a well known tailoring technique, and I like this this tutorial, so I’m not going to rewrite it. Press really well, because we can’t baste invisibly with the machine.
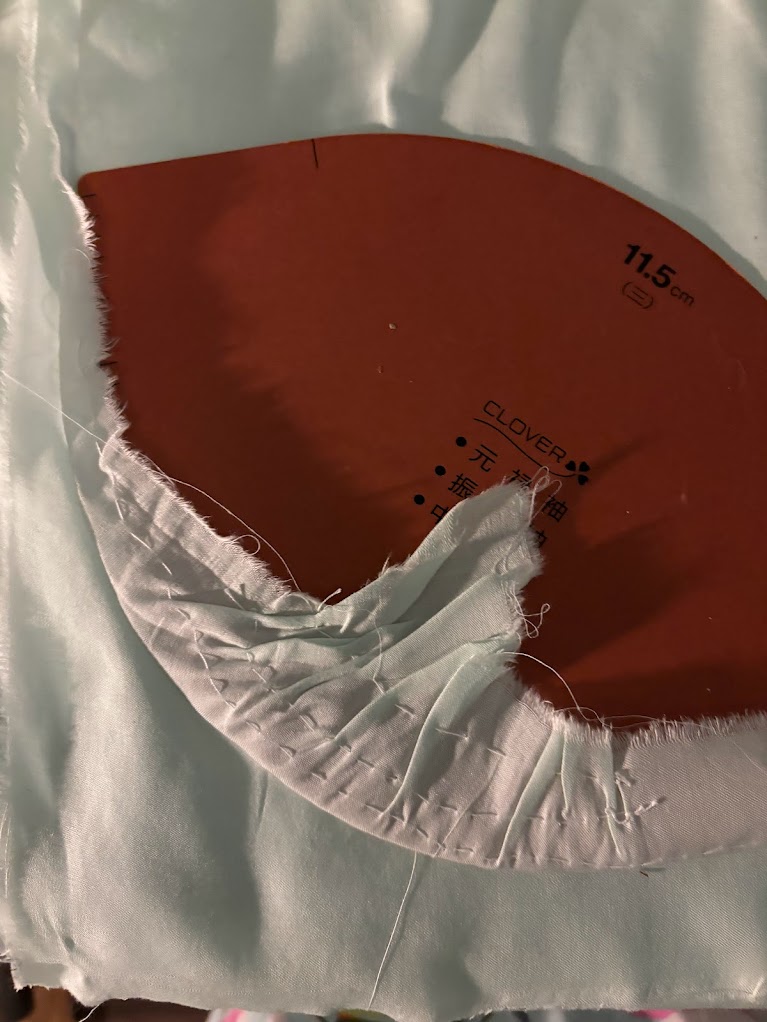
STEP FOUR: BASTE NECKLINE & DRAPE
Now it’s time to put the face and lining together!
Flip the face garment inside out, and put the lining, also inside out, inside of it. For this step, it’s nice to have a long pole or a kimono stand to work on. Baste the neckline by hand; do not attach the collar, simply attach face and lining together at the neck. The basting can be huge 1-2 cm stitches, because the point is just to get alignment. The neckline basting and exact collar positioning are somewhat a matter of preference. For example, some folks cut the neck slit straight on the center fold and don’t set the collar back by 1.5 cm, they just align the collar edge to the neckline seam itself. These are my personal preferences from my modern kimono sewing book, which create a round and full neckline that drapes circularly around my neck. For an exact historic copy of a particular garment, please use some of the books I’ve cited, keeping in mind that garments were sized to the weared.
Leave the garment to hang on the kimono stand overnight to accommodate fabric stretch over time before sewing hem.
Collar basting. Will be repeated again for collar attachment.
STEP FIVE: FInal draping and toji with pins
Drape and pin the entire hem, and up the sides. If you don’t want to pin, you can baste the seams together with a technique called 綴じ/Toji/binding, which is discussed in the kimono books in the citations, Nami’s videos, and also here.
step Six: HEM BOttom and sides
Straight machine stitch the hem and sides together.
STEP SEVEN: SEW THE COLLAR
Remove neckline basting. Flip the garment inside out, and carefully remove the neckline basting bit by bit, replacing with pins and folding the tucked-in neckline out.
Sew the collar and the collar lining to the neckline with a straight running stitch.
Two options for closing the collar.
First, the traditional way: Flip the collar and the collar lining up, fold torso panels as needed, and join with 本くけ・honkuke, or substitute with felling stitch. (depicted)
Secondly, the way if your face fabric is really tough to hand sew:
Sew the collar lining to the collar face, then sew the face and lining neckline to the outer collar. Flip the collar over, and fell stitch the collar lining to the body. If the fabric is thick on the outside and it hurts to sew through it, just sew through the lining as close to the attachment stitching as possible to keep it anchored.
Thirdly, if you can’t or don’t want to handsew at all, only attach the face of the collar to kosode (both layers). Then, fold the collar over and iron it such that you have a 3-4 mm overhang of the collar. Then, pin it from the face side and attach the underside of the collar along the edge of the outer collar seam, with a stitch in the ditch foot. There’s a good video of this process here. This technique is very fast and sturdy, it’s how commercial yukatas are sewn. However, it takes a little practice to get straight lines. Once your seam is sewn, you can hide it on the outside with a kise/fold press of the outer collar edge where it meets the body fabric.
Where to pin the seamline of the collar.Traditional collar attachment and closure.
step eight: Close the sleeves
Fell stitch or honkuke the sleeve lining at the wrist opening to the face sleeve opening.
I folded and tacked the collar for wearing with a few hidden stitches at the top of the neckline, and pressed the garment. Complete!
I used this methodology for several reasons: Firstly, I couldn’t do the toji/binding that helps establish an even drape before the collar is sewn up. I’m convinced that the toji is what allows a seamstress to sew a whole kimono seated, at a table, without needing to stand to drape the face against the lining to check alignment. Accurate measurements at cutting, and folding on the table at the beginning help, but stitching everything up along the length at each panel is even better. To compensate for the lack of toji, I basted the necklines together and draped the garment on a pole overnight, then pinned along the length of each panel before hemming. It worked really well, even if it was time consuming.
I sewed the sleeves before the hem, and the process still worked. I had intended for the attached sleeves to help guide my draping of the hem on the pole, but I don’t think it actually made a big difference. Traditionally the sleeves would be attached after the hem and the collar, but this is really only something you can do easily by hand, because the garment cannot be turned inside out very easily at that point.
Finally, I would have really liked to have done the collar closure and sleeve closure differently. I would have greatly preferred to sew both the collar lining and the collar to the neckline face and lining at the same time, then flipped them both up and done the traditional hon-kuke stitch that is used to bind the top of the collar. Hon-kuke is similar to a felling stitch, but you’re allowed to keep the needle in for longer and it has a different place where the needle comes out to release folded fabric. Instead of a slight zig zag, it runs straight through the fabric. However, the face fabric was really tough to sew through, not my usual preference, and so it was too physically challenging. I consulted with my friend Ian at Royal Blue Traders for something easier that was similar (he is a professional historical tailor who sews for museums). He recommended felling stitch, and it worked really well.
Results, Conclusion, Future
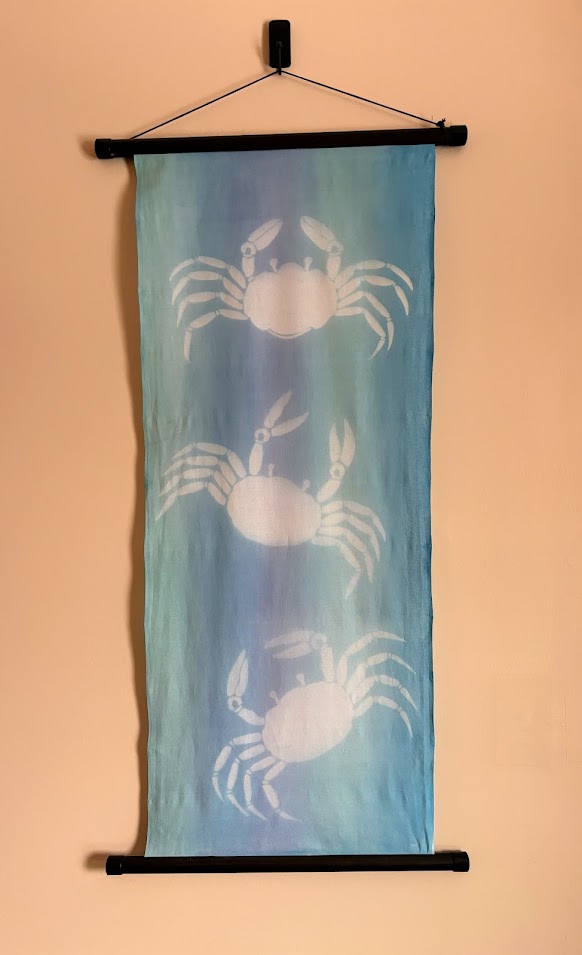
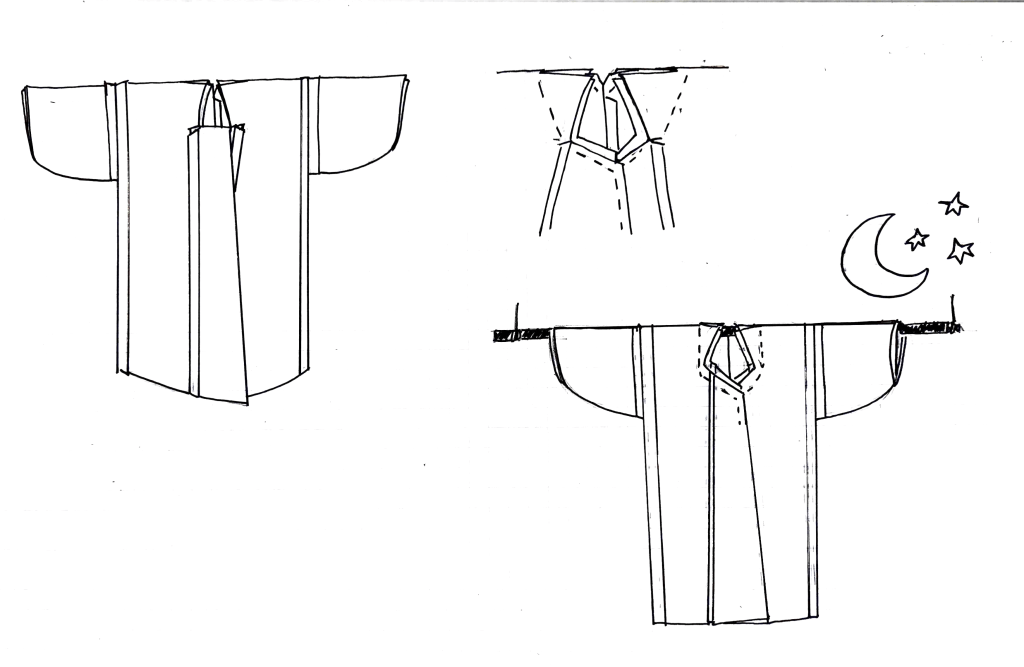
I wore the kimono with a crab mask to a winter masquerade ball, and I was very happy except for the short sleeves, so I felt overall that it was a success.
As a result of this process, I have a set of steps for an accessible sewing process for lined kosode that I plan to teach as a class later this year. This was one of my goals, so I am happy to have achieved it.
I now know my proper panel size that is comfortable for me to wear, as long as I don’t trim the sleeves :). This will allow me to dye bolts with confidence that I can wear them.
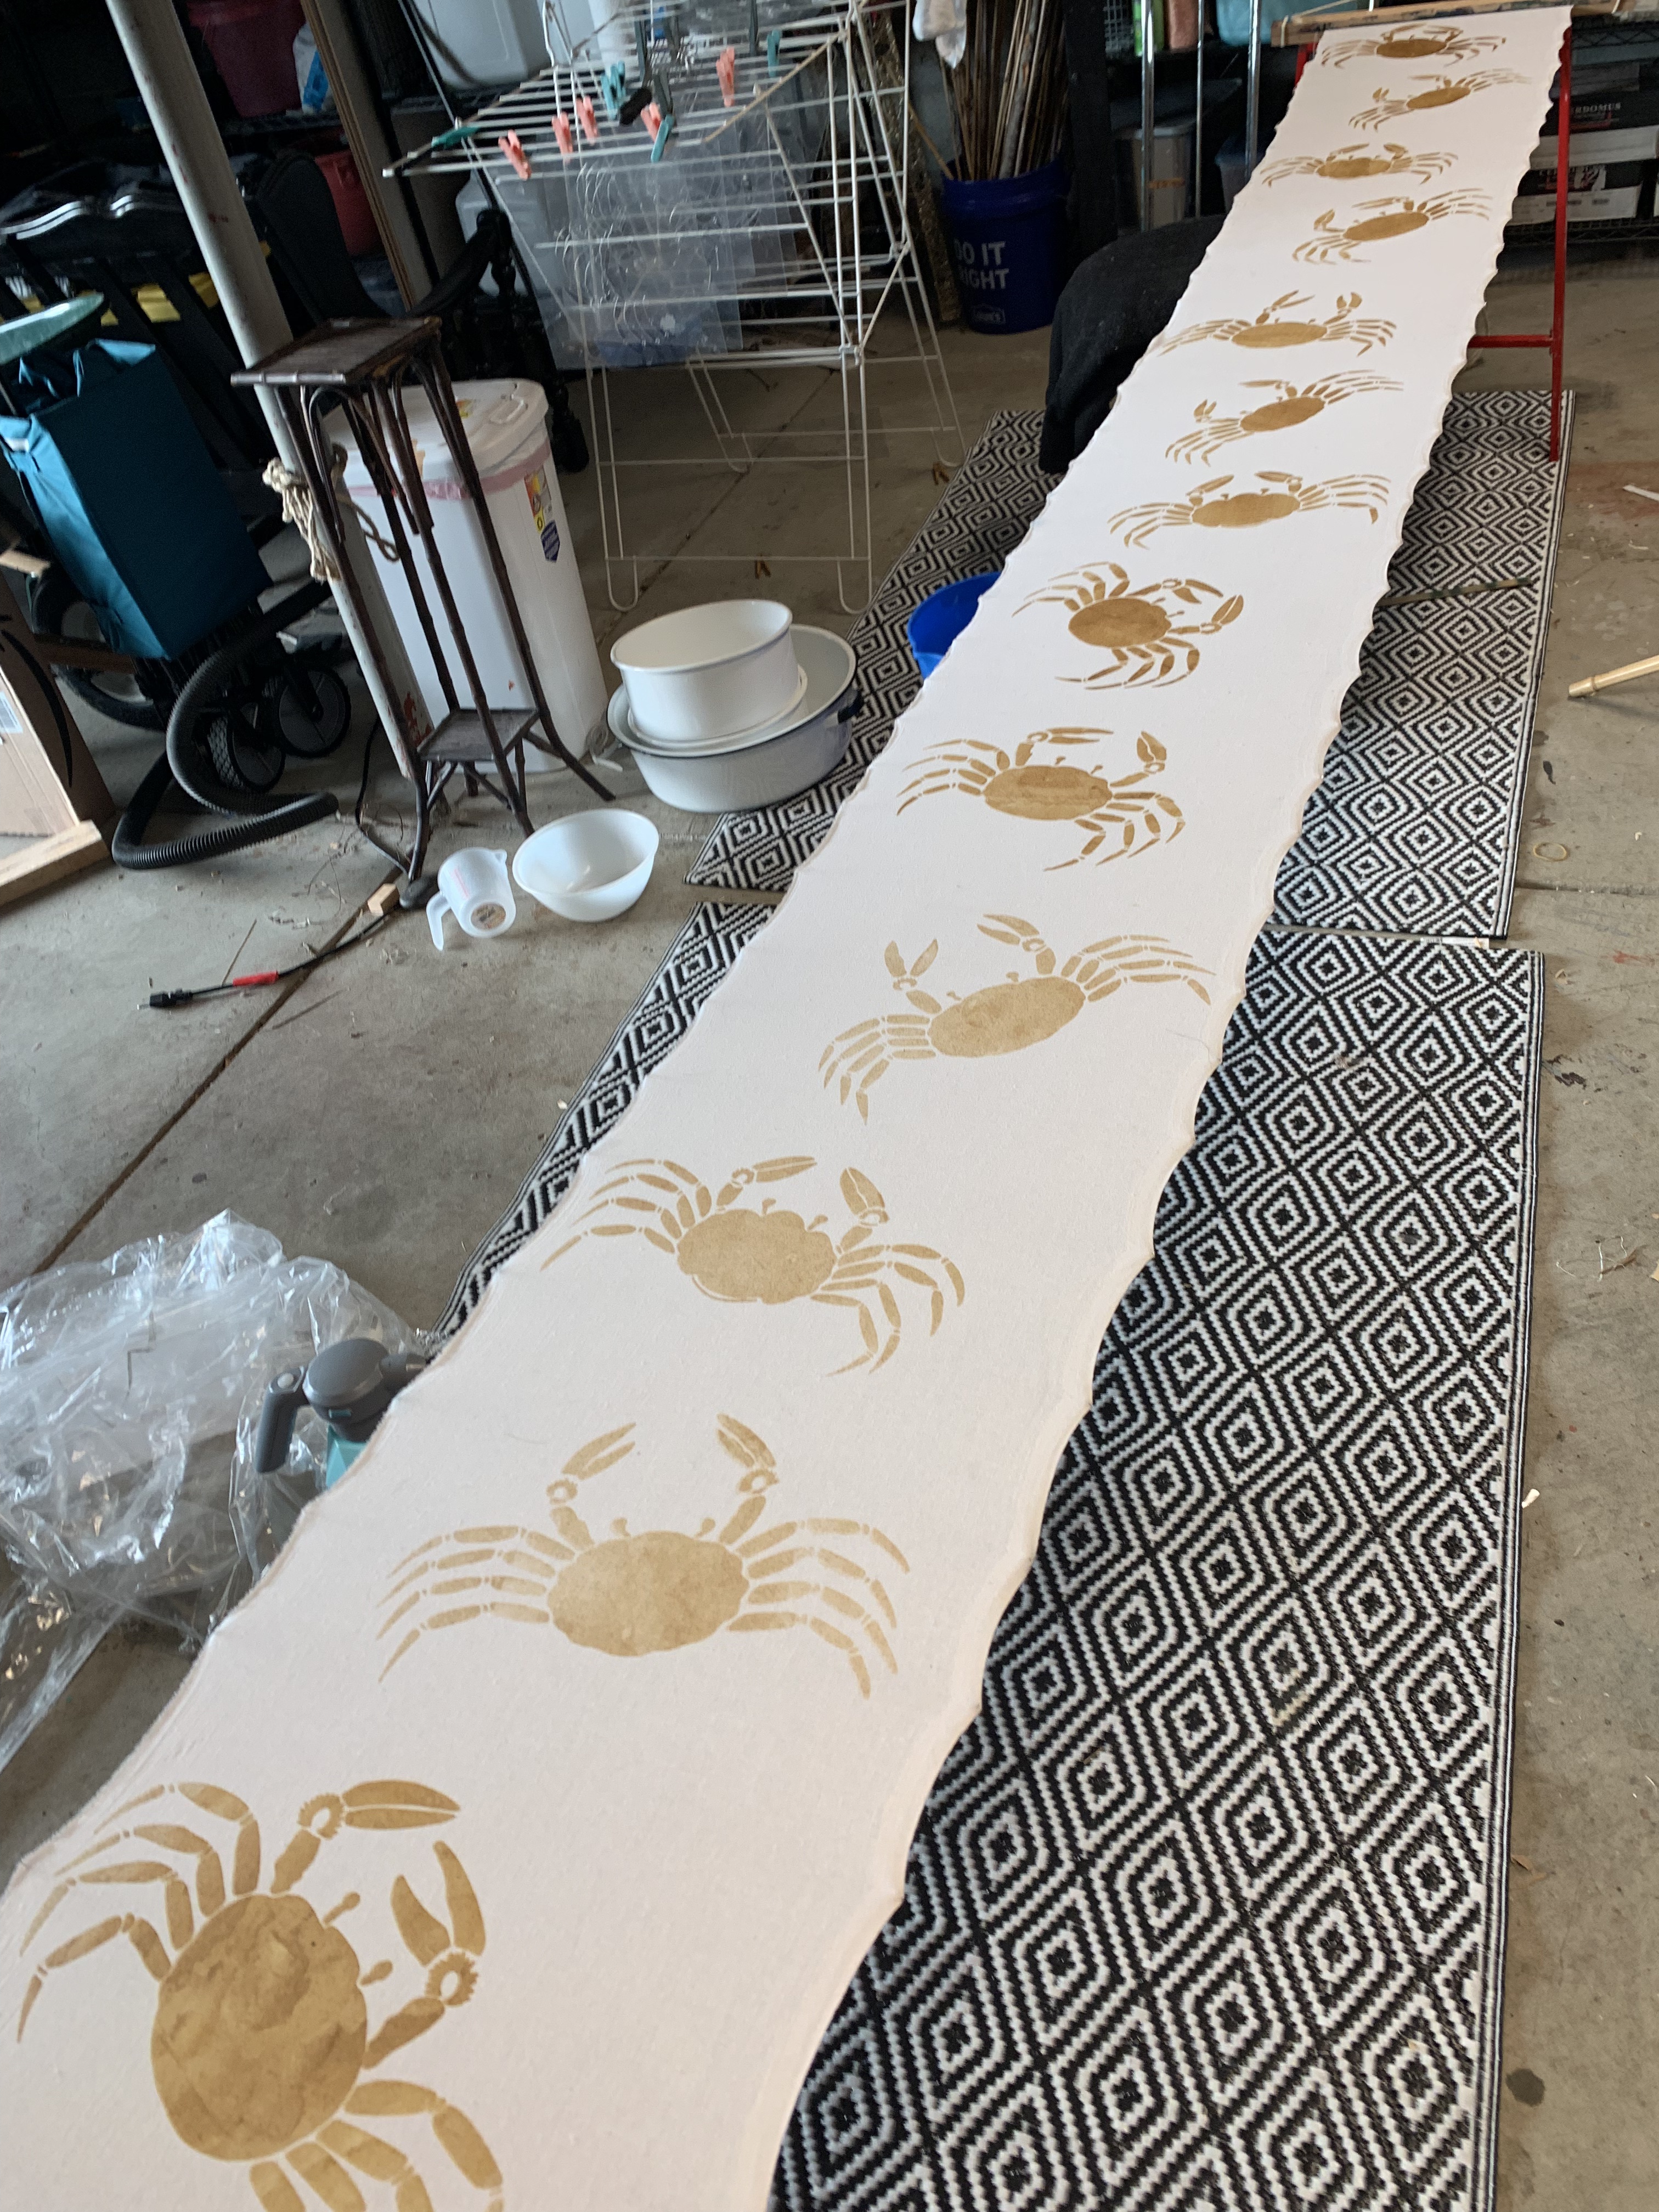
I will make a summer version of this robe this year, when the weather warms a bit. I have included a set of diagrams for the panels I plan to dye (my garage is not long enough to dye a whole bolt, which is 10 to 12 meters). I have included a diagram of my proposed stencil layout, which I determined through my research for this project. Note that I have more unique crab stencils than Tokugawa’s robe, just because I wanted to draw more crabs.
Kani Katabira on display at a local arts faire!
I am not sure yet if I will do indigo dipping or some of the Procion dyes in the crab sampler. I am leaning towards the Procion dyes simply because I feel confident I can wear an underlayer with them without dye transfer. I may make an indigo crab tenugui and see if I can pin down the double sided stencil technique on a small scale.
One of the most common questions I get about fabric dyeing is “How do you get the color so even?”.
My colors were splotchy for a long time! So I understand the frustration. In this short post, I’ll go over things I do to keep immersion dyed fabric even. As a note, I dye pretty much exclusively on plant fibers, though many of the same principles apply to proteins.
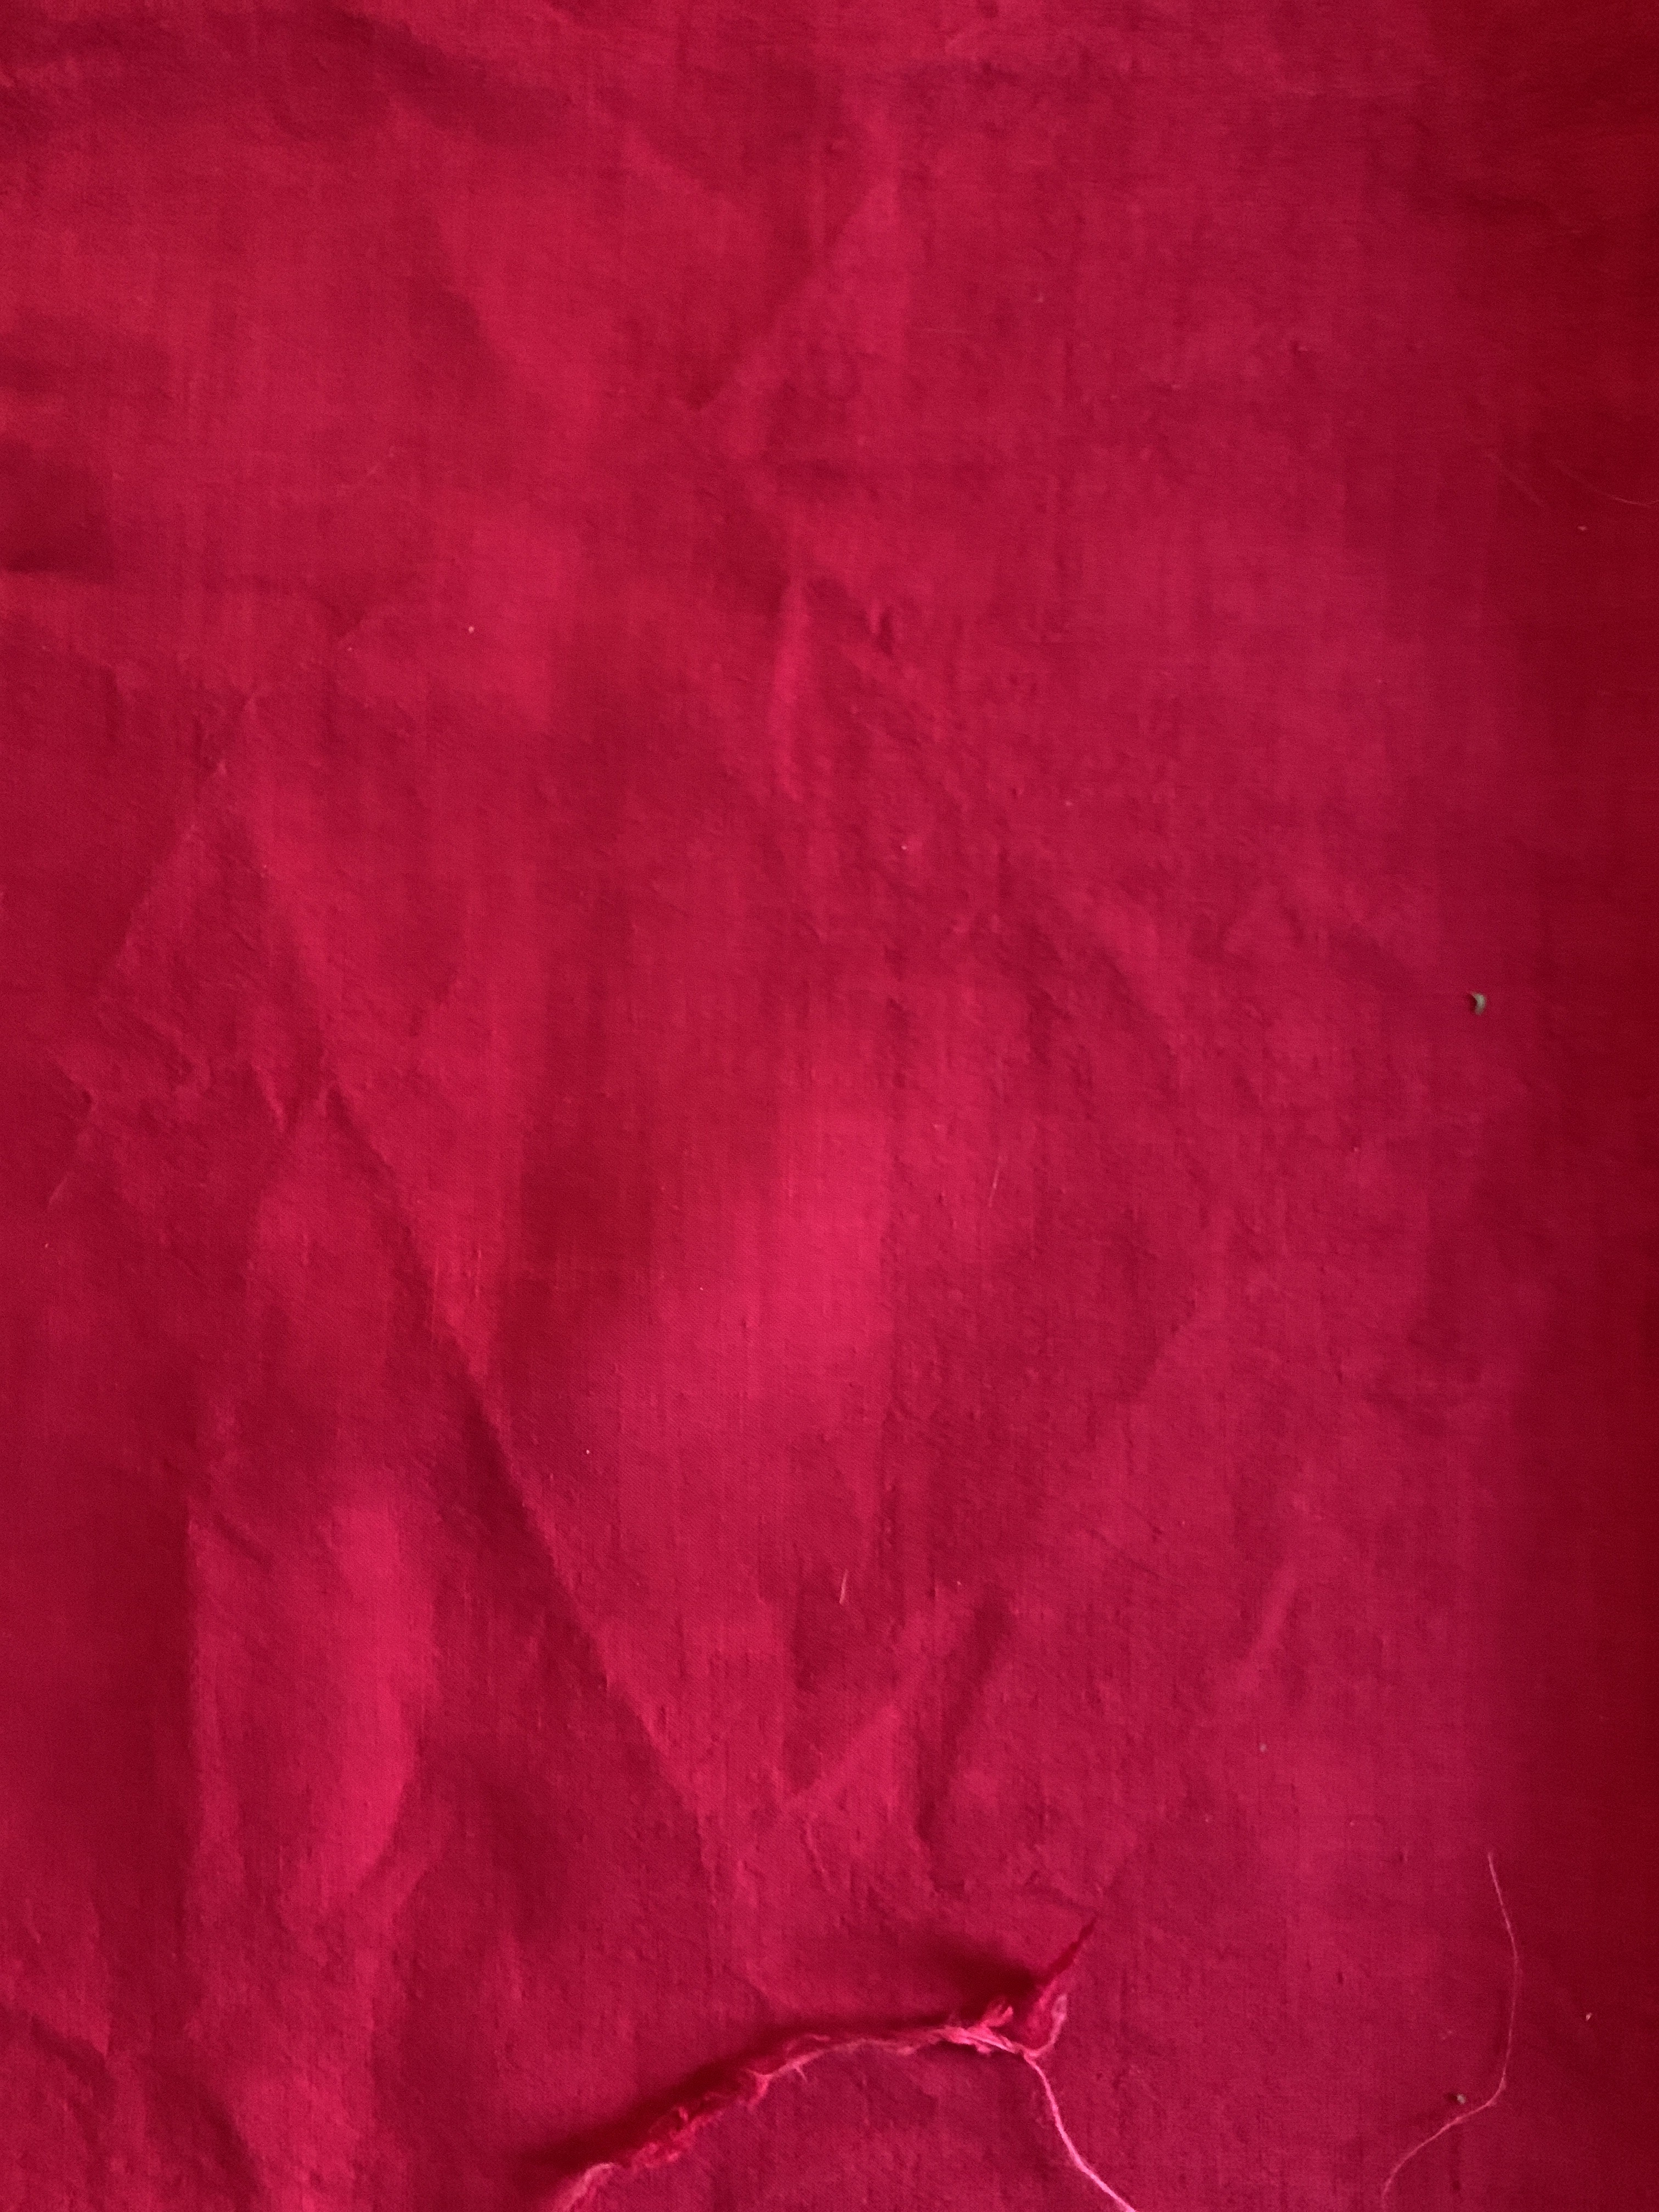
Fire Red ‘Tofu Skin’ Hemp
Use high quality dyes
I don’t use RIT or iDye. I use Procion MX dyes, which are professional dyes that react with the fiber to form a permanent bond. If I have to dye thread to match, I buy a seperate packet of synthetic dye to match, and do that step after. I buy my dyes from Dharma.
Test Your Pieces
If you’re dyeing something large or expensive, test on a small 1/2 yard swatch first – enough to catch errors, but not so big you’ll have a big loss. Dye is unpredictable. NEVER dye something you can’t afford to lose.
Prepare your fabrics properly
No matter what the manufacturer claims about the fibre being “prepared for dyeing”, wash and scour it first. I use synthraprol almost exclusively, but if it’s old or smelly fabric, I usually do one wash to “clean” with tide hygenic and borox first.
If you’re dyeing garments, this still applies.
Also, check fiber content! Blends with synthetics and proteins tend to heather, and thread is almost always polyester, which will need a second dye bath in a polyester dye bath. Try to buy blanks with cotton thread if possible.
If you have old, vintage garments, temper your expectations. Usually these have oils and stains that take a lot of effort to get out. It might be more effort, or be impossible, to get a truly even dye on old fabrics.
Give the fabric space
You need more water than you think you do. In general, I use 3-4 gallons of a 5 gallon bucket for something as small as a t-shirt or two. The fabric needs to be able to float freely.
If I’m dyeing a few meters of fabric, I have 15-20 gallon rope handle tubs I got from Target and Walmart.
If I need to dye more than about 3 meters of fabric, I start cutting the fabric up into smaller pieces.
If the fabric has to be scrunched up or doesn’t easily move in the water, use a larger tub. If you don’t, you will get speckling and fold lines.
Actually follow the instructions
Really do follow the instructions, even the annoying parts. For reference, here are the Procion instructions from the Dharma website.
As a note, I never use a washing machine. It seems too risky and kinda messy on a very expensive Speed Queen. I’ve always dyed in a tub. I have never needed a washing machine to get even color.
Indigo and Iron Dyed Shirting Cotton
Measure with a scale
I always measure with a scale for the dye itself, unless I’m doing a lazy one-off t shirt or something. I use the table here. I also am careful to use an accurate scale – it doesn’t have to be fancy. This is the one I prefer.
Dissolve and strain ingredients
When I mix up dye, I have a big pitcher of hot, hot water, and a whisk. I dissolve everything thoroughly with the hot water. For dye, I have a fine mesh strainer that I filter all dissolved dye through as I pour it into the vat.
For salt, I use pickling salt. I try to make sure the tub water is warm, by leaving it in the sun, so that when I pour in the salt, it dissolves well. If it’s really cold, I’ll get a lot of hot water and make a salt-slurry before I pour in the salt.
The soda ash I also dissolve in hot water, and I always move the fabric to the side when I add it. I’ve personally never needed to add it gradually like the instructions say.
Stir, Stir, Stir
I have a long stick of bamboo and I stir the fabric thoroughly with it, and I go back to it every five minutes while the fabric sits in the vat and stir it for a minute or two. If I have to, I use gloves to expose every fold to the dye evenly.
Generally, I leave fabric in an hour to an hour and a half. I NEVER leave fabric in the vat if I’m not going to stir it – I always keep it moving.
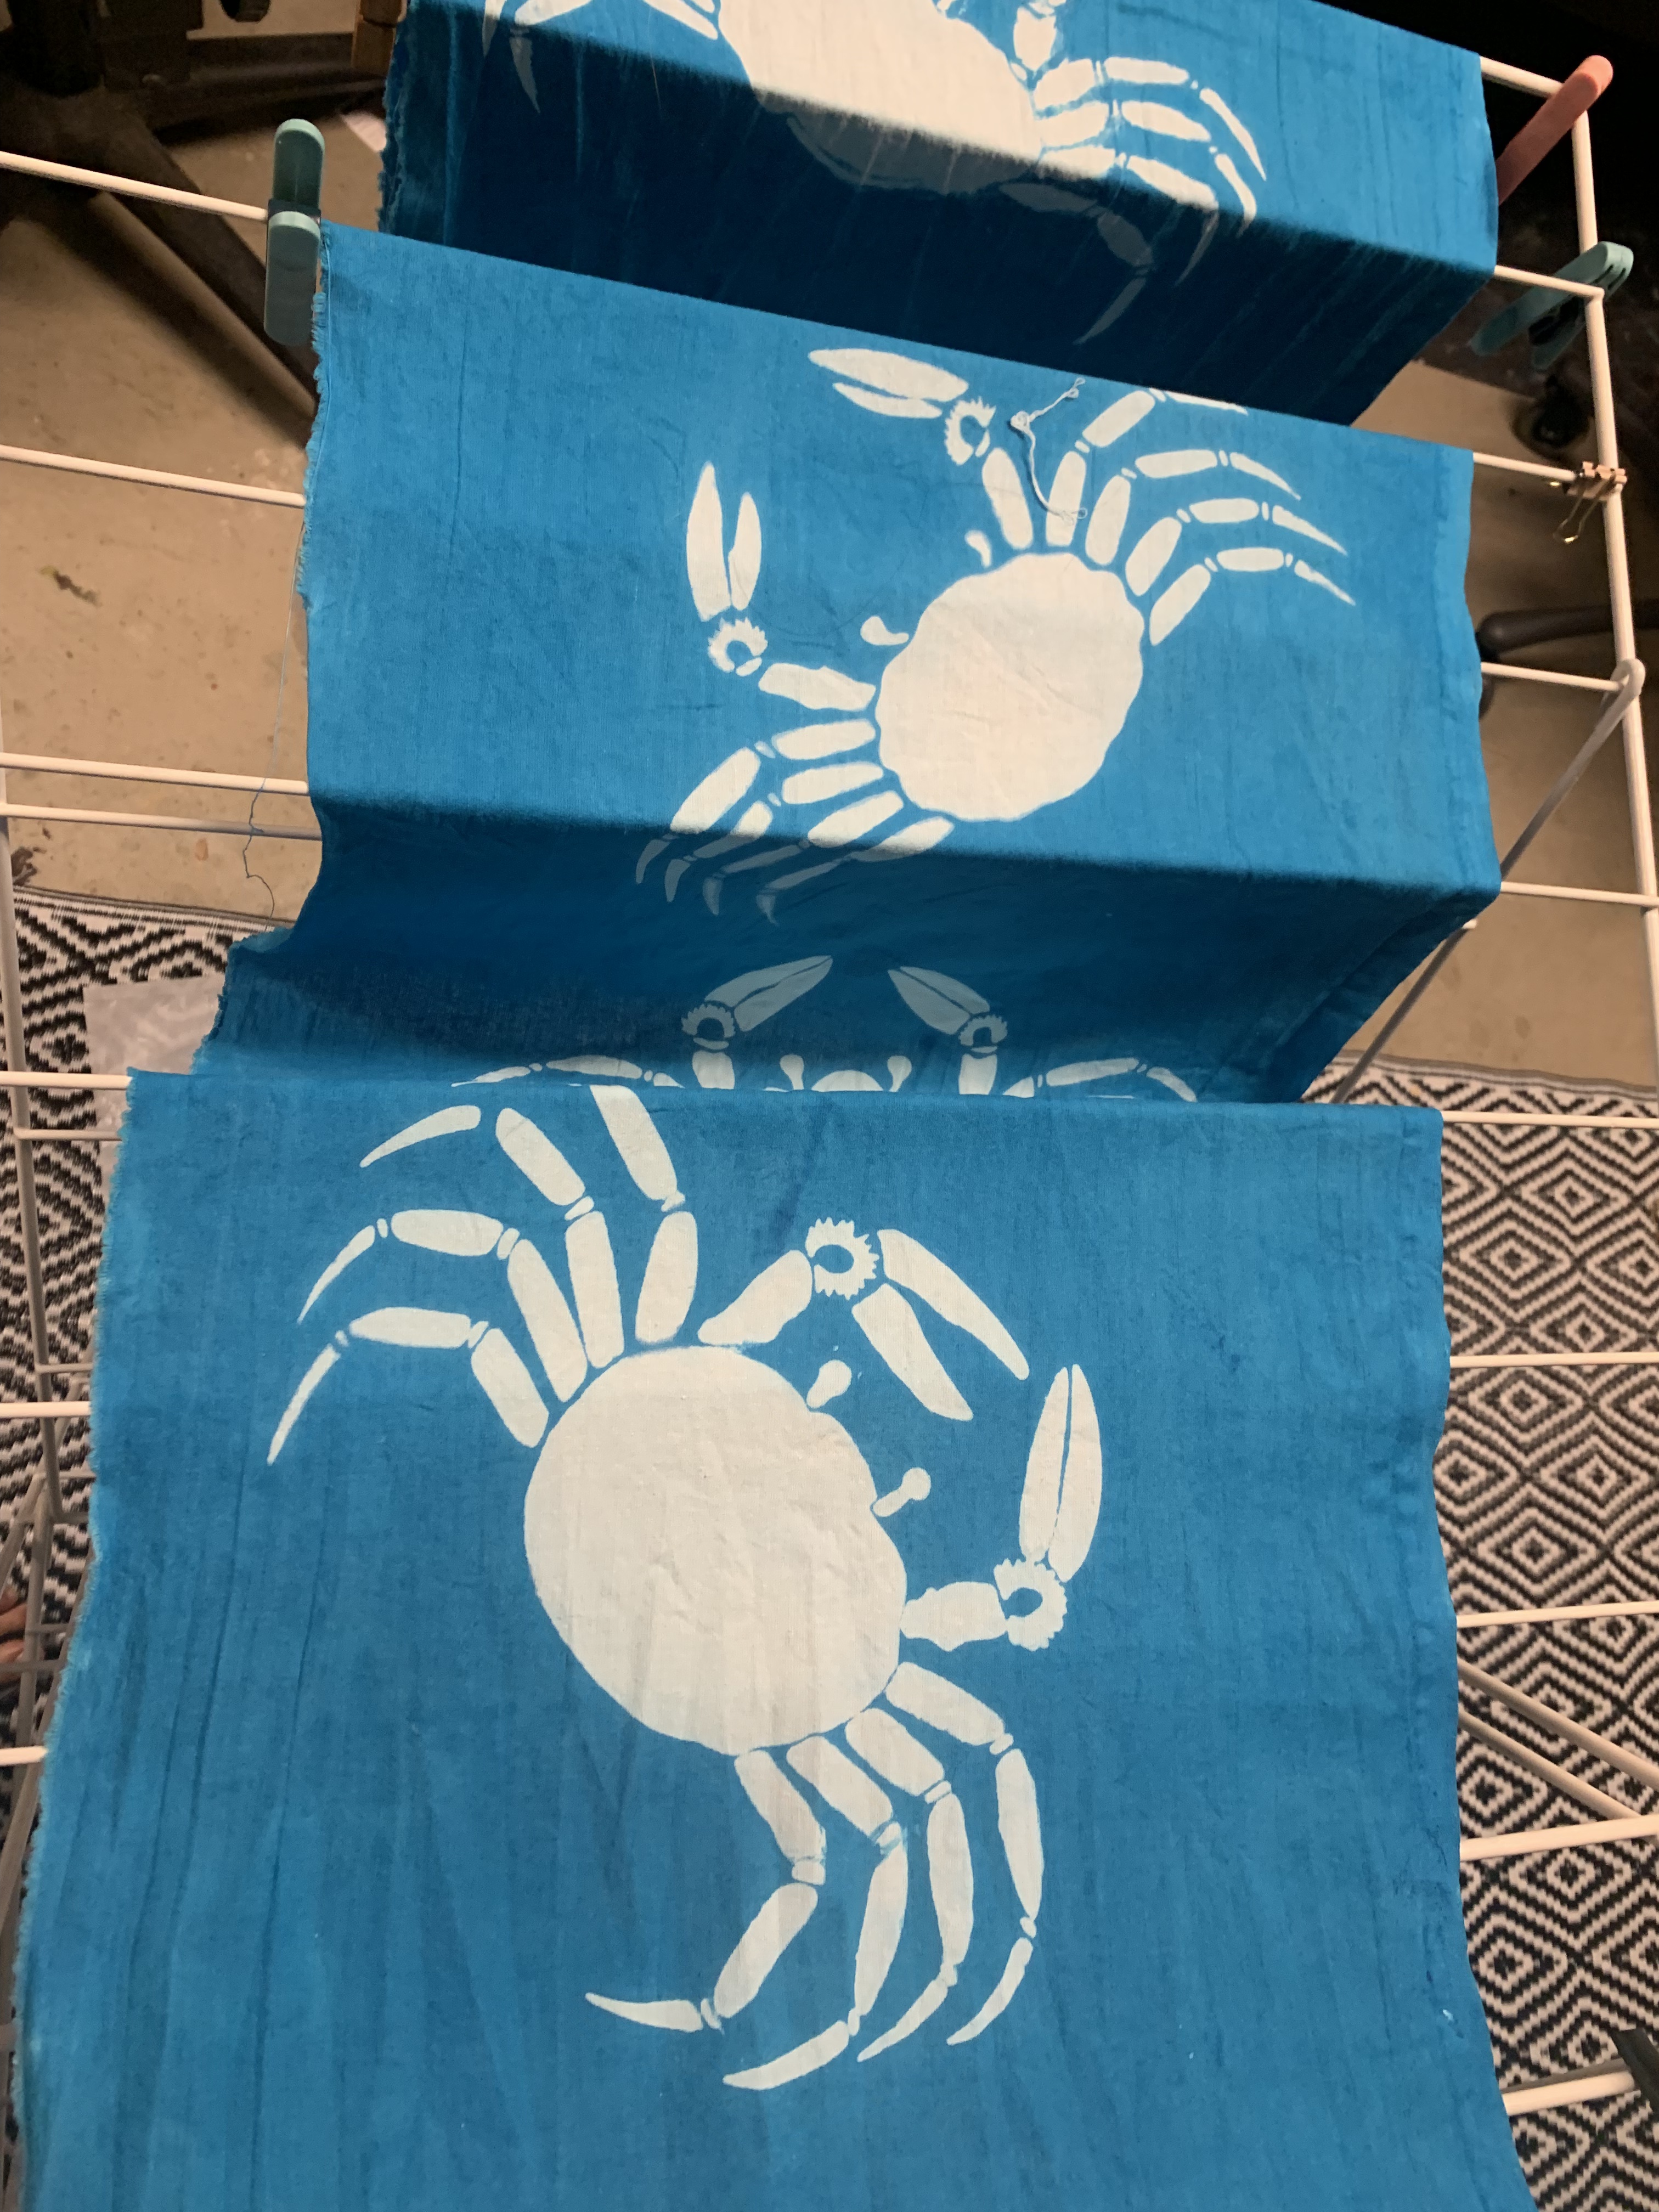
If the washing machine is occupied when the vat is done, I rinse out the fabric and hang it up. I never leave it. Although people will say the reaction has finished after an hour or so, I have successfully dyed lighter shades with expired vats an hour or two after they were done, so I don’t leave fabric in them to rest.
Lather, Rinse, Repeat
After the vat is done, I promptly wash it with synthraprol in warm to hot water. If, for whatever reason, the dye didn’t come out even, I repeat the process. Sometimes, with some colors, it takes two coats of dye. If it’s still not going well, I’ll darken the shade a touch, and try again, two more times.
If it’s still not working, then it becomes a lining fabric or a work clothing fabric. This is an important lesson: never dye fabric you can’t afford to lose, and always test with a small (1/2 yard) piece first.
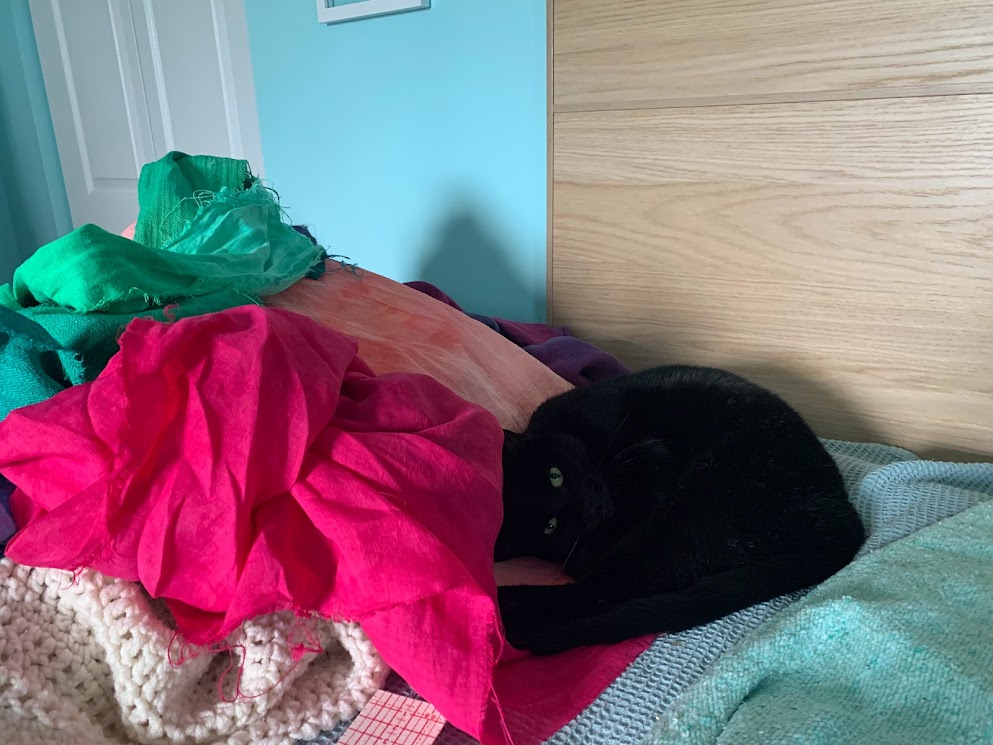
Dragonfruit ramie, and some bokashi dyed hemps for belts Also Nell
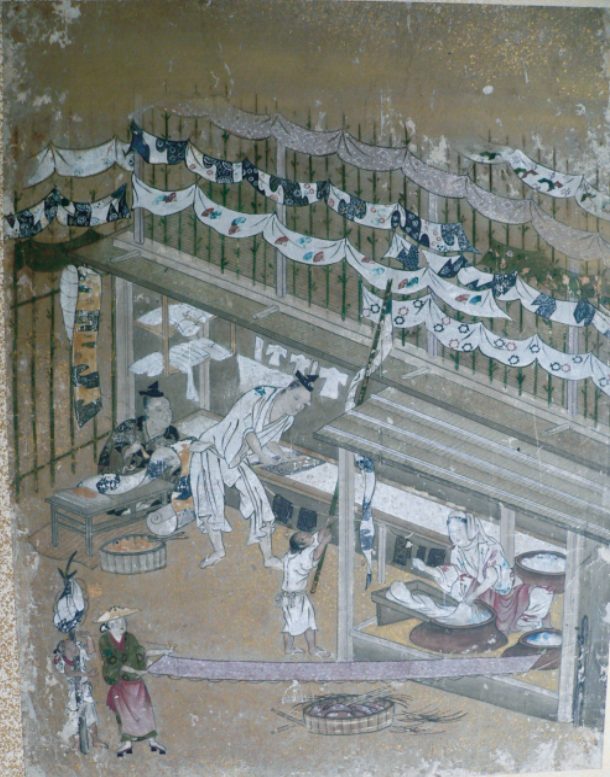
Japanese stencil dye technology was perfected at the end of the Muromachi period(1336-1537). It is remarkably similar to the process used by contemporary dye houses in Japan, allowing for some modern conveniences and proprieties. The goal of this project was to copy a Momoyama era(1573–1615) stencil textile using the same techniques in period, in preparation for the construction of an extant garment. Adjustments were made for cost, ergonomics, environmental impact, and a touch of modern aesthetics.
The extant piece is a katabira (unlined summer robe) owned by Tokugawa Ieyasu, the first shogun of the Tokugawa dynasty. It is dated to the Momoyama period. It is made of hemp, and dyed with stencil resist and indigo. The Tokugawa Art Museum recently did their own reconstruction of this garment, and they attempted to recreate the original color of this garment as well, which was a darker blue.
Tokugawa Ieyesu’s Katabira The Tokugawa Art Museum Google Arts and CultureReproduction of Tokugawa’s Katabira Tokugawa Art Museum Twitter
Methodology
Japanese stencil dyeing, more properly called “katazome”, is a many step process, about eight to ten steps from designing the stencil to the final drying process. In the table below, each step is listed, with the in period techniques contrasted with the adapted techniques used. I changed some things to make the process accessible to me. Many of the modern changes I have made (like cutting with a die cutter machine) are in practice in the modern dye houses of Kyoto and are well accepted by Japanese artisans practicing the traditional craft.
職人尽絵屏風「型置師」 Kano Yoshinobu
No medieval (or modern) Japanese artisan house would write down their recipes and processes; doing so would only invite the theft of trade secrets. The small amount of documentation that does exist comes from a medieval painting of stencil dyers, [職人尽絵屏風], and the extant stencil dyed garments themselves. Since paste and resist and sizing are designed to wash out, it’s difficult to determine the recipes used from extants. As a substitute, I have used the recipes and techniques used by modern Japanese dyers carrying on traditional methods. These techniques have been handed down for generations through oral traditions and training. Where I was unable to find the exact medieval formula, I have marked a “(?)” next to the item or ingredient.
I preserved authentic methods and equipment as much as possible. I hand drew and designed each stencil based on the original garment. I handmade the resist paste, down to making and mashing the steamed bran donuts in a huge ceramic Japanese mortar and pestle. I ordered and mastered the dye brushes and fabric suspension system from a dye house in Kyoto. I even purchased and cautiously cut the persimmon tannin paper, though I ended up with a more economical substitute.
Medieval Technique
Technique Used
Reason for Technique Used
Prepare Bolt
purchase hemp tanmono (bolt) from weaver directly
cotton sheeting, ripped into bolt, scoured with synthaprol and ironed
Cotton is much cheaper for experiments, and the behavior of the resist depends on the weave and weight of the fabric, so I matched my “final goal” hemp with cotton sheeting. The dye will shift hue slightly, so a test swatch on hemp can be done later.
Design Stencil
sumi and rice paper brush drawing
mylar stencil cut with Cricut machine after digital tracing of hand drawing
Less messy, more control, ergonomics, easy to do in small time periods
Stencil Making
smoked persimmon paper hand cut with a knife, human hair or silk mesh, urushii
komon nuka, mochiko, calx and salt recipe, suribachi
Ergonomics, fidelity, easy to make and resize multiple stencils. Persimmon paper was tested but there was no significant difference for this type of design other than 10x the cost. An aluminum mesh frame was attempted to substitute for the silk mesh, but discarded
Paste Making
rice paste resist (?) Suribachi
glued wood board, Yamato nori paste
Dye houses jealously guard their paste formulas; no medieval recipe was accessible, so I used a published one modified after buying some ready made paste from a kyoto dye house for reference.
Pasteboard Preparation
wood board + rice glue (?)
wood spatulas
Difficult to find wood boards 16” wide, so a glued board was used. Yamato nori is only tapioca starch and water, so it’s very similar to the original.
Paste Laying
bamboo spatula
wood spatulas
Comfort and ergonomics, availability of large bamboo planks
Soybean milk can ruin the process of the dye I chose to use; sodium alginate (seaweed extract) and water is the preferred substitute. Sheep Hair brush chosen for cost
Dye
indigo or pigment hair brush(deer?) shinshi, harite
Procion MX deer hair brush shinshi harite
I’m more familiar with procion dyes, and do not have an indigo vat large enough. Isolating test variables meant using a dye that would be consistent batch to batch that I could already work well with. Plant pigment dyes other than indigo would be dyed with a brush, whereas indigo would use a likely use a vat.
Washing
nearby river
garden hose, tubs, soft dish brush
Whole bolts used to just be put into the river and the current would gently wash away the paste. Obviously not good for the environment.
Process Photos
Results
Overall, the resist paste worked as expected on the first crab bolt. Some crabs came out perfectly, whereas others did not. Additionally, the background color seemed very vibrant and even. I have some refinements to my technique to make because of errors in my process. Without a teacher, most of these errors can only be discovered organically. So I tried again with a second bolt, and fewer errors occurred. I plan to iterate this process until I cannot find any more improvements to make.
The biggest aesthetic issue with the bolt is that some lines on the crabs appear smudged or not clearly defined. This happened for three reasons. Firstly, overapplication of dye, or failure to keep the dye brush dry enough while still applying dye, is the most common reason for this failure. Procion MX dyes are notorious for causing bleed in katazome, so I have to be extra vigilant. If the brush is too dry, however, the dye will streak and the color will be uneven.
Secondly, underapplication of paste – if the paste is not mixed well or not applied thickly enough, then the dye will seep through. If the paste is too thick, it will crack, so I can’t just spatula paste on to solve the issue. This is mostly an experience issue, and I get a little better sense of how “thick” to mix the paste each time, and also by watching youtube videos of other dyers. Thirdly, if the stencil is disturbed while the paste is being applied, then it will smudge. One of the crabs has a ghosted outline because its stencil fell on it. For a small portion of the first bolt, I experimented with using an aluminum mesh frame on top of the stencil to help distribute the paste evenly. The mylar stuck to the aluminum frame when I went to lift it up and crashed onto its crab, smearing it. Normally, a silk mesh would be bonded to the persimmon stencil with urushii (lacquer), but urushii is highly toxic, and the appropriate substitute, cashew lacquer, is $60/oz in the US. I stopped using the frame for the rest of the bolt, and cleaned up the stencil as best I could with a small brush.
The other aesthetic issue with the bolt is oddities in the coloration where the pasteboard adhesive rice paste stuck to the bolt. To remedy this, I let the next set of pasteboards dry fully before adhering the bolt for pastelaying, rewetting with a spray bottle to activate the glue “just enough”.
Some dye remained on the shinshi after my first dye run, and it snuck onto the selvedge of the next bolt. I later learned that shinshi must be soaked for three hours after dyeing to avoid this. Some dye houses put vinyl screw caps on their shinshi as well.
I also had some dye creep back into the resist paste on the second bolt because my bowl had some leftover dye in it that I missed (bowl and dye were both blue). I have made separate bowls for paste and dye going forward, but there are some speckled crabs as a result.
Streaks on the main color background color itself are from uneven dissolution of the dye or the soda ash, which I plan to remedy by using hotter water to dissolve the dye before mixing it in to the carrier water.
By the third bolt, I mostly had the process down – a dye mix with more sodium alginate really helped, there was almost no bleed through, and I had enough finesse to not drop stencils or smudge them. I sometimes saw a “halo effect” around a few of the crabs, which I did not see on the earlier stencils. It smoothed out with more applications of dye, but was still present after cleaning off the paste. I assume, since it was not where I saw any paste, that it is either from slightly dirty stencils, or from some sort of spreading interaction between the sizing and the rice paste. My suspicion is slightly dirty stencils, and I will clean them better next time. As a side note, this problem would be almost unheard of with kakishibu paper katazome stencils, because they are soaked overnight before use. It’s almost impossible for them to be dirty.
I have come to dislike the mylar after three uses, mostly because my cats like to eat all the little pieces of plastic that are cut out from them, and I can never seem to find them all. But also because I do adore the sustainability of the original process – it’s all natural materials, front to end, and the paper is remarkably durable. It also has the cedar and incense aroma of what I imagine a forest in heaven to be.
“Halo” effect – look at the left claw especially.
Further Experiments
With the successful conclusion of the test bolts, I am pleasantly surprised with the result. I am going to sew them up into a katabira before proceeding with one final design. I will probably dye a bokashi style with procion dye, not indigo. This is partially because I don’t have a vat large enough to dip a full bolt in, and partially because chemical dyes are a bit tougher than indigo, and I am rough on my clothes. This batch’s color was clearly not a simulation of indigo; I chose it simply because I liked it and had some extra.
I am in the process of learning to adhere mesh to persimmon paper stencils with ordinary black house paint and polyurethane. This will allow the construction of more intricate and detailed stencils with isolated sections.
Bokashi Crab Experiment
I am also learning to paint gradients and selective color with smaller brushes. This will be facilitated with the mesh stencils discussed above, as the type of stencils with selective small bits of color tend to need mesh to support them. Finally, I am refining the paste recipe and learning to apply dye more delicately. The addition of a better flour sifter and a power mixer will greatly aid this process. Initially, I found the paste very hard to work and painful for my hands to apply. I originally thought this was just a hand strength recovery issue, but I discovered after watching youtube videos from other bingata houses that 1) they send out a young man with a power drill to mix the paste in buckets and 2) their paste is much thinner than mine. To remedy this for further batches, I plan to thin down the paste more, and heat it up, with the addition of hot water.
References
Although not a book, Yuta, from Japanese dye store Aikuma Dye works, was invaluable to my process. She answered every question I had patiently, and sometimes would walk over to the master kimono dyer and ask him for me. She also praised all my work, even my first, very unevenly dyed crab, and helped me troubleshoot issues.
I watched dozens of videos from different dye houses in Japan, and have listed a selection of the most helpful below.
Videos
1. CHINEN BINGATA. “【Bingata Vlog】紅型の型置き、日々の仕事。【沖縄】One Day to Do Kataoki. My Day Job.” Www.youtube.com, http://www.youtube.com/watch?v=rpXD56Fy8eY. Accessed 14 Sept. 2023.
2. Nakano, Eiko, and Barbara B Stephan. Japanese Stencil Dyeing. Weatherhill, Incorporated, 1982.
3. 金子賢治. 型染・小紋・中型. 1994.
Primary Sources
1. “Bath Robe (Yukata).” Google Arts & Culture, artsandculture.google.com/asset/bath-robe-yukata/8QG-Upsnye_SZg. Accessed 14 Sept. 2023.
2. Kano, Yoshinobu. 職人尽絵屏風「型置師」, Momoyama to Early Edo Period
Appendix
Resist Paste Recipe
Makes 2.5 cups of Resist Paste Adapted from Japanese Stencil Dyeing by Eishia Nakano
120 grams (1 cup) Mochiko / Glutinous Rice Flour 150 grams (1.5 cups) Komon Nuka / Defatted Rice Bran – do not substitute 120-175 ml (.5-.75 cups) Water 40 grams (2 tbsp) Salt dissolved in 80 ml (.33 cups) Hot Water 20+ grams (2+tbsps) Calcium Hydroxide, also called Pickling Lime, dissolved in 120 ml (.5 cup) Hot Water
1. Sift the komon nuka. Modern mochiko typically does not need sifting. 2. Mix the komon nuka and mochiko well in a large bowl 3. Add water a little at a time, kneading. 4. Shape dough into doughnuts 5. Wrap the doughnuts in a damp kitchen towel (preferable white or unbleached) and steam 50-60 minutes. 6. White they are hot, pound doughnuts into a paste. This is traditionally done with a large suribachi, but you can also use a bread mixer. Do not use a cake mixer, the dough is too tough for the motor. 7. Add hot water and salt solution. 8. Beat well, and slowly if you are using the electric mixer. Five minutes at a minimum. 9. Add only enough of the top water of the calcium hydroxide solution to turn the paste a glossy mustard yellow.
After this, you can either let the paste cool a bit and use it immediately, or store the mixture in a mason jar with a bit of water on top in the fridge. You will need to re-warm the mixture from the fridge. I find that this recipe makes a very thick paste, and I am able to dilute it with hot water considerably, but the amount of water needed varies based on the age of the paste and the temperature of the room. It is hard to describe exactly what the texture of resist paste should be; I recommend watching some of the above linked videos. In general, it should spread smoothly and easily, but not be runny.
It is also worth noting that the dye paste I purchased from Aikuma did not use calx, it was a clearer color. This made the paste hard to see. Some professional dye shops seem to add a fugitive blue dye to their paste (probably aobana or a synthetic version of it); this makes the paste very easy to see.
Sizing Formula
10 grams of High Viscosity Sodium Alginate 1 liter of Water
Add the alginate a little bit at a time. Mix thoroughly with a whisk, and allow to rest for a few hours so the alginate will dissolve fully.
Dye Formula
Chemical Water Can be stored in the refrigerator 13 grams of High Viscosity Sodium Alginate 100 grams of Urea 1 liter of Hot Water
Dissolve the urea in the hot water. Add the alginate a little bit at a time. Mix thoroughly with a whisk, and allow to rest for a few hours so the alginate will dissolve fully.
Dye Solution 10 grams Soda Ash Dye to taste – 1-6% OWG. 1 cup of Chemical Water
1. Dissolve soda ash in as little hot water as possible 2. Dissolve dye in as little hot water as possible; strain through a fine mesh 3. Mix thoroughly, ensuring everything has fully dissolved and there are no speckles of concentrated dye.