Introduction
Previously I dyed a bolt of fabric to make a crab kosode, and I detailed my journey in this post: Katazome Stencil Dyeing.
Originally, I had intended for the test fabric for the crab kosode to be curtains. I had purchased cheap $4/yd sheet cotton from Dharma, and I had used a bright turquoise blue that was unusual if not out of period to dye it, because it matched the room. However, when I completed dyeing, the fabric looked better than expected, and my husband pointed all the claw holes from our cat in the current curtains. I had spent a month dyeing this fabric, so maybe letting it get destroyed wasn’t the best option. I opted to make a prototype kosode with it, in preparation for making a hemp katabira with the same pattern.
A kosode is a garment that was a staple of Japanese clothing from the Kamakura period to through to the Edo period. Initially, it was a garment of the common people , but as the warrior class rose to power, the kosode gained favor among them as a simpler garment for attire, and it was elevated with fabrics more suitable to the upper and middle classes.

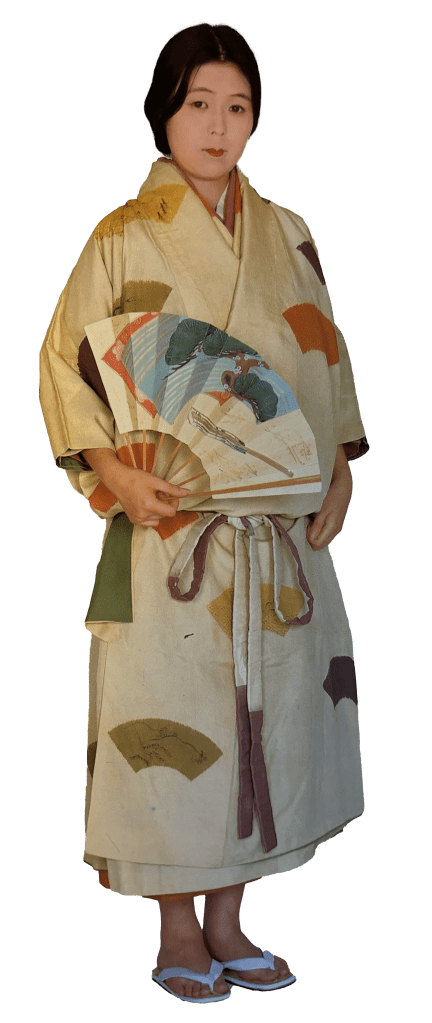
Recreation of Kamakura Era Garb
Taken from 写真でみる日本の女性風俗史 : 京都染織まつり記念図録 (1)
Interestingly, because this kosode is intended for a working woman, it has detached sleeves and a narrower profile. It looks more modern than the Muromachi era kosode from a later period intended for a noblewoman. It may have been modified from a kimono for budgetary reasons. The Kyoto costume museum also does this.

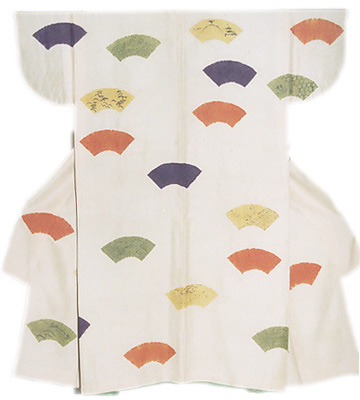
Reconstruction
Kyoto Senshoku Bunka Kyokai (2)
Reconstruction
Taken from 写真でみる日本の女性風俗史 : 京都染織まつり記念図録 (1)
Reconstruction
Kyoto Senshoku Bunka Kyokai (2)
Its sister garment was the katabira, which is a lightweight, and casual garment that has no ornamentation that prevents it from being washed. Katabira are cut differently on the bolt than kosode. Importantly, the sleeves are not cut alongside the collar, but alongside the okumi (small front panels). This makes the sleeves wider, and allows for the use of a narrower bolt in general, but it also necessitates a longer bolt. Here are a representative stencil dyed katabira’s cutting layout and dimensions.

Muromachi – Momoyama Period
From Komon, Katazome, Chuugata (Citation 5)

From 日本の美術 No 67 小袖 (4)

From 日本の美術 No 67 小袖 (4)

From 日本の美術 No 67 小袖 (4)
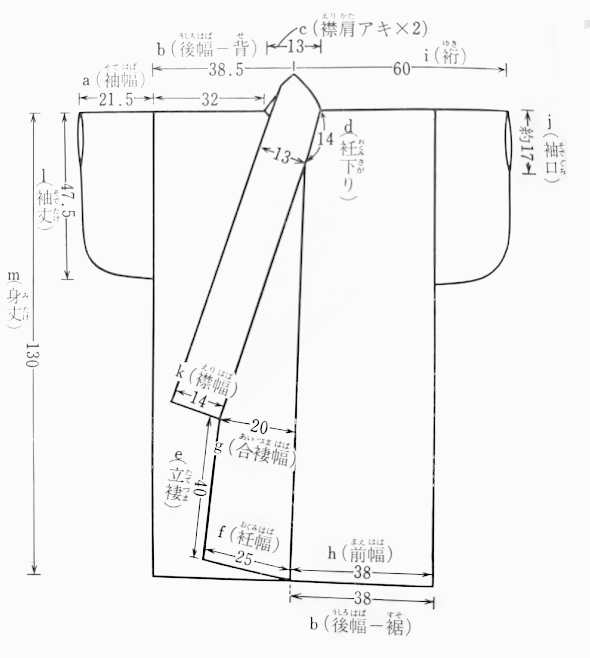
To contrast, here is a representative kosode with its cutting layout and dimensions.
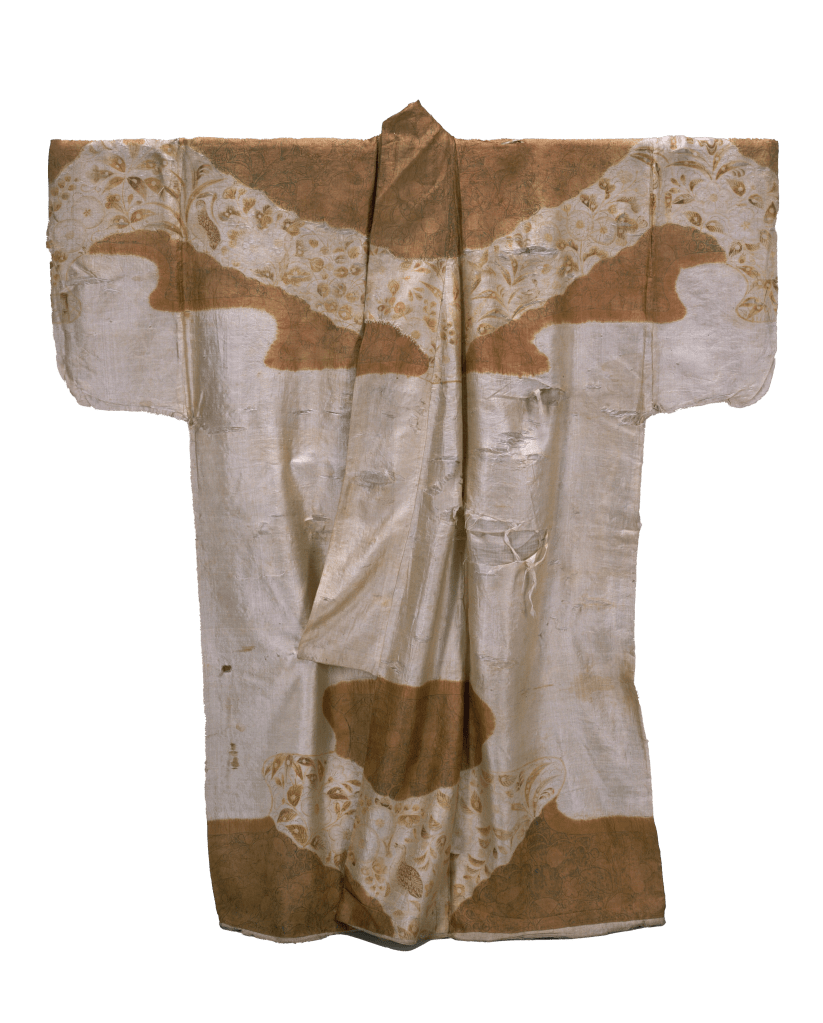
16th Century
E国宝 (3)
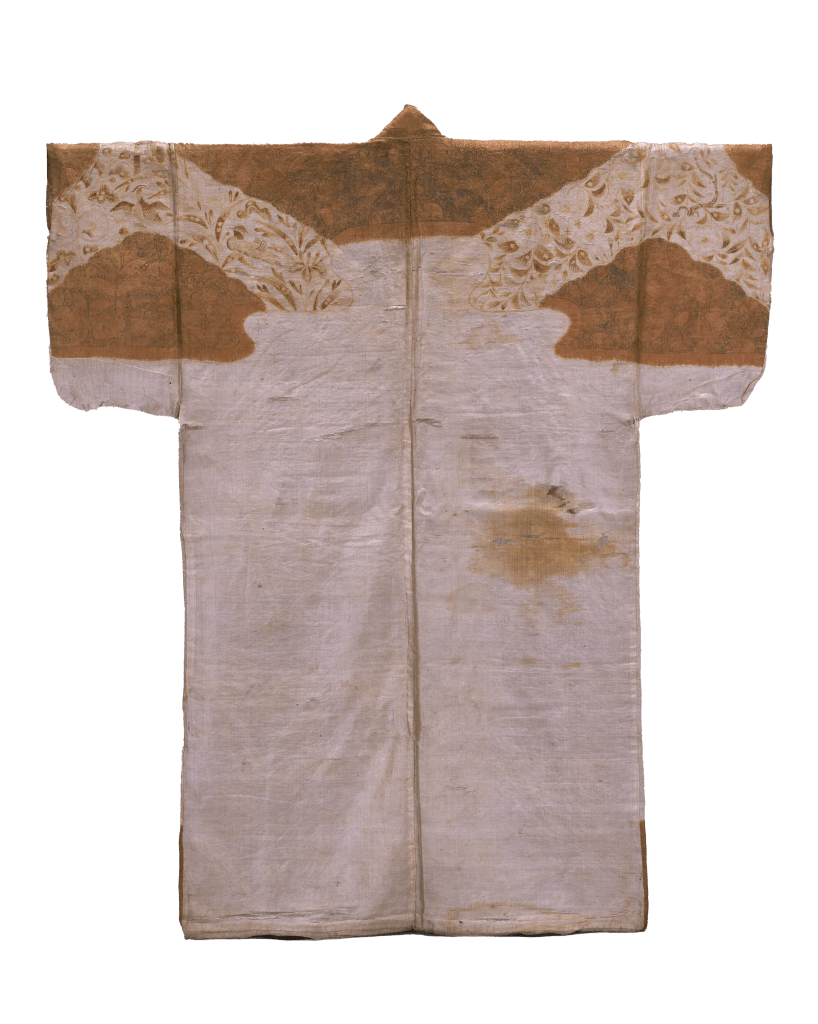
16th Century
E国宝 (3)
From 日本の美術 No 67 小袖(4)

From 日本の美術 No 67 小袖(4)
When cutting the bolt, two dimensions need to be considered – firstly, that the bolt is sufficient width for the wearer, and that it can be cut accommodate a sufficient length. Upper class kosode and uchikake can be cut where the “shoulder” or torso panel reaches to the elbow. However, lower class and casual kosode very. Katabira dimensions can be a narrower torso with longer sleeves because of their changed cutting method. It’s important to understand that these measurements are not meant to be copied directly, but need to be checked against the wearer’s dimensions and altered as needed. The cut body panel length needs to accommodate the wearer’s height, and the bolt must be of sufficient width to accommodate the torso and length of the arm. It is desirable for the wearer to be able to sit cross legged the traditional way while still being modest, and also for the sleeves to reach the wrist if the garment is upper class and formal.
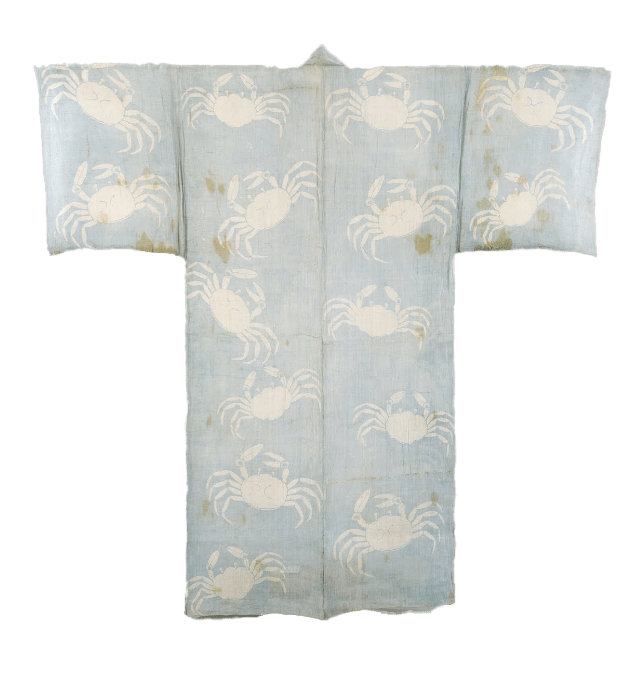
Momoyama-Edo period, 17th c
Tokugawa Art Museum
Accessed at Google Arts And Culture (Citation 11)
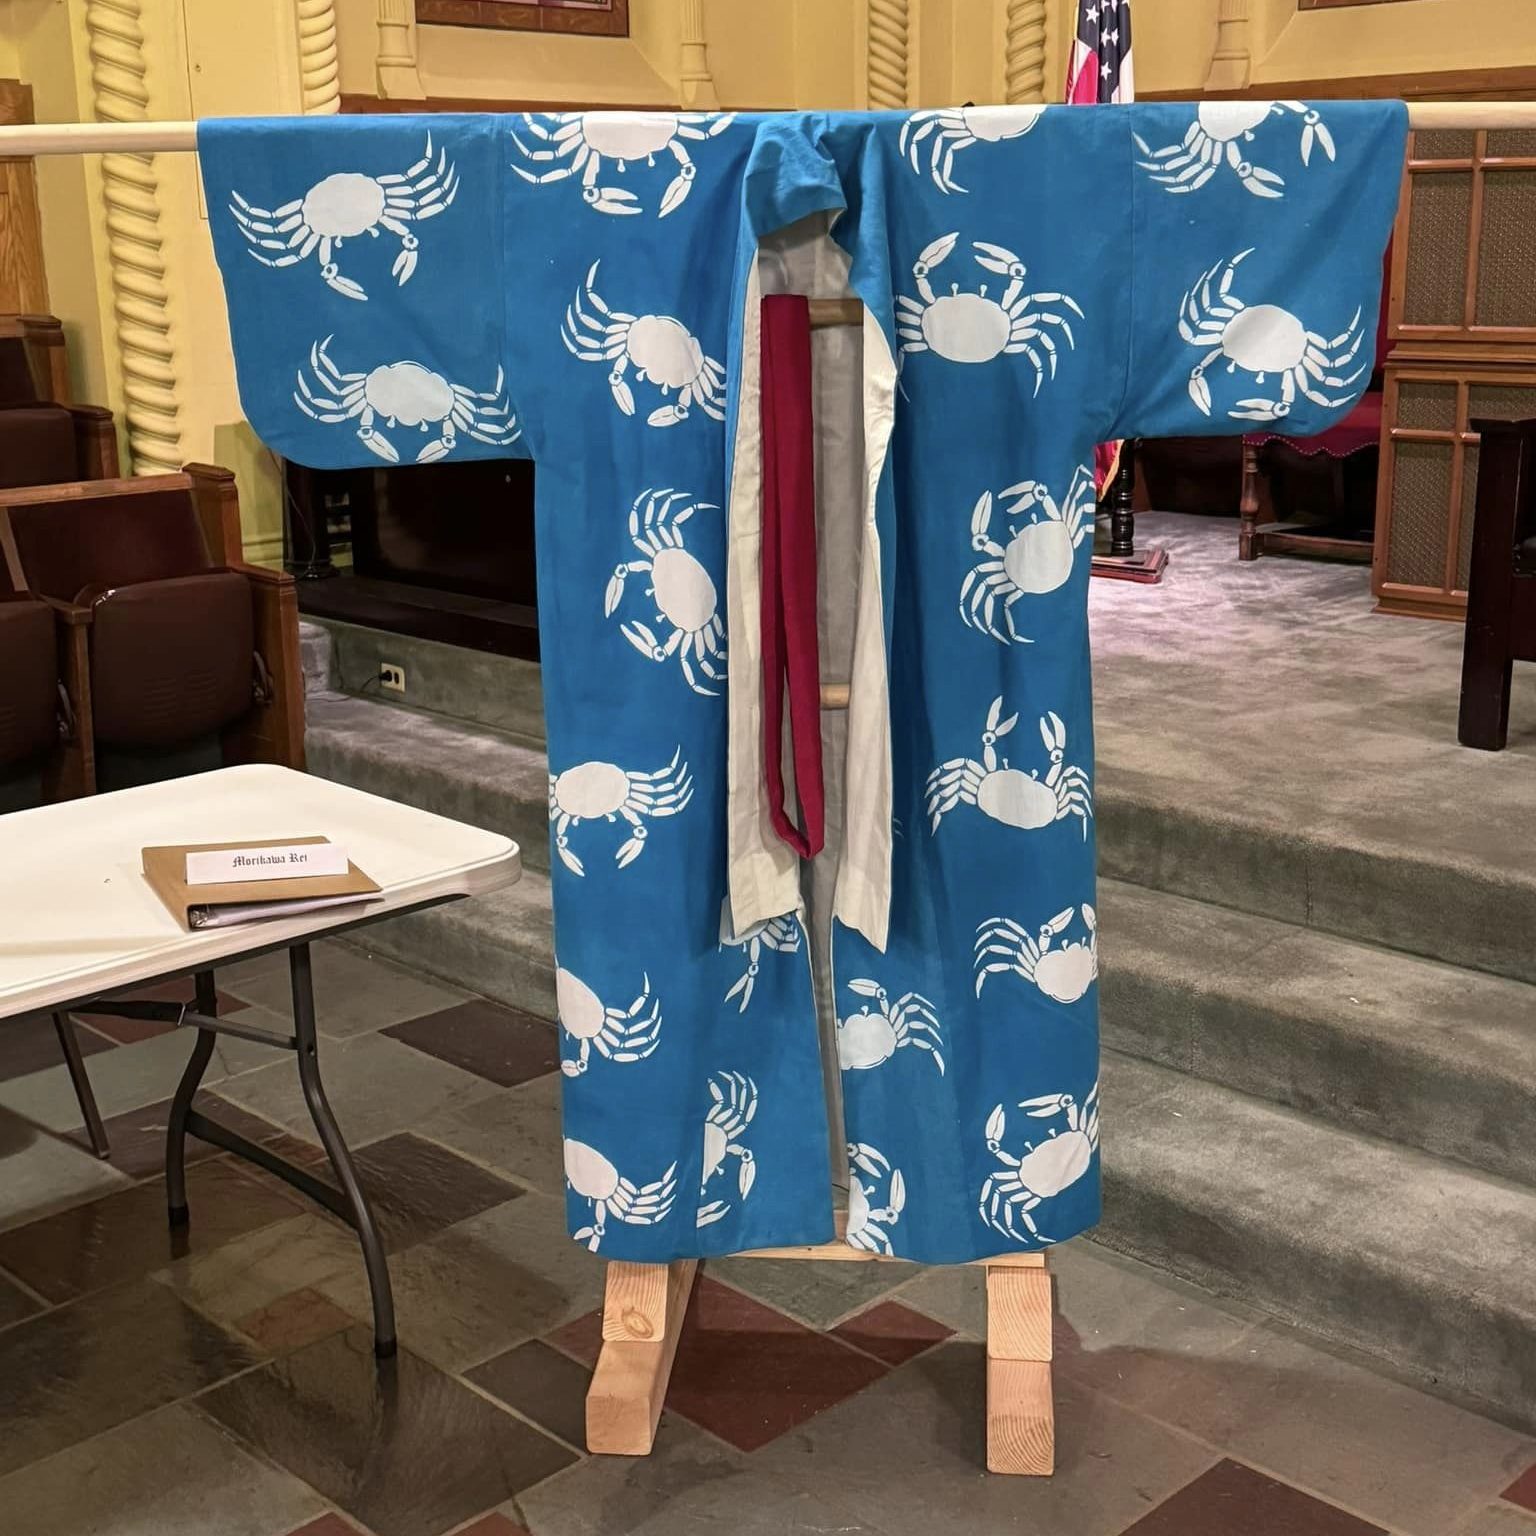
The crab patterned robe that I had based my dye pattern on is a katabira, though interestingly many of the books that reference it call it a ‘yukata’. A yukata is an Edo period robe that was used as a bathrobe. Because this crab patterned robe is the earliest example of chuugata (literally, ‘mid size pattern’), the type of stencil dyeing that was used predominantly for yukata, it may be called yukata by a museum even though the people in period would likely have referred to it as a katabira.
It would have been nice to make an unlined katabira, because that is typical for the era. However, the cheap cotton from Dharma was quite scratchy and thick when I was done dyeing it, and it didn’t really seem like something I wanted on me, even with an undergarment. Additionally, the fabric was fairly heavy for a summer weight garment, so it seemed to be calling for a lining. I decided to make a ‘lined katabira’ – that is, a lined garment with a katabira’s cutting pattern. Firstly, I chose to do this to more closely mimic the extant’s external appearance. Secondly, because I really do prefer the dimensions of the katabira’s longer sleeves and slightly narrower body for my own comfort and mobility. And thirdly, because I wanted big sleeves to show off more cute crabs. I imagine this garment with its playful deep ocean motif would look very cool for a summer festival at night, where it gets chilly and it’s nice to have a lining.
Materials
Cotton was in production in Japan in the 1600s, although its usage was more limited than the widespread adoption for everyday garments in the later Edo Period. In the 1500s, it had spread beyond the aristocracy and into military use, particularly for winter garments. Cotton would have been an unusual choice for a casual summer robe – hemp or ramie would have been more typical. However, I test on what is cheap and somewhat close to my goal, and in this case, a loose weave cotton fit the bill, because I was interested primarily in how the dye resist would behave on a similarly woven hemp.
Because cotton was used for the face, the simplest way to proceed for the best result was to choose a cotton lining or cotton thread, so that the drapes and shrinkages would match. I chose a satin batiste cotton from Switzerland for my lining, very modern manufacture, but it feels quite similar in drape, weight, and sheen to silk habotai, and it drapes very well. It also is comfortable on my sensitive skin. As a side note, the batiste cost more than the silk I typically import from China, so I did not actually save any money and will be using nicer fabrics for my test bolts in the future :).
A final note about the dye colors and methods: they are not fully medieval. In fact, I didn’t understand some of the differences until I translated a historical chapter from one of the many stencil dyeing books I had purchased, and was sewing up the garment. In this book, it is mentioned that the crabs are resisted on both sides. That means someone flipped the dried resisted fabric over before it was dyed, and perfectly lined up the crab stencils on the opposite side, and then reapplied the paste. Why was this done?
For the original robe, the crabs would have been paste resisted and dipped in indigo. There were only three ways to get blue pigment at this time: dip fiber in indigo, apply indigo with a soymilk binder with a brush, or use a crushed mineral pigment. It is fairly easy to tell from appearance alone that Tokugawa’s garment was dipped in indigo, but luckily the Tokugawa Museum and other historical authors confirm that dipping was the method, so we can be certain. Now, dipping in indigo with the stencil resisted on both sides means the resisted area will get a bright, perfect crisp white outline. If you only dip on one side, you might get some blue in areas of imperfect resist on the opposite, non resisted side. Both options were done in period – one and double sided. But the double sides are particularly luxurious, and fit for a shogun.

Done by the Tokugawa Art Museum
Posted on Tokugawa Art Museum Twitter
I, however, used Procion MX dyes. I did this for several reasons, firstly because I had done a lot of synthetic indigo submersion dyeing this summer and I was a little weary of it and the sulphur fumes, but also because I wanted a bright turquoise color for curtains, which is easily and economically achievable with chemical dyes. The second reason I used Procion mx dyes is I feel moderately better about the overall health and environmental impact of the Procion dyes compared to their natural counterparts (natural indigo excepted, although its vat maintenance is its own issue). I’m still learning and researching about this topic, while trying to do the best I can.

(I dyed this with indigo I grew myself)
The difference between indigo and Procion (and every other natural dye excepting woad and tyrian purple) is the non-vat dyes can be applied with the fabric mounted on the shinshi, and then brushed on. Because the dye can be applied only on one side instead of being dipped, the bright white can be preserved without having to apply the resist on both sides. Now, applying the resist and dye on both sides will make for an especially vivid, and beautiful garment, especially if unlined. However, I chose to line the garment and use a bright chemical dye, so I don’t believe a substantial difference would have been visible.
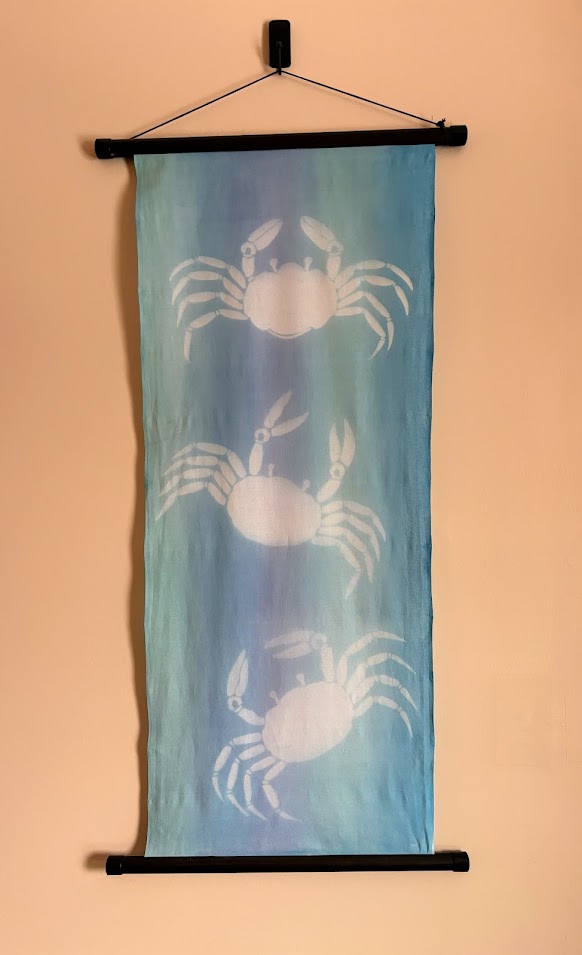
In the future, I hope to try the double sided technique, but it appears it is something even the master dyers present very proudly, and I understand it is considered extremely difficult even for professionals. It may be a little while. For the next garment, I did a test crab towel of different chemical dyes similar to indigo, to give myself options in addition to natural dye.
Methods
I used to handsew with great enthusiasm, but I have had 5 nerve surgeries on my hands in the past 18 months, so I now spend my handsewing time very wisely. Rather than feel discouraged by this, I decided to use this project as an opportunity to see how much of the kosode construction could be done well on the machine, so that others with accessibility issues or time constraints could easily sew kosode as authentically as possible.
Layout and Cutting
Japanese kosode and kimono are cut and sewn from a single bolt, also called a tanmono, or 反物. Ideally, the whole bolt is used and no fabric is wasted, just folded into the seams. The width of medieval tanmono is a subject of popular discussion in the SCA Japanese community, with the common assertion that bolts measured up to 45-50cm wide. However, katabira are a little different. Uesugi Kenshin’s katabira, which belonged to a man of considerable means, only measures 35.5 cm wide, and it is not the only one with that width in the collection. What this means to me is that while upper classes often favored styles where the body panel draped to their elbow, that was not the only option, particularly for casual robes. Accordingly, I sized my panels to be a little bit narrower than the average (around 44 cm), because I like to move easily and prefer a slimmer silhouette, and also because it fit the length of my arm.I thought this probably was a reasonable scaling of what a casual kosode would be for a likely smaller medieval Japanese man.
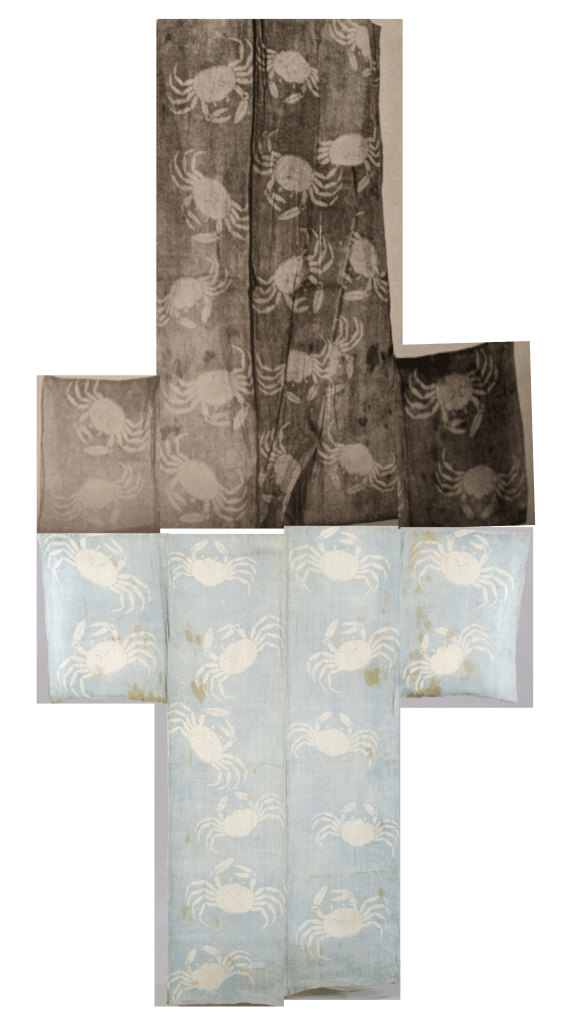
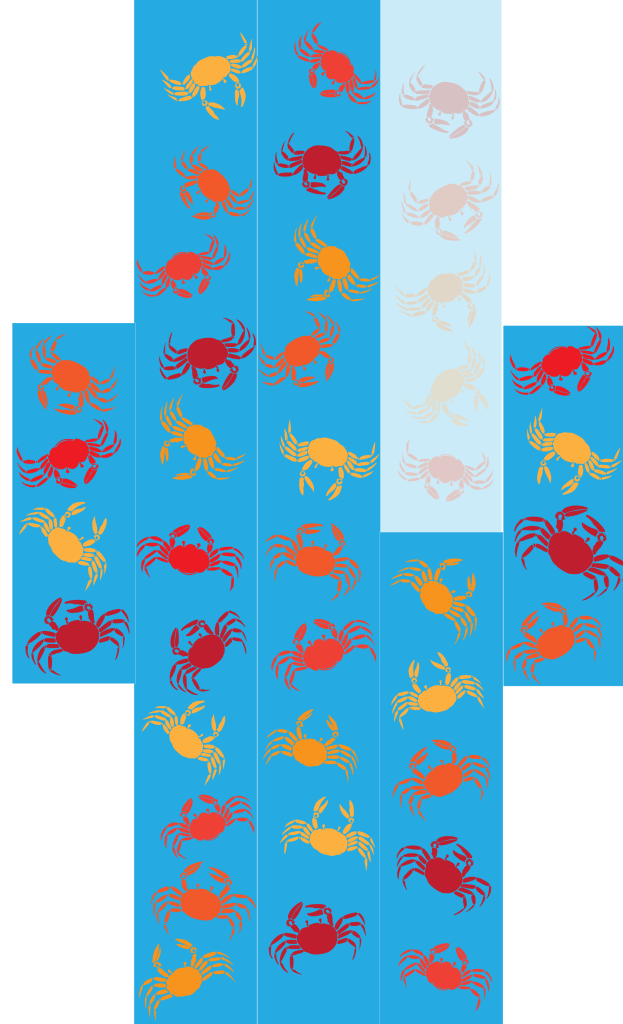
The original extant has a very special layout where the crabs were dyed walking up and down the garment. Because I was making curtains, I did not dye the crabs this way, and so I had to cut and piece my kosode to make an appealing arrangement. The way I arranged the crabs is slightly more modern; it comes from my kimono tailoring book. The crabs crawl up on one side and down on the other. I have prepared the proper dyeing layout for the final robe.

I laid out the fabric on the floor, pulled threads, and then ripped the fabric. I couldn’t find any good documentation of how garments were cut in period. I watched how the professional kimono tailors perform the task with videos, They either rip or pull out a thread and cut as appropriate to the material. I used ergonomic scissors in place of traditional cutting tools like a knife where the fabric didn’t want to rip well. Because I only cut in a straight line, there would be very little difference in the result.
I used the cutting layout for the katabira in Figure 5 to pattern my pieces. One variation is that I actually dyed the collar separately. I did this because I was short on fabric, and I needed to cut the okumi panels side by side instead of next to the collar. As a result, I have a plain collar instead of a collar with matching crabs.
I modified the layout and dimensions for my body size to determine the minimum amount of fabric needed. Because I had ripped the bolt myself, I had the minimum seam allowance (1 cm) to conserve fabric, whereas in period the seam allowances could be larger to tailor the kimono to the wearer without cutting the fabric, simple taking in the excess. However, with vertical integration of bolt production and construction, I could be efficient. I made a mistake and cut the sleeves a little too narrow (there was a lot of dyeing error and I was eager to be rid of it, in period the error would have been folded in the seam and still saved). However, shorter sleeves are still perfectly accurate in period, just not for upper class. I will not trim the sleeve by 5 cm, and my kosode should fit perfectly. It turns out the period practice was the right way, so I will not stray in the future!
Sewing
Research & Background
I referred to several respected books for the sewing of my kosode: 時代衣裳の縫い方 (Jidai Isshou no Nuikata / How to Sew Period Costumes), 資料日本衣服裁縫史 (Shiryō Nihon Ifuku Saihō-Shi / Materials History of Japanese Clothing Sewing). Both of these books present museum extants and then instructions for sewing them. It seems that the authors had unparalleled access to the pieces and were able to take detailed measurements and notes on the construction. Short of being allowed into some of the shrines for private viewing (very hard to do), this is the best one can do.
The books are intended for kimono tailor with professional certifications. It is important to understand that many details of the construction are omitted, because it is assumed that the reader will simply apply standard kimono construction techniques. Therefore, I also used 図説きものの仕立方 ( Zusetsu kimono no shitate hō / Illustrated Kimono Sewing Manual) and 和裁の基本 (Wasai no Kihon/Basics of Japanese Sewing), standard kimono construction books, along with some youtube videos, listed in the citations and appendix, to understand the construction.
I used standard Japanese tools during sewing, including a hera (a small spatula for folding fabric and making creases), a small iron just for pressing seams, a leather ring thimble and accompanying needles from a Japanese needle maker who sells handmade needles. I used the needles intended for use with cotton – they are a slightly different diameter than the silk ones, but otherwise the same.
The basic sequence for hand sewing a lined Japanese kimono is over a dozen steps, and takes a professional about 8 to 9 hours without stops. This is a simplified overview, it takes about 20 pages of detail in a textbook, with special folds and stitches for each step, along with millimeter widths for stitches. The textbooks are actually pretty confusing, with lots of black and white small pictures and a lot of advanced kanji. I spent a long time watching a professional seamstress go through sewing an entire lined kimono as exam practice on youtube. Here is another series of helpful videos that specifically show the sleeves.
(Notice I said kimono, and not kosode, because this is expected knowledge for the kosode instructions, which are mostly just dimensions and finishing details)
Kimono Sewing Steps
- Measure and cut. There is a clever folding sequence using the length of the body and the bolt where you simply make cuts at certain stacked foldlines.
- Measure and fold all of your important seam locations with the hera, small iron or tacking. Do this for the lining as well.
- Sew the sleeves, independent of the torso, tacking down the curve and folding or basting wrist opening.
- Join the back seam of the main body panels.
- Sew the sides of the main body panels together, leaving a gap for the sleeves (which, since you have already sewed, are easy to measure and make.)
- Sew the okumi (diagonal panels) onto the main body.
- Sew the collar pieces to torso fabric.
- Repeat steps 2-7 in the lining fabric
- Join the hems, at the sides and bottom.
- 綴じ/Toji/ Binding – This is a basting step where the seams are basted together on the seam allowances the make the garment drape more gracefully. DO NOT BASTE THE COLLAR SEAMS TOGETHER HERE, you will not be able to attach the sleeves.
- Attach the sleeves. The face is joined together, and then the inner lining is joined along that seam with another seam.
- Sew the collar seam allowances together, then the collar sides where it meets the body. Then flip the collar over and finish the collar with a special invisible stitch.
- Add traditional white tacking, for presentation, if desired.
- Fold and press as needed. Done!
As for an extant kosode, there is an excellent translation of a representative kosode pattern in 時代衣裳の縫い方 by Tsukime Oribe (Citation 7). The only difficulty is that it is for a padded kosode, not one that is simply lined. This means that the internal toji/binding and finishing of seams may be slightly different from how a simple lined kosode would be constructed, but luckily we have a modern guide on those sorts of seam finishes to fall back on. It would be wonderful if there was a plain, lined kosode entry in 時代衣裳の縫い方, but there isn’t except for an “under” kosode, and it essentially reads ‘do the same thing as the uchikake instructions, except the dimensions are different’. Checking the uchikake instructions, which deserve a full and thorough translation at some point in the future, they seem very similar to the padded kosode instructions, omitting the padding part.
The kosode pattern has the following major deviations from the modern kimono sewing sequence, aside from dimensions:
- It does not sew the sleeve lining and the sleeve face together when the sleeves are attached to the shoulder, it sews face to face and lining to lining and leaves them separate. This is probably because of the batting, or just individual tailor preference. I own a modern haori that also did not join together the sleeve lining and sleeve face at the shoulder, so I do not take it to be a rule either way.
- It has wide collar that is tacked down and folded for wearing – this is not always the case with modern kimono, but it is not the rule either. Hiro-eri kimono (literally ‘wide collar’) follow the same basic construction, but some kimono don’t. Most yukata have a tri-fold collar as well.
- It makes no mention of toji/binding on the seam allowances. This may be because of the wadding, but I also saw no mention of it in the uchikake pattern from what I could read (I need to do a formal translation with a lot of time with a dictionary, though). For a regular kosode, it may simply be omitted along with other implied details.
One thing I cannot discuss in sufficient detail in this paper are the basic hand stitches used in kimono construction. The most important one is unshin, which is a running stitch. Unshin is sewn with two hands, the dominant hand holding the needle, while the left hand assists with folding the fabric over the needle. It is blazingly fast in the hands of a skilled seamstress, but it requires a hand posture that is challenging for most people. Even Nami, the professional seamstress I watch on youtube, warns to be careful with how much you do at first, because your hand muscles and tendons have to stretch out a bit to accommodate it.
There are also a variety of invisible stitches, like honguke (本ぐけ), used to bind the collar and finish seams. This site has a good overview, and I like this video for the stitch used to bind the collar. There’s another, harder one, ぬいぐけ, that goes faster that can be attempted as well for other applications.
Methods
After a lot of thinking, I decided I could do everything except the sleeve hem and the final collar finishing on the sewing machine. I wasn’t going to be able to directly mimic all the stitches; I would be forced to substitute machine stitching for Japanese running stitch (unshin). I would also need to omit the toji/binding of seam allowances because it would be topologically complex with a sewing machine. However, it was also omitted in the reference book, so I decided to pretend that meant it was okay, at least for this time.
I also did not press kise (a type of fold which hides the seams slightly) diligently on all the seams, which would be typical for this type of garment. This is because when I have pressed kise on machine washable clothing in the past and then washed it, they have not really stayed and re-pressing them is challenging. Most of my machine washable kimono and yukata from Japan are also missing kise except at the collar and a few other critical places. So I did not overpress my seams, but I didn’t try to have the typical 1-2mm kise everywhere either; I just took a relaxed approach so I didn’t waste effort, because I knew I would want to wash this kosode.
Kosode/Katabira Machine Sewing Method
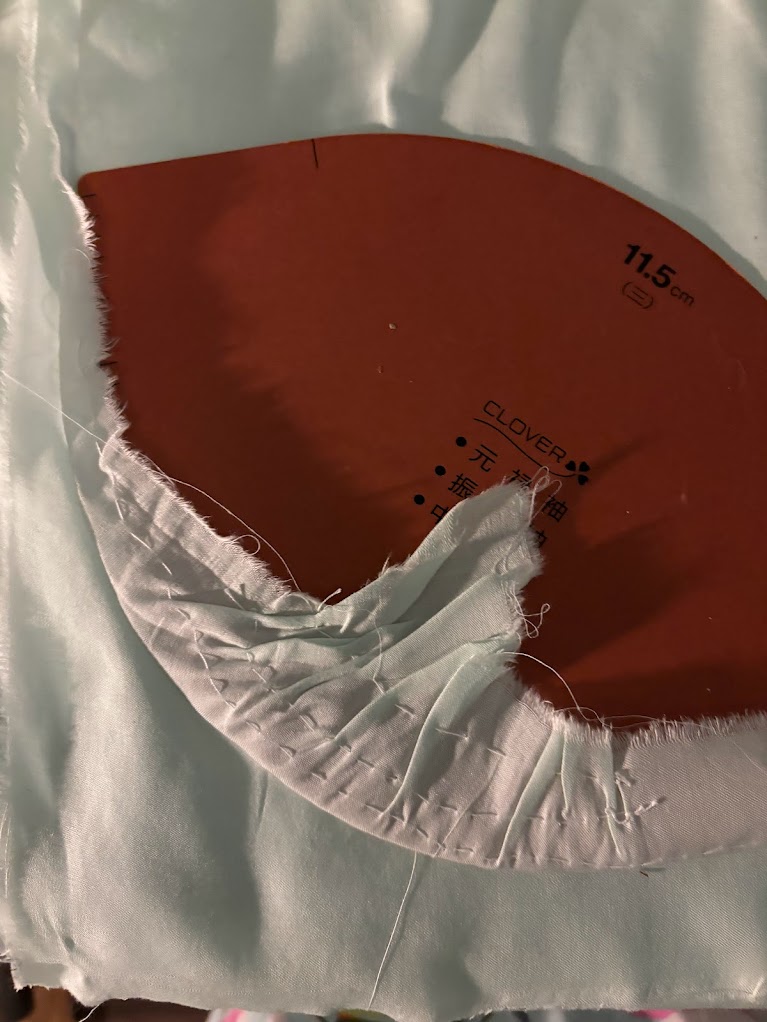
STep one – Sleeves
Sew the sleeves and their linings with a straight stitch. Machine stitch the curve with a 5mm stitch stitch, pull taut. (I figured this out halfway through, half are handsewn). Press.


step two: TorsO panels
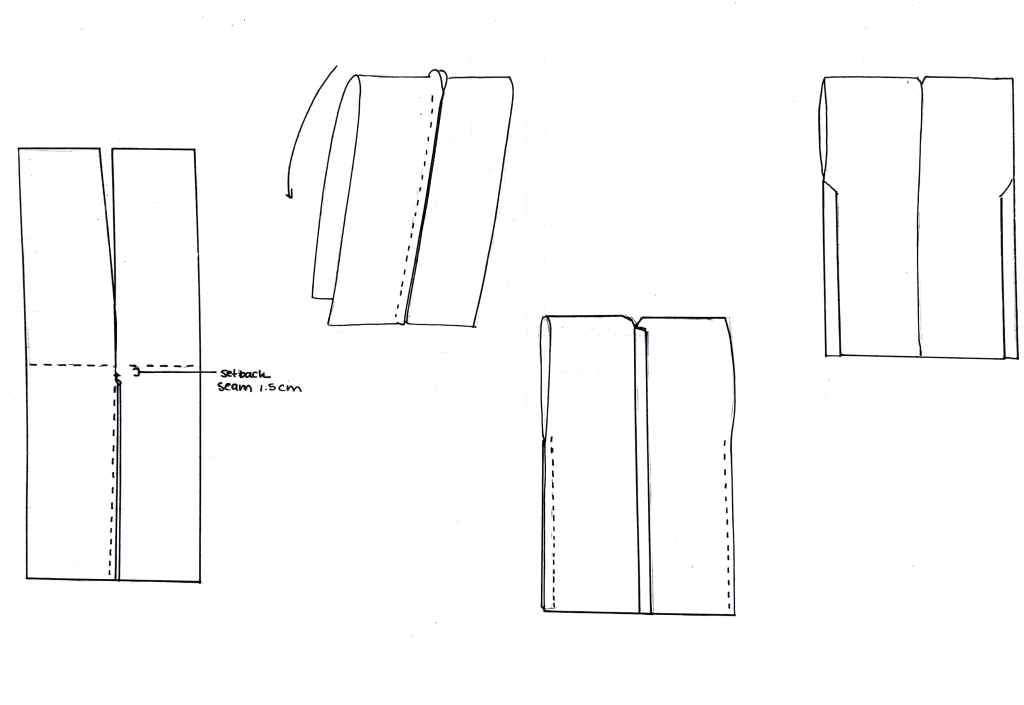
Sew the back seams, side seams, and the okumi together with a straight machine stitch. Be mindful to stop the back seam 1.5 before the center fold. Repeat on lining. Press.
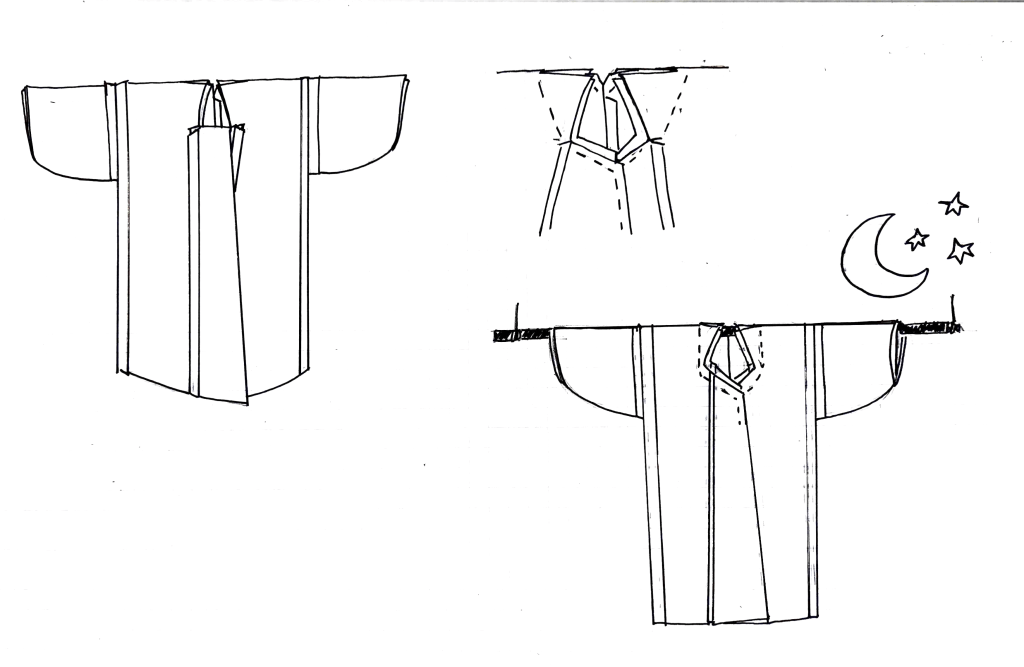
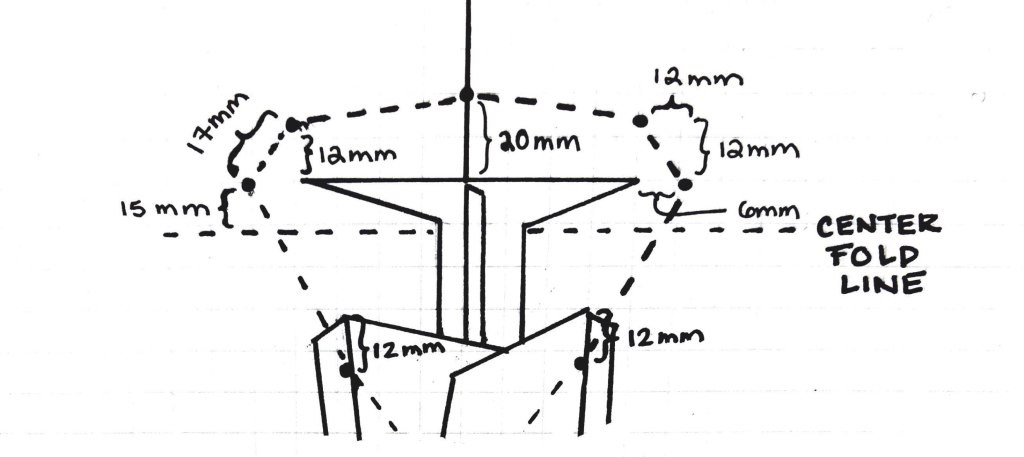
Step Three: Cut Neck SLIt, attach sleeves and Okumi
Cut the neck slit – it is on the center fold of the torso panel, and it is cut 8.7 cm deep on each side. You may need to adjust the depth if your neck is particularly thick.
At this point, you can attach the okumi, the small diagonal front panel, which relies on the neck slit for its placement. When attaching the okumi, notice it has two sides – a straight side, and a diagonal side. The diagonal side is on the bias of the fabric and tends to stretch out, so it’s best to sew it to the body panels to stabilize it. It also makes sewing the collar easier if you have a straight woven edge to align the collar with.
However, if your fabric is only patterned on one side, it’s going to need one okumi panel to be attached on diagonal, and one attached on straight edge. Since the right side of the kosode is usually hidden and receives less wear, attach the right side on the straight edge if you have patterned fabric that is not reversible.
When attaching the okumi, it’s not going to match up with the top of the neck slit. Its top edge should be about 10 cm down from the top of the neck slit, and vertical attachment seam should start about 12 mm from the neck slit’s interior stop. This is pretty wierd in text, please look at the diagrams I have drawn because it’s much clearer.
When the okumi is done on both sides, attach the sleeves. Attach the face sleeves to the face shoulders, using the set-in sleeve technique, and then repeat with lining. Set in sleeves are a little tricky at first, but they’re a well known tailoring technique, and I like this this tutorial, so I’m not going to rewrite it. Press really well, because we can’t baste invisibly with the machine.

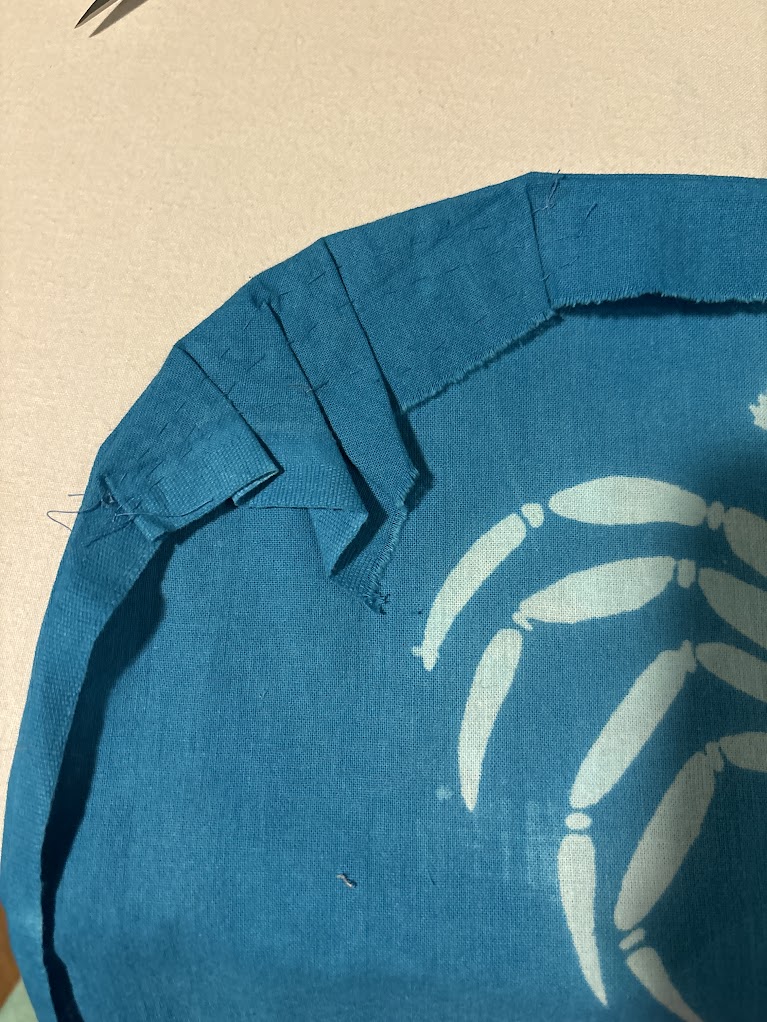
STEP FOUR: BASTE NECKLINE & DRAPE
Now it’s time to put the face and lining together!
Flip the face garment inside out, and put the lining, also inside out, inside of it. For this step, it’s nice to have a long pole or a kimono stand to work on. Baste the neckline by hand; do not attach the collar, simply attach face and lining together at the neck. The basting can be huge 1-2 cm stitches, because the point is just to get alignment. The neckline basting and exact collar positioning are somewhat a matter of preference. For example, some folks cut the neck slit straight on the center fold and don’t set the collar back by 1.5 cm, they just align the collar edge to the neckline seam itself. These are my personal preferences from my modern kimono sewing book, which create a round and full neckline that drapes circularly around my neck. For an exact historic copy of a particular garment, please use some of the books I’ve cited, keeping in mind that garments were sized to the weared.
Leave the garment to hang on the kimono stand overnight to accommodate fabric stretch over time before sewing hem.

STEP FIVE: FInal draping and toji with pins
Drape and pin the entire hem, and up the sides. If you don’t want to pin, you can baste the seams together with a technique called 綴じ/Toji/binding, which is discussed in the kimono books in the citations, Nami’s videos, and also here.

step Six: HEM BOttom and sides
Straight machine stitch the hem and sides together.

STEP SEVEN: SEW THE COLLAR
Remove neckline basting. Flip the garment inside out, and carefully remove the neckline basting bit by bit, replacing with pins and folding the tucked-in neckline out.
Sew the collar and the collar lining to the neckline with a straight running stitch.
Two options for closing the collar.
- First, the traditional way:
Flip the collar and the collar lining up, fold torso panels as needed, and join with 本くけ・honkuke, or substitute with felling stitch. (depicted) - Secondly, the way if your face fabric is really tough to hand sew:
Sew the collar lining to the collar face, then sew the face and lining neckline to the outer collar. Flip the collar over, and fell stitch the collar lining to the body. If the fabric is thick on the outside and it hurts to sew through it, just sew through the lining as close to the attachment stitching as possible to keep it anchored. - Thirdly, if you can’t or don’t want to handsew at all, only attach the face of the collar to kosode (both layers). Then, fold the collar over and iron it such that you have a 3-4 mm overhang of the collar. Then, pin it from the face side and attach the underside of the collar along the edge of the outer collar seam, with a stitch in the ditch foot. There’s a good video of this process here. This technique is very fast and sturdy, it’s how commercial yukatas are sewn. However, it takes a little practice to get straight lines. Once your seam is sewn, you can hide it on the outside with a kise/fold press of the outer collar edge where it meets the body fabric.

step eight: Close the sleeves
Fell stitch or honkuke the sleeve lining at the wrist opening to the face sleeve opening.

I folded and tacked the collar for wearing with a few hidden stitches at the top of the neckline, and pressed the garment. Complete!
I used this methodology for several reasons: Firstly, I couldn’t do the toji/binding that helps establish an even drape before the collar is sewn up. I’m convinced that the toji is what allows a seamstress to sew a whole kimono seated, at a table, without needing to stand to drape the face against the lining to check alignment. Accurate measurements at cutting, and folding on the table at the beginning help, but stitching everything up along the length at each panel is even better. To compensate for the lack of toji, I basted the necklines together and draped the garment on a pole overnight, then pinned along the length of each panel before hemming. It worked really well, even if it was time consuming.
I sewed the sleeves before the hem, and the process still worked. I had intended for the attached sleeves to help guide my draping of the hem on the pole, but I don’t think it actually made a big difference. Traditionally the sleeves would be attached after the hem and the collar, but this is really only something you can do easily by hand, because the garment cannot be turned inside out very easily at that point.
Finally, I would have really liked to have done the collar closure and sleeve closure differently. I would have greatly preferred to sew both the collar lining and the collar to the neckline face and lining at the same time, then flipped them both up and done the traditional hon-kuke stitch that is used to bind the top of the collar. Hon-kuke is similar to a felling stitch, but you’re allowed to keep the needle in for longer and it has a different place where the needle comes out to release folded fabric. Instead of a slight zig zag, it runs straight through the fabric. However, the face fabric was really tough to sew through, not my usual preference, and so it was too physically challenging. I consulted with my friend Ian at Royal Blue Traders for something easier that was similar (he is a professional historical tailor who sews for museums). He recommended felling stitch, and it worked really well.
Results, Conclusion, Future
I wore the kimono with a crab mask to a winter masquerade ball, and I was very happy except for the short sleeves, so I felt overall that it was a success.
As a result of this process, I have a set of steps for an accessible sewing process for lined kosode that I plan to teach as a class later this year. This was one of my goals, so I am happy to have achieved it.
I now know my proper panel size that is comfortable for me to wear, as long as I don’t trim the sleeves :). This will allow me to dye bolts with confidence that I can wear them.
I will make a summer version of this robe this year, when the weather warms a bit. I have included a set of diagrams for the panels I plan to dye (my garage is not long enough to dye a whole bolt, which is 10 to 12 meters). I have included a diagram of my proposed stencil layout, which I determined through my research for this project. Note that I have more unique crab stencils than Tokugawa’s robe, just because I wanted to draw more crabs.
I am not sure yet if I will do indigo dipping or some of the Procion dyes in the crab sampler. I am leaning towards the Procion dyes simply because I feel confident I can wear an underlayer with them without dye transfer. I may make an indigo crab tenugui and see if I can pin down the double sided stencil technique on a small scale.
Bibliography
- 切畑健, 市田ひろみ 著. 写真でみる日本の女性風俗史 : 京都染織まつり記念図録, 京都書院, 1985.1, 10.11501/12169300. https://ndlsearch.ndl.go.jp/books/R100000002-I000001770454
- Kyoto Senshoku Bunka Kyokai. “公益社団法人 京都染織文化協会/染織祭衣装 室町時代.” Senshokubunka-Kyoto.jp, senshokubunka-kyoto.jp/maturi/index.html. Accessed 10 Jan. 2024.
- “E国宝 – 小袖 白練緯地花鳥模様辻が花染.” Emuseum.nich.go.jp, emuseum.nich.go.jp/detail?langId=ja&webView=&content_base_id=100558&content_part_id=0&content_pict_id=0. Accessed 10 Jan. 2024.
- 神谷栄子. 日本の美術 No 67 小袖. 至文堂, 15 Dec. 1971.
- 金子賢治. 型染・小紋・中型. Kyoto Shoin International, 1994.
- Nami Wasai. “【和裁士の本気!8時間30分 袷着物全縫製】和裁検定1級内容お見せします.” Www.youtube.com, 18 Jan. 2023, youtu.be/1v8VWwOVY98?si=t9e6II02PasKGuuf. Accessed 11 Jan. 2024
- Kimono-Tsushin. “運針の準備 (2/4) 針に糸を通す.” http://Www.youtube.com, 27 Mar. 2021, http://www.youtube.com/watch?v=7HZSiIaJ2_c. Accessed 11 Jan. 2024.
- Oribe, Tsukime. “JINN Kosode Translation.” Google Docs, docs.google.com/document/d/1MeAGwSTCuAOP6Q8NrvDzTHECsU4FjDSU3VIjMnJruyY/edit. Accessed 11 Jan. 2024.
- 栗原弘. 時代衣裳の縫い方. 源流社, 1984.
- nuu 和裁. “【本ぐけ】Part1 袋状になっているところを縫いふさぐ時にも使える技(ワザ)!.” http://Www.youtube.com, 19 Oct. 2021, https://youtu.be/8g5_E5aEyBM?si=_reVziUPdfJ-4epJ. Accessed 11 Jan. 2024.
- “Bath Robe (Yukata).” Google Arts & Culture, artsandculture.google.com/asset/bath-robe-yukata/8QG-Upsnye_SZg?hl=jp. Accessed 11 Jan. 2024.
- 村林益子, and 永野 一晃. 図説きものの仕立方. 紫紅社, 1 Apr. 1989.
- 松井扶江. いちばんやさしい和裁の基本. ナツメ社 , 30 Apr. 2015.
- 堀越, すみ. 資料日本衣服裁縫史. Japan, 雄山閣出版, 1974.
- “綿の歴史.” H.A.M.A.木綿庵(ゆうあん), hamayuan.com/cotton/history/. Accessed 25 Jan. 2024.